> ## Documentation Index
> Fetch the complete documentation index at: https://docs.hotglue.com/llms.txt
> Use this file to discover all available pages before exploring further.
# AWS Redshift
# Connector Details
| Name | Value |
| :------------- | :---------------------------------------------------------------------------------------------------------------------------------------------------------------------------------------------------------------------------------------------------------------------------------------------------------------- |
| Platform | [AWS Redshift](https://aws.amazon.com/redshift) |
| Auth Type | API Keys |
| Direction | Bidirectional |
| Tap Repo | [https://github.com/hotgluexyz/tap-redshift](https://github.com/hotgluexyz/tap-redshift) |
| Target Repo | [https://github.com/hotgluexyz/target-redshift](https://github.com/hotgluexyz/target-redshift) |
| Tap Metrics | Usage:
|
| Target Metrics | Usage:
|
# Credentials Setup
The AWS Redshift connector uses the following 12 connection parameters:
```json theme={null}
{
"Host": "example-cluster.xxx123.us-xxx-1.redshift.amazonaws.com",
"Port": "xxxx",
"User": "xxx_user",
"Password": "xxxxxx",
"Database Name": "database_name",
"Access Key Id": "xxxxx",
"Secret Access Key": "xxxxxx",
"S3 Bucket": "my-redshift-staging-bucket",
"Default Target Schema": "xxx",
"SSH Host": "12.345.67.89",
"SSH User": "xxx-user",
"SSH Key": "xxxx.pem"
}
```
Follow the steps below to find each of these in AWS.
### 1. `Host`
This is the Redshift endpoint hostname.
**Where to get it:**
1. Sign in to the AWS Console.
2. Open Amazon Redshift.
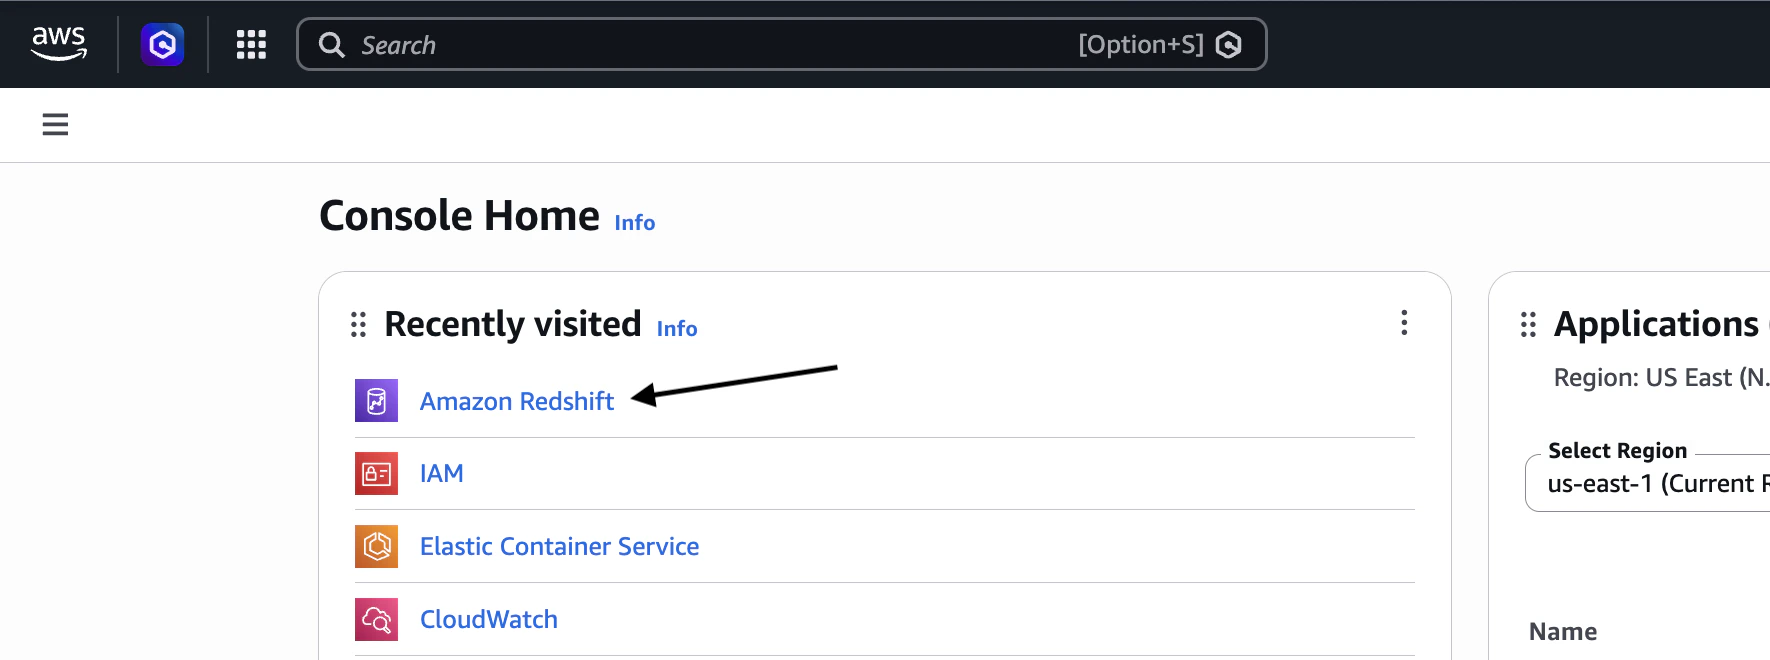 3. Go to Clusters and select your Redshift cluster.
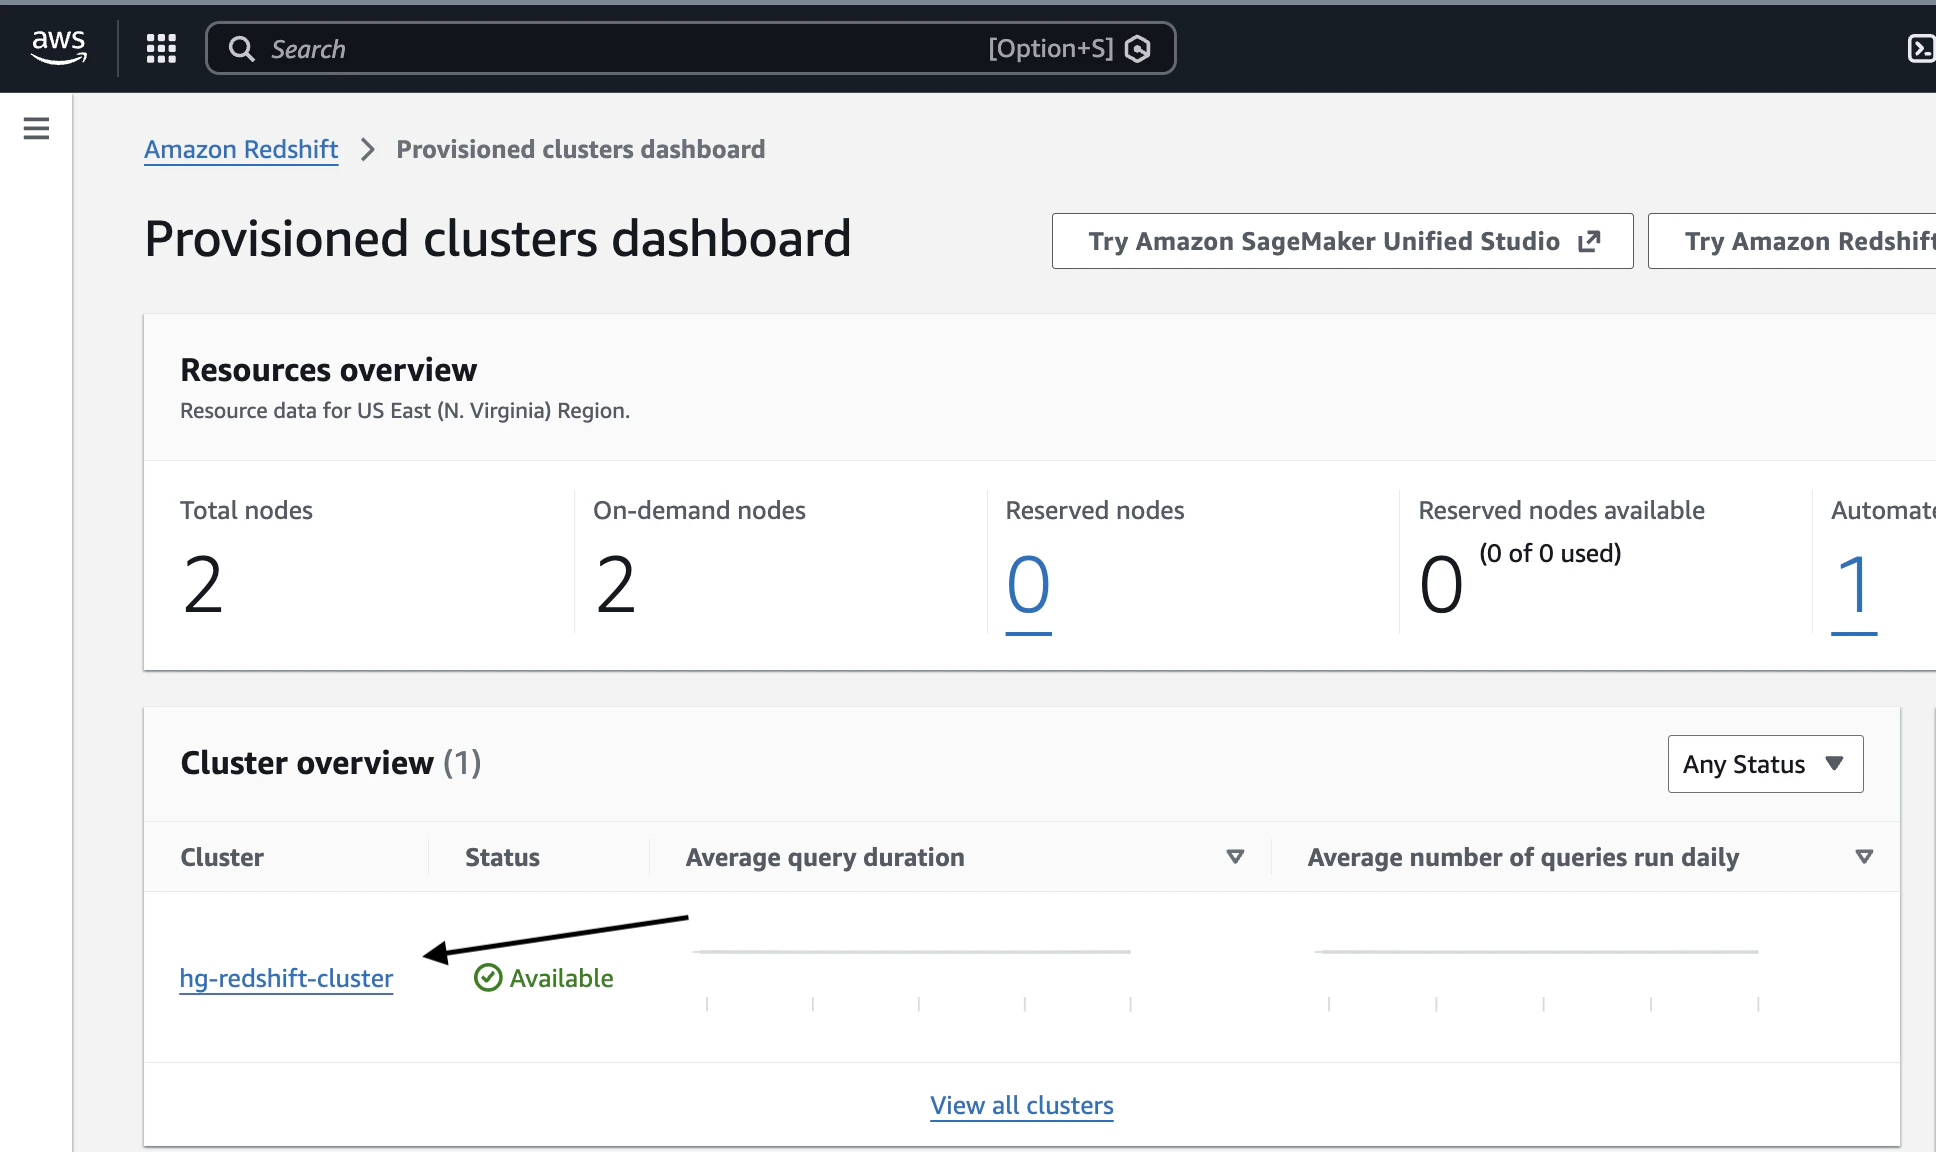 4. In the cluster details, find the Endpoint.
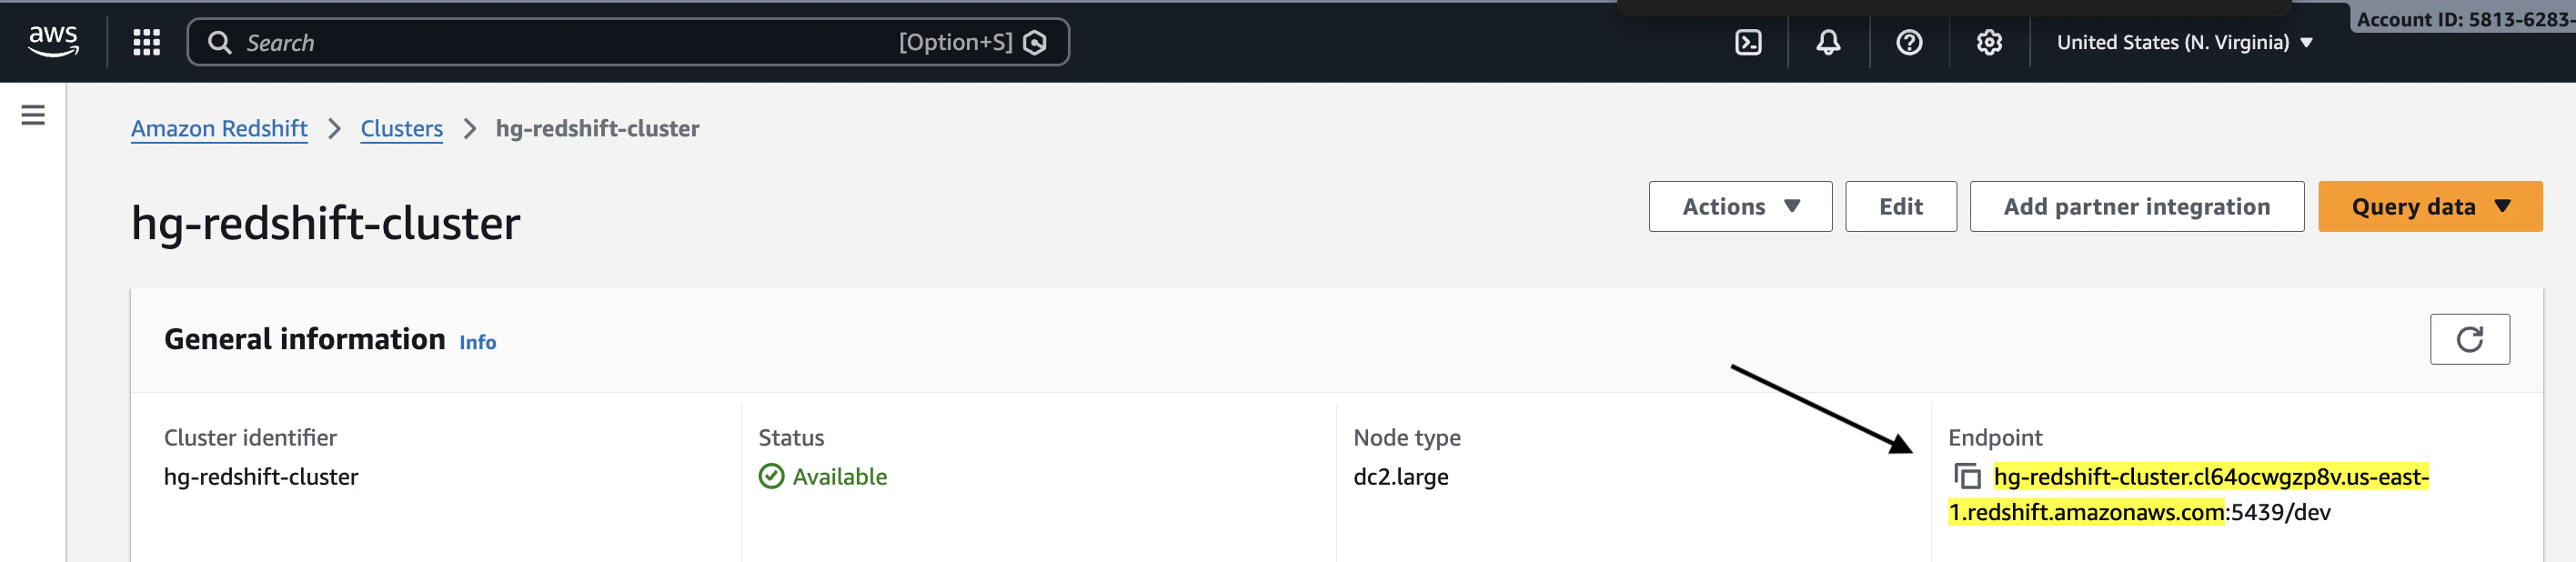 **What to enter**:
Copy the hostname from the Endpoint (the part before the colon `:`), for example:
```
example-cluster.abc123.us-east-1.redshift.amazonaws.com
```
### 2. `Port`
The port Redshift listens on.
**Where to get it:**
Follow steps 1, 2, 3 and 4 for getting **Host** credentials. Then follow these steps:
5. In the cluster details, find the Endpoint.
**What to enter**:
Copy the hostname from the Endpoint (the part before the colon `:`), for example:
```
example-cluster.abc123.us-east-1.redshift.amazonaws.com
```
### 2. `Port`
The port Redshift listens on.
**Where to get it:**
Follow steps 1, 2, 3 and 4 for getting **Host** credentials. Then follow these steps:
5. In the cluster details, find the Endpoint.
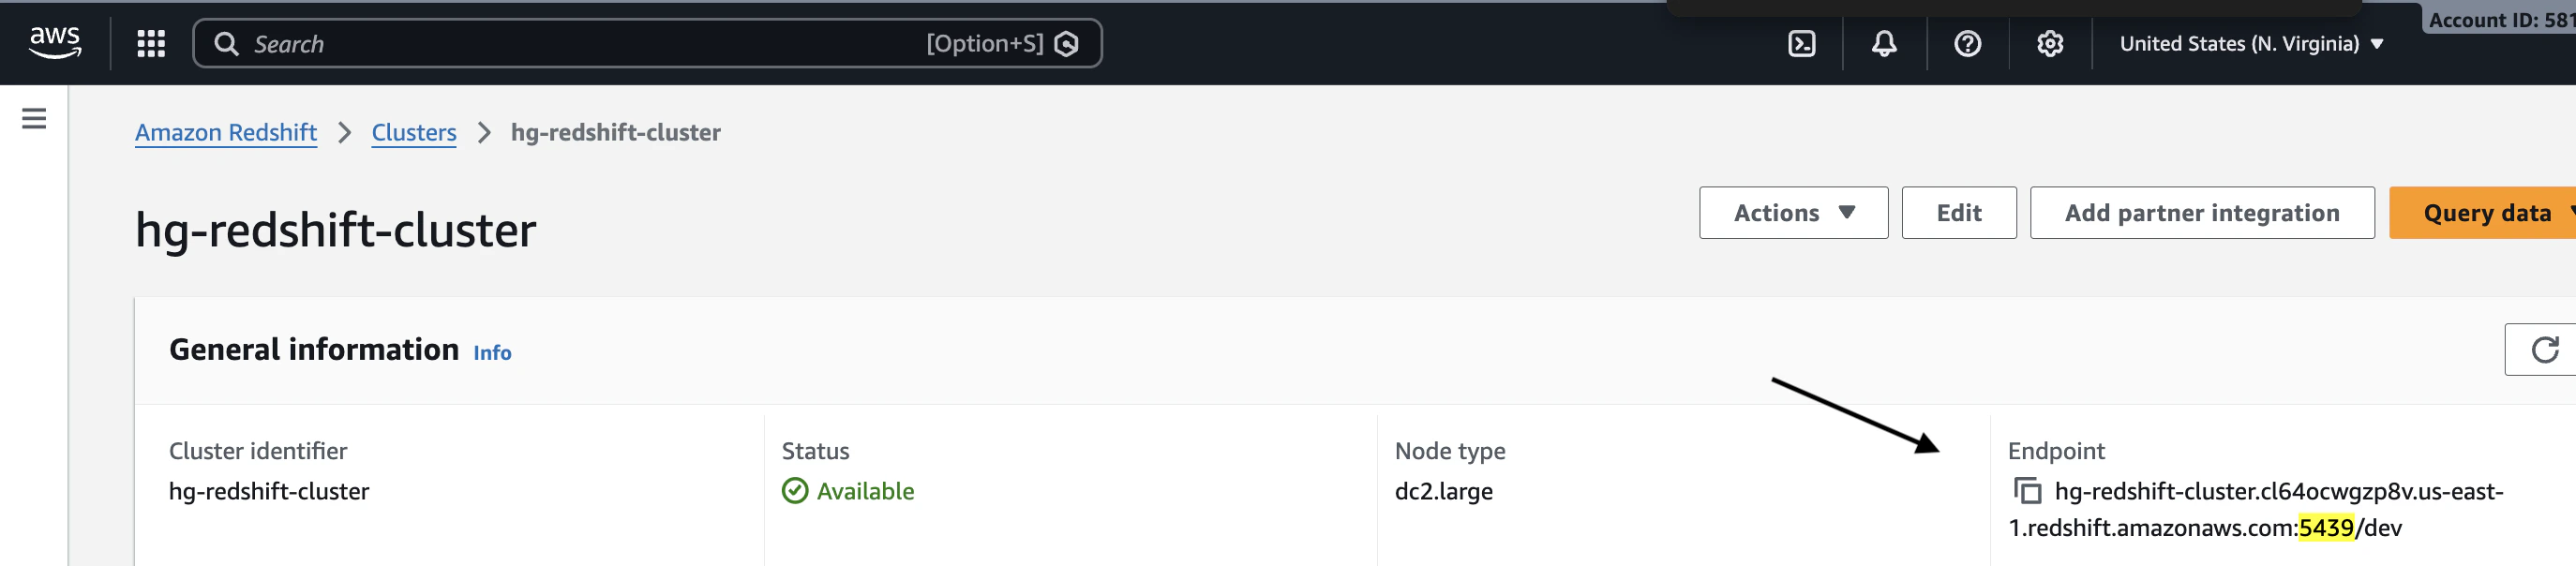 Copy the port from the Endpoint (the part after the colon `:` and before the slash `/`).
### 3. `User`
The Redshift user is created inside the Redshift database.
**Where to get it:**
Follow steps 1, 2 and 3 for getting **Host** credentials. Then follow these steps:
4. Click the Properties tab.
Copy the port from the Endpoint (the part after the colon `:` and before the slash `/`).
### 3. `User`
The Redshift user is created inside the Redshift database.
**Where to get it:**
Follow steps 1, 2 and 3 for getting **Host** credentials. Then follow these steps:
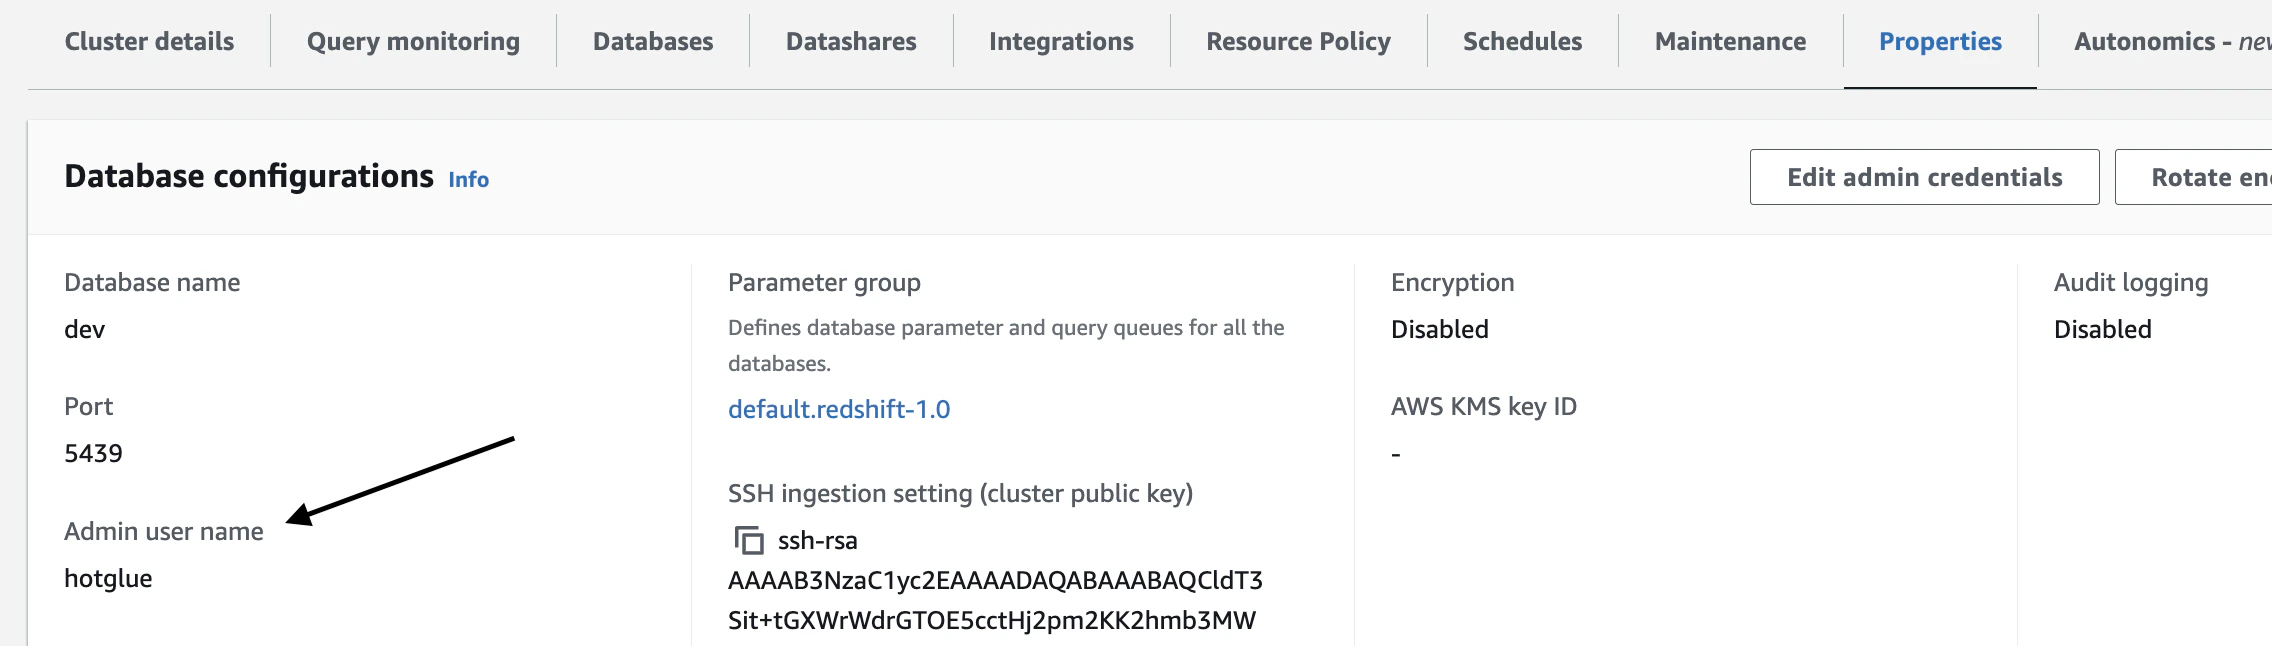
4. Click the Properties tab.
 5. Scroll down to **Database configurations**.
6. Locate Admin user name.
5. Scroll down to **Database configurations**.
6. Locate Admin user name.
 If you need a non-admin or dedicated user instead, contact your AWS administrator.
We can also run the following query in Query Editor v2:
```
SELECT usename FROM pg_user;
```
If you need to create a dedicated user for integrations, run:
```
CREATE USER sample_user PASSWORD 'StrongPassword123';
```
Use the created username as the User value when configuring the Redshift connector.
### 4. `Password`
The password is set when the Redshift user is created; it is **not** visible in the AWS console afterward, so save it then.
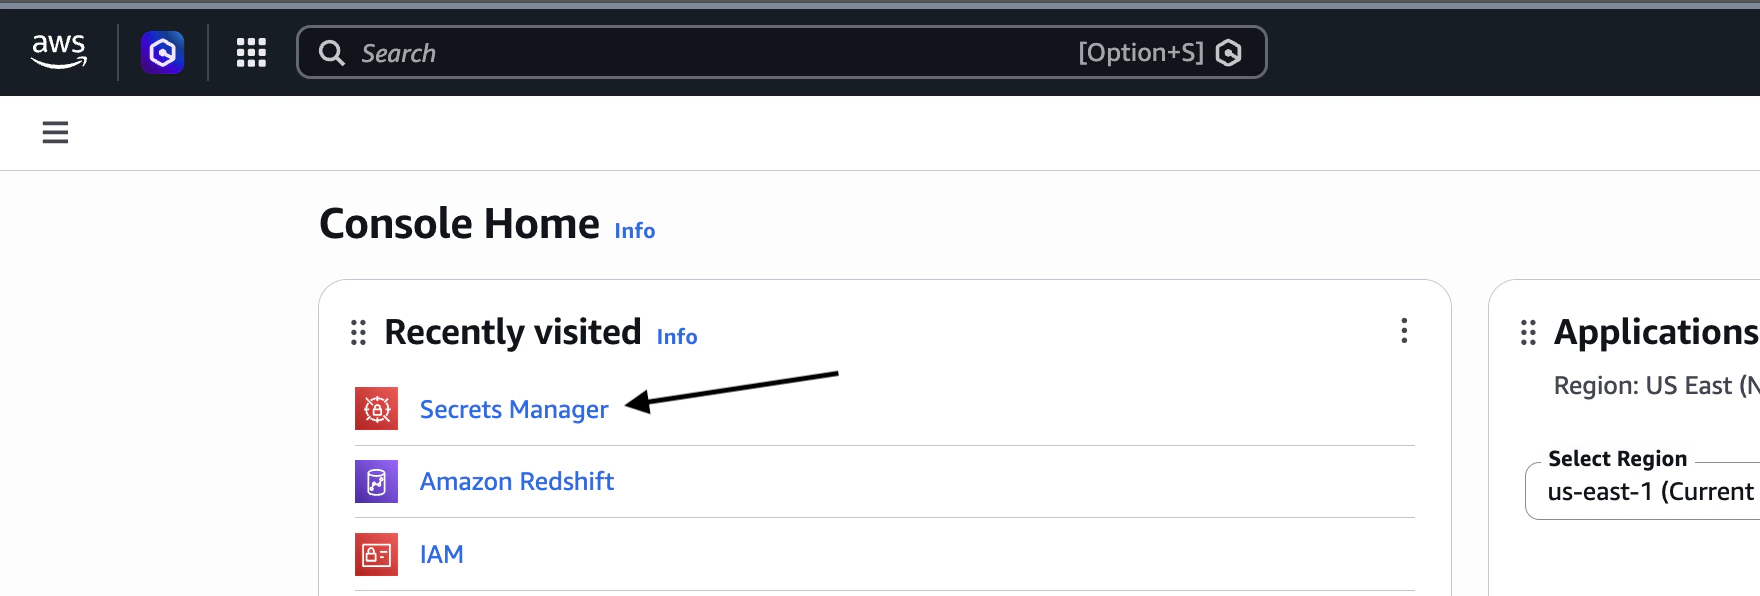
The password can be retrieved from **AWS Secrets Manager** if it was stored there at the time of cluster creation.
If you need a non-admin or dedicated user instead, contact your AWS administrator.
We can also run the following query in Query Editor v2:
```
SELECT usename FROM pg_user;
```
If you need to create a dedicated user for integrations, run:
```
CREATE USER sample_user PASSWORD 'StrongPassword123';
```
Use the created username as the User value when configuring the Redshift connector.
### 4. `Password`
The password is set when the Redshift user is created; it is **not** visible in the AWS console afterward, so save it then.
The password can be retrieved from **AWS Secrets Manager** if it was stored there at the time of cluster creation.
 **Where to set or reset the password**:
Follow steps 1, 2 and 3 for getting **Host** credentials. Then follow these steps:
4. Click on Query Data.
**Where to set or reset the password**:
Follow steps 1, 2 and 3 for getting **Host** credentials. Then follow these steps:
4. Click on Query Data.
 5. Open Query Editor v2.
6. Connect to your Redshift cluster or workgroup.
If creating a new user:
```
CREATE USER sample_user PASSWORD 'StrongPassword123';
```
If resetting the password for an existing user:
```
ALTER USER sample_user PASSWORD 'NewStrongPassword123';
```
Use the password specified in the SQL command as the Password value when configuring the Redshift connector.
### 5. `Database Name`
The database on your Redshift cluster—often `dev`, `analytics`, or another name your team uses.
**Where to get it:**
Follow steps 1, 2 and 3 for getting **Host** credentials. Then follow these steps:
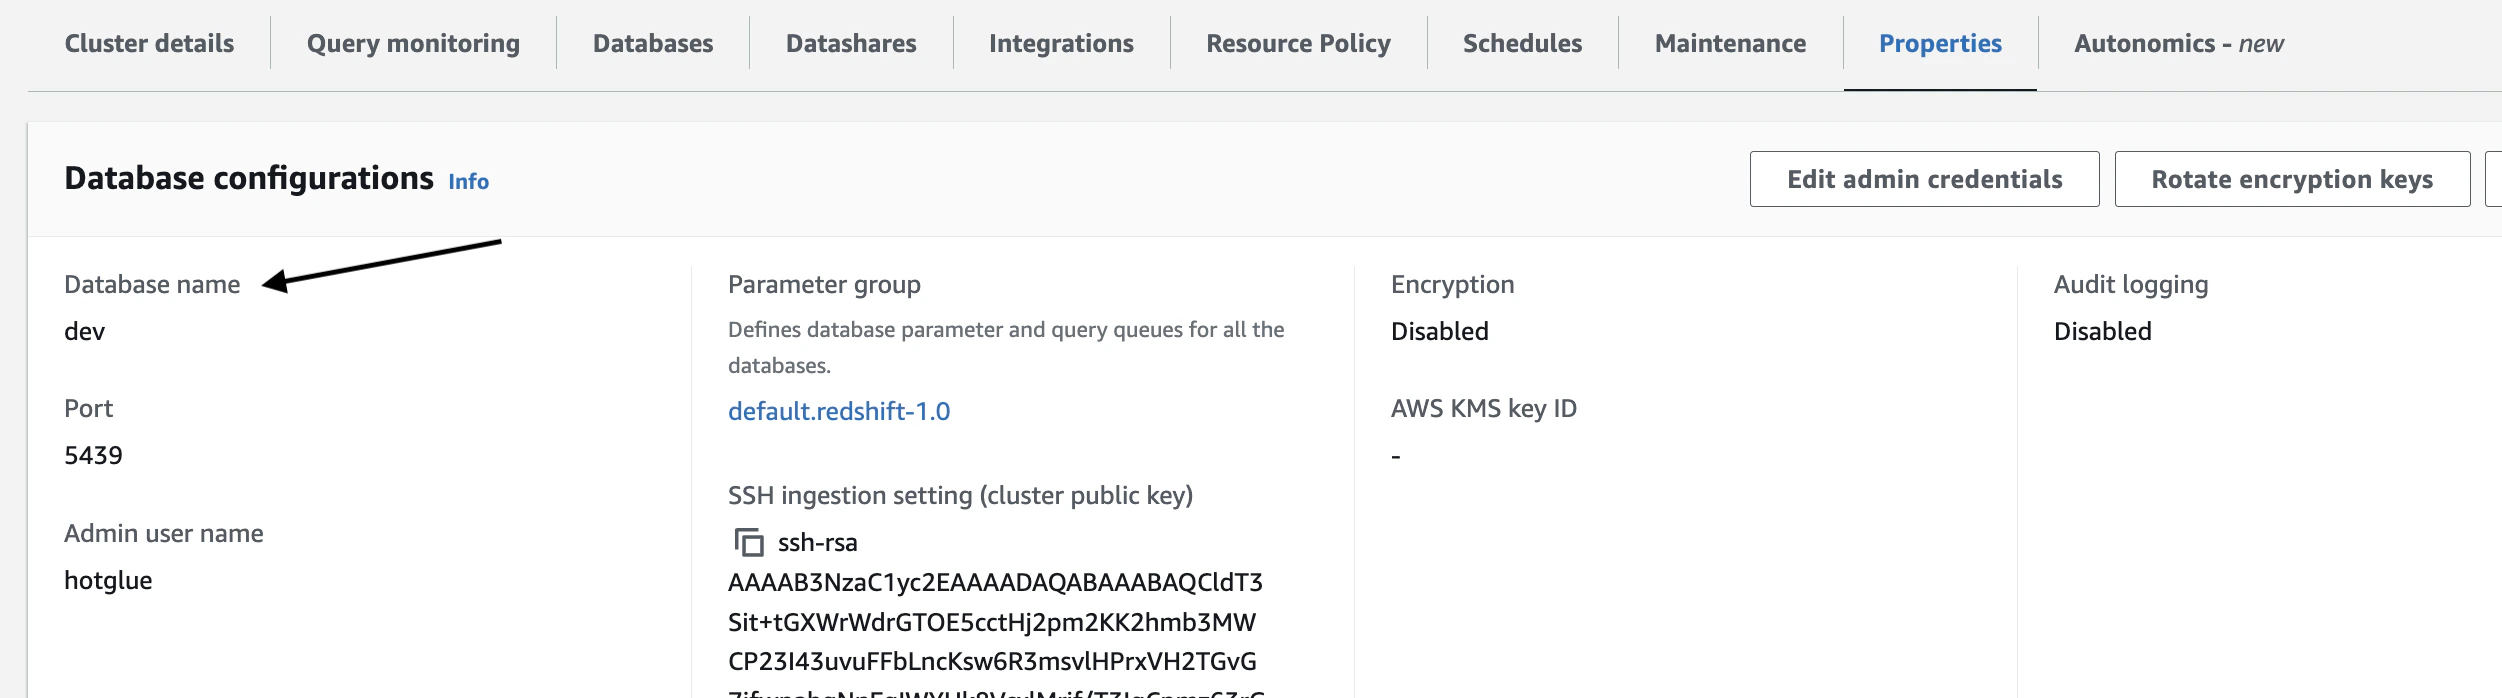
4. Click the Properties tab.
5. Scroll down to Database configurations.
6. Locate Database name.
5. Open Query Editor v2.
6. Connect to your Redshift cluster or workgroup.
If creating a new user:
```
CREATE USER sample_user PASSWORD 'StrongPassword123';
```
If resetting the password for an existing user:
```
ALTER USER sample_user PASSWORD 'NewStrongPassword123';
```
Use the password specified in the SQL command as the Password value when configuring the Redshift connector.
### 5. `Database Name`
The database on your Redshift cluster—often `dev`, `analytics`, or another name your team uses.
**Where to get it:**
Follow steps 1, 2 and 3 for getting **Host** credentials. Then follow these steps:
4. Click the Properties tab.
5. Scroll down to Database configurations.
6. Locate Database name.
 ### 6. `Access Key Id`
The AWS access key used for S3 access.
**Where to get it:**
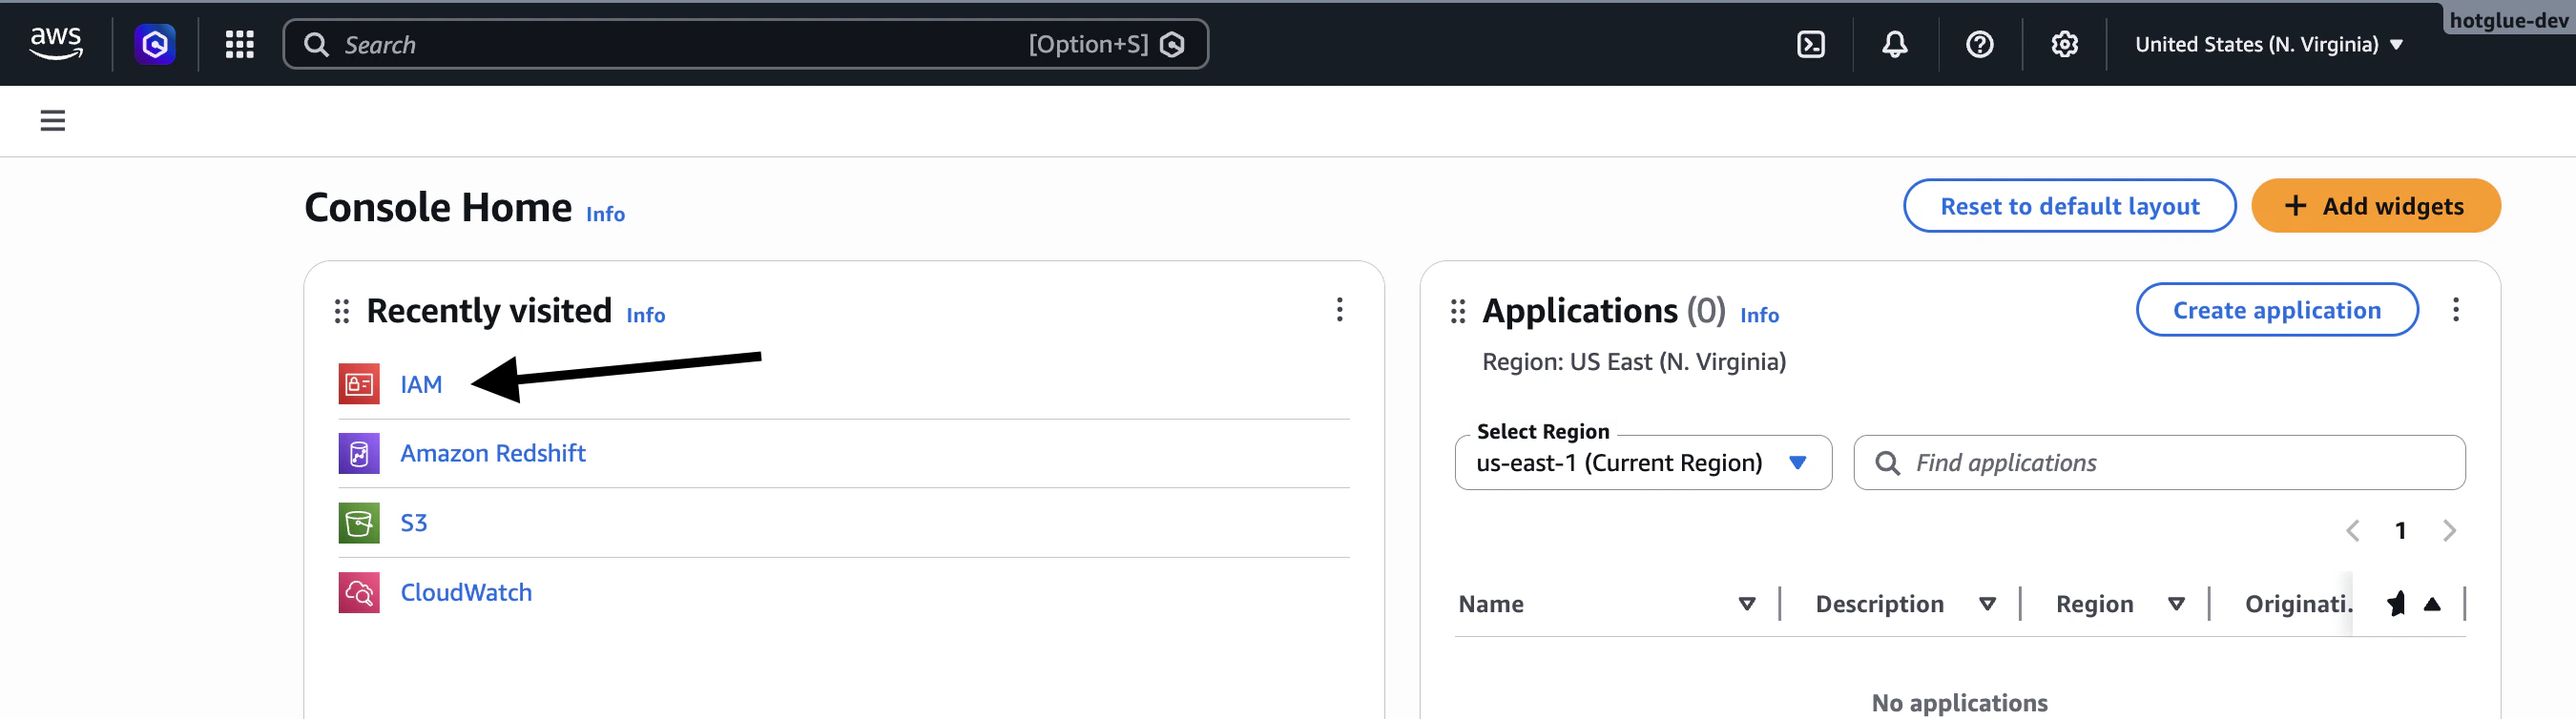
1. Open the AWS Console.
2. Go to IAM.
### 6. `Access Key Id`
The AWS access key used for S3 access.
**Where to get it:**
1. Open the AWS Console.
2. Go to IAM.
 3. Select Users.
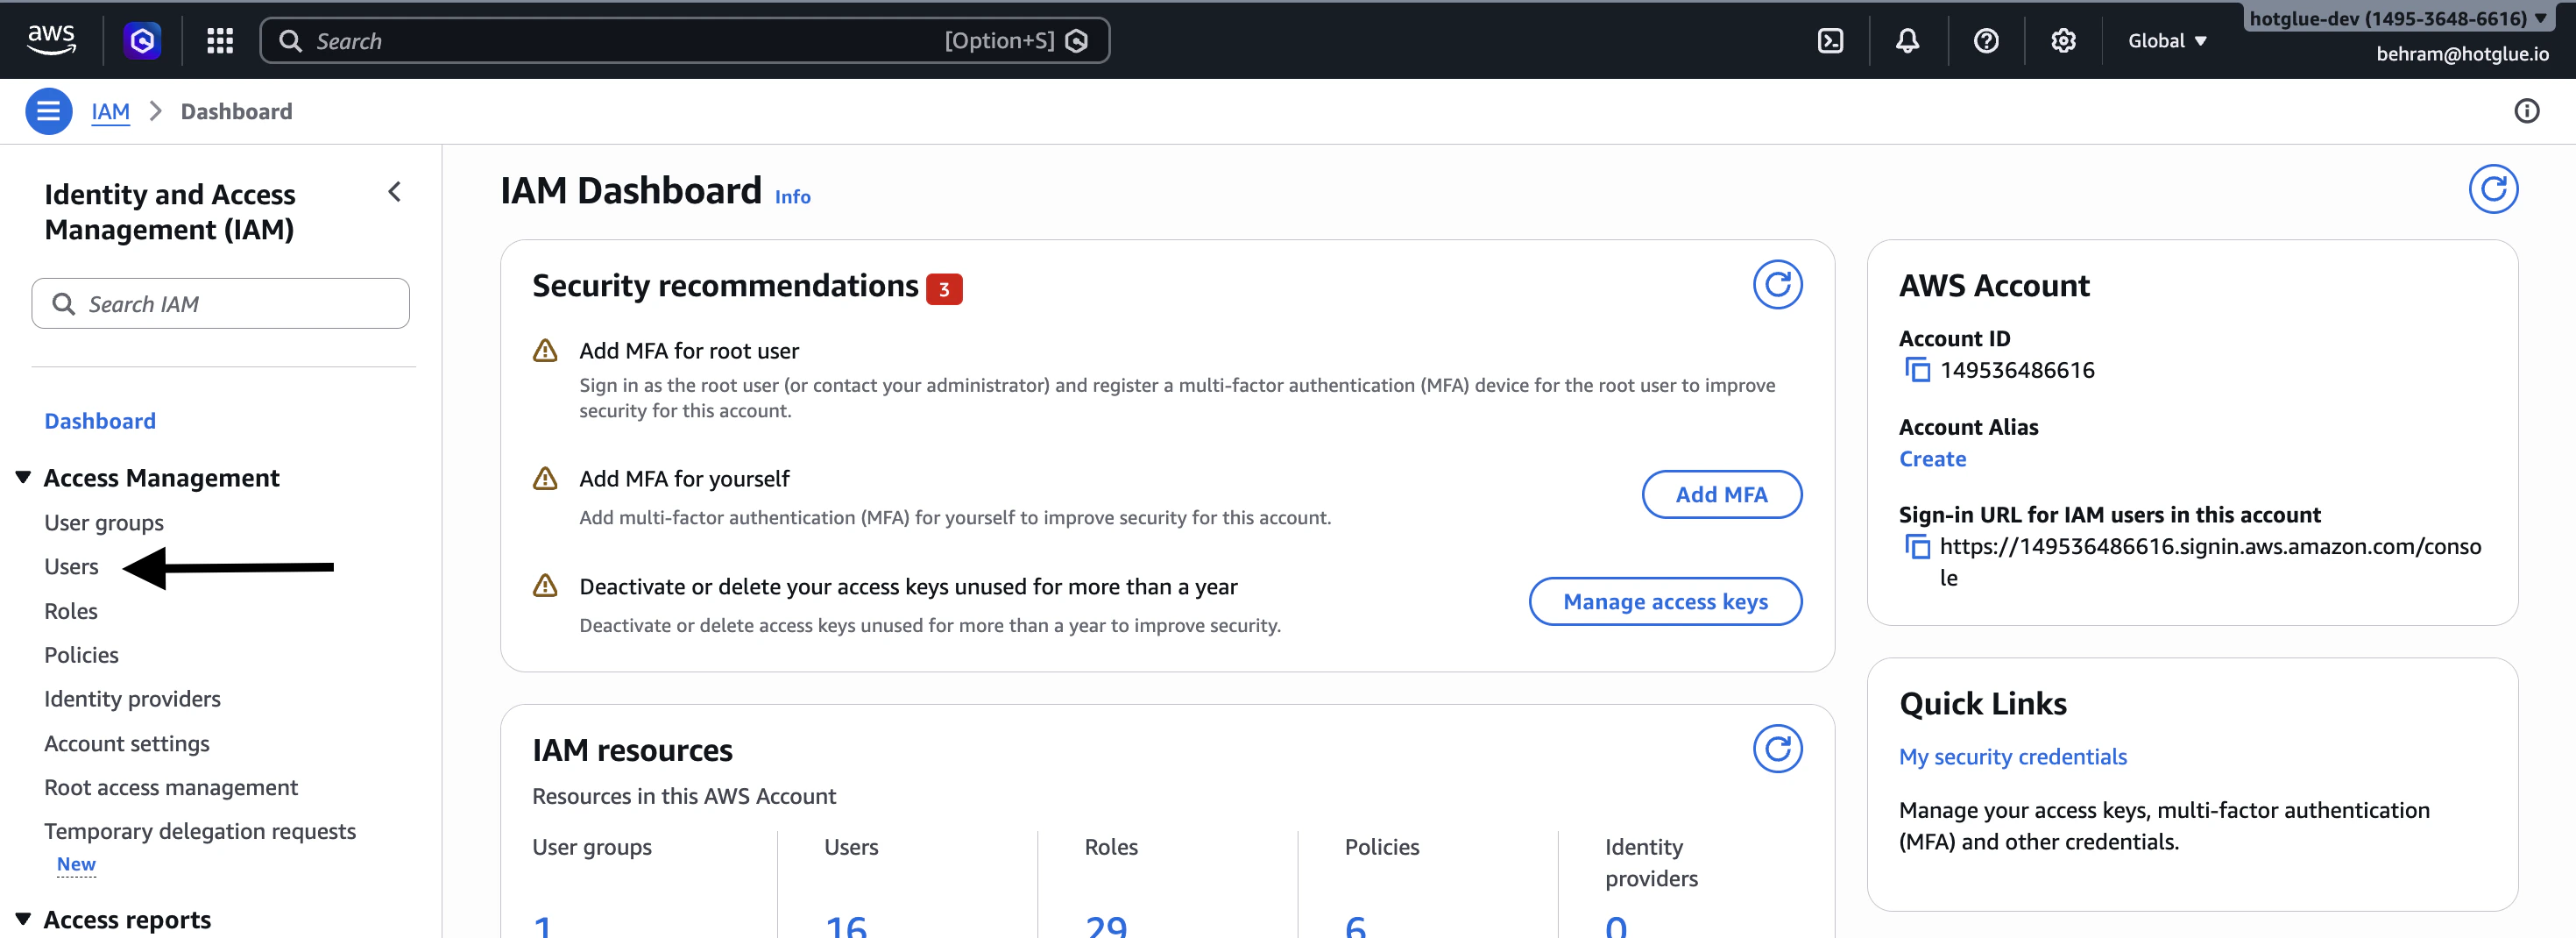 4. From the list of Users, click the IAM user that will be used for the integration.
5. Open the Security credentials tab.
4. From the list of Users, click the IAM user that will be used for the integration.
5. Open the Security credentials tab.
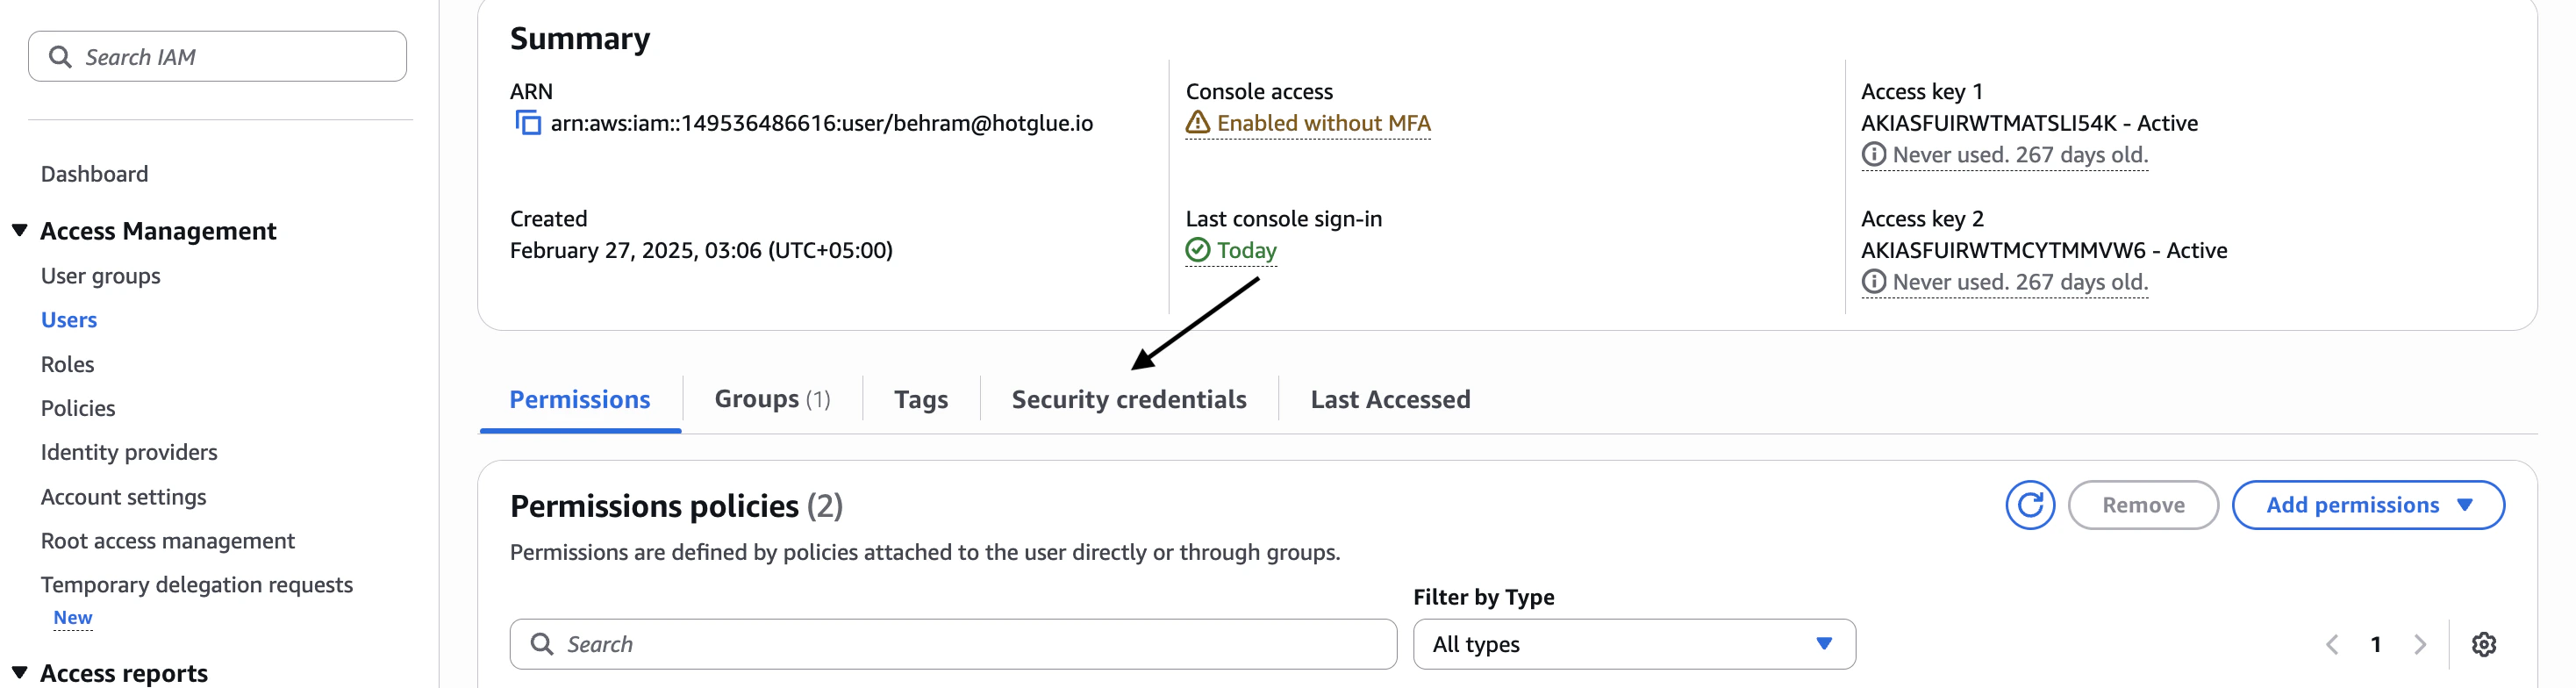 6. Under Access keys, create or view the relevant access key metadata.
### 7. `Secret Access Key`
The secret paired with the Access Key Id.
AWS only shows the secret access key once at the time the access key is created. If it wasn’t saved, your admin must generate a new access key. Lost keys cannot be recovered.
**Where to get it:**
Create a new access key for the IAM user if needed, then copy the secret when it is shown and store it securely.
### 8. `S3 Bucket`
The S3 bucket used for staging data.
**Where to get it:**
1. Open the AWS Console.
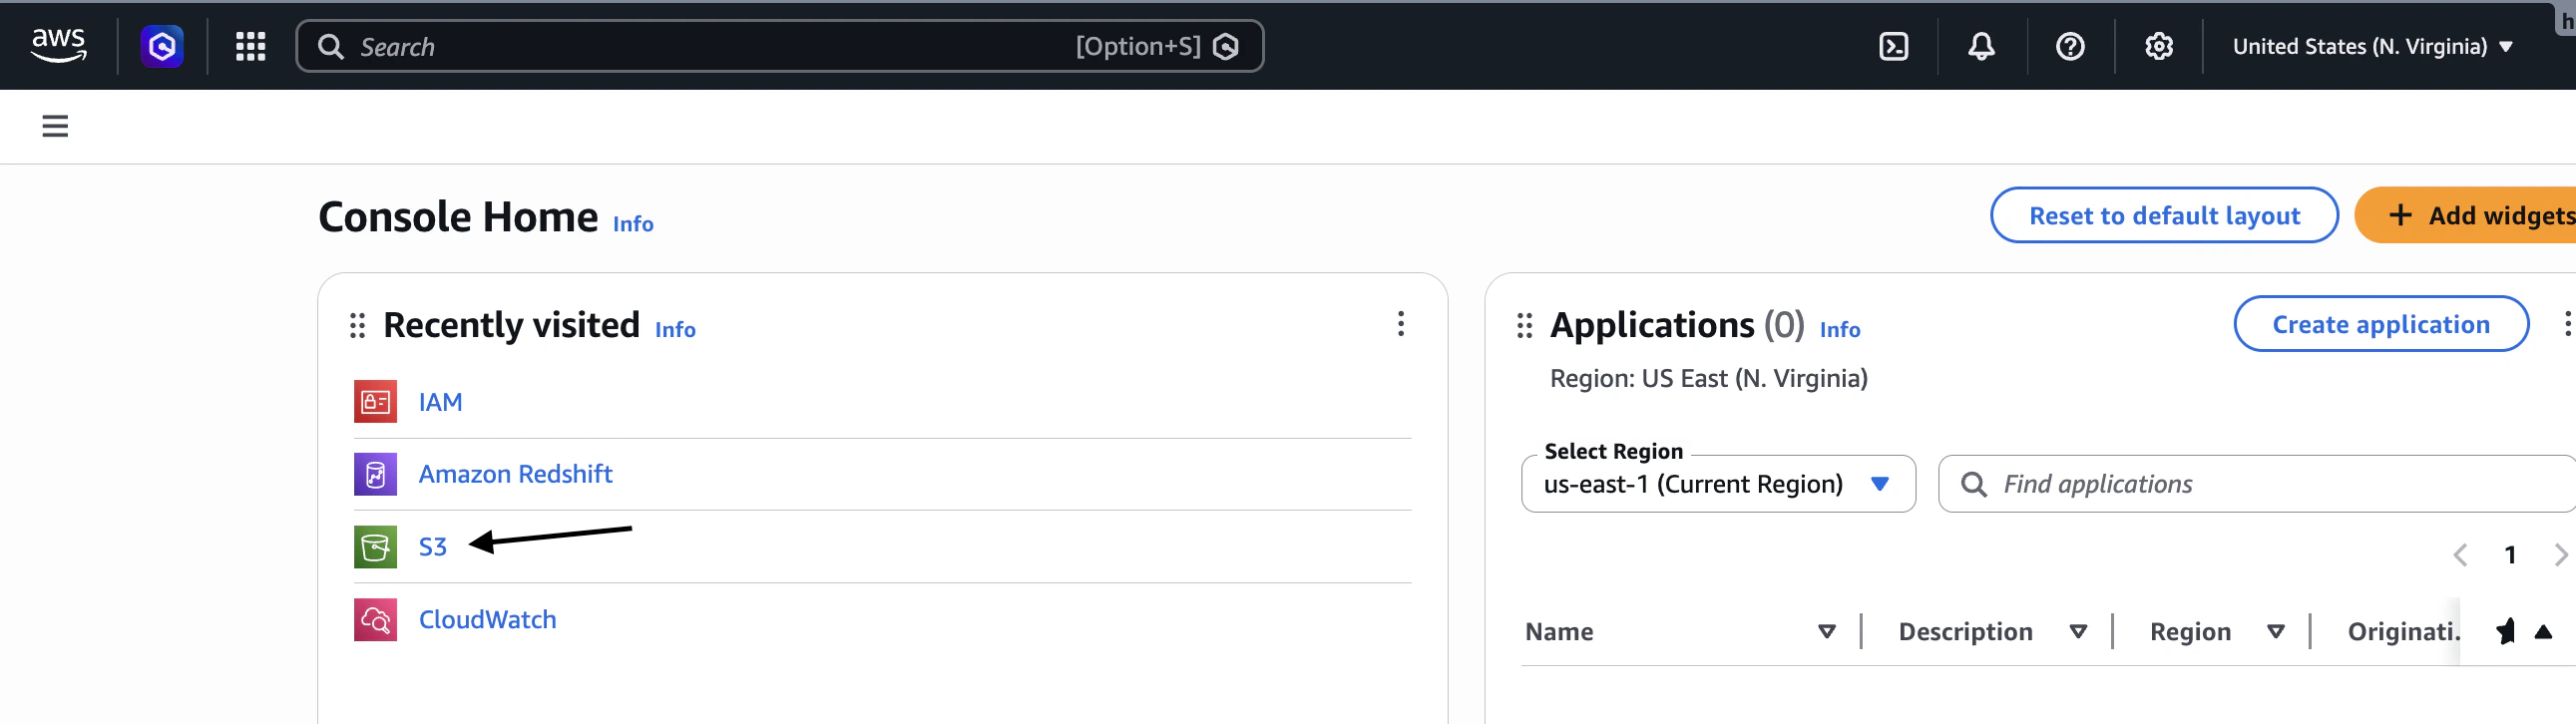
2. Go to Amazon S3.
6. Under Access keys, create or view the relevant access key metadata.
### 7. `Secret Access Key`
The secret paired with the Access Key Id.
AWS only shows the secret access key once at the time the access key is created. If it wasn’t saved, your admin must generate a new access key. Lost keys cannot be recovered.
**Where to get it:**
Create a new access key for the IAM user if needed, then copy the secret when it is shown and store it securely.
### 8. `S3 Bucket`
The S3 bucket used for staging data.
**Where to get it:**
1. Open the AWS Console.
2. Go to Amazon S3.
 3. Click on General purpose buckets.
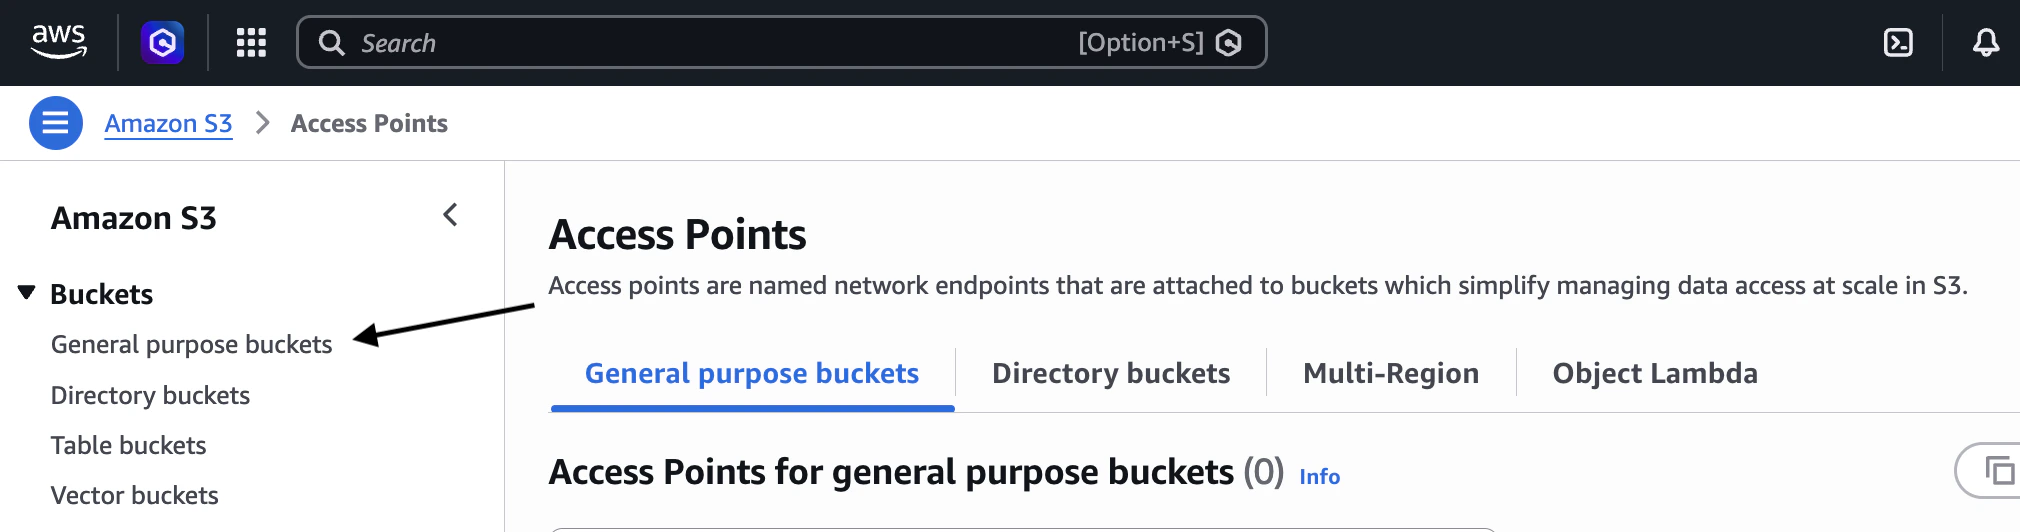 4. From the list of buckets, copy the name of the bucket your team uses for Redshift staging.
### 9. `Default Target Schema`
Schema name for data loaded into Redshift.
Schemas are **not** visible in the AWS Console without SQL access. You will need to use a SQL client (e.g., DBeaver, TablePlus, or psql) connected to your Redshift cluster.
**Where to get it:**
1. Open your **SQL client** and connect to your Redshift cluster using your Host, Port, Database, User, and Password credentials.
2. Once connected, run the following query:
```
SELECT schema_name FROM information_schema.schemata;
```
3. Pick the schema where data should land and enter it as Default Target Schema. If unsure, common choices are `public`, `analytics`, or `raw`. If none exists yet, ask your administrator to create one; `public` is a safe default.
### 10. `SSH Host`
The public IP address of the EC2 bastion host used to establish the SSH tunnel to the Redshift cluster.
SSH fields are only required if your Redshift cluster is not publicly accessible and requires an SSH tunnel. If your cluster is publicly accessible, you can leave these fields empty.
**Where to get it:**
1. Go to AWS Console
2. Open EC2
4. From the list of buckets, copy the name of the bucket your team uses for Redshift staging.
### 9. `Default Target Schema`
Schema name for data loaded into Redshift.
Schemas are **not** visible in the AWS Console without SQL access. You will need to use a SQL client (e.g., DBeaver, TablePlus, or psql) connected to your Redshift cluster.
**Where to get it:**
1. Open your **SQL client** and connect to your Redshift cluster using your Host, Port, Database, User, and Password credentials.
2. Once connected, run the following query:
```
SELECT schema_name FROM information_schema.schemata;
```
3. Pick the schema where data should land and enter it as Default Target Schema. If unsure, common choices are `public`, `analytics`, or `raw`. If none exists yet, ask your administrator to create one; `public` is a safe default.
### 10. `SSH Host`
The public IP address of the EC2 bastion host used to establish the SSH tunnel to the Redshift cluster.
SSH fields are only required if your Redshift cluster is not publicly accessible and requires an SSH tunnel. If your cluster is publicly accessible, you can leave these fields empty.
**Where to get it:**
1. Go to AWS Console
2. Open EC2
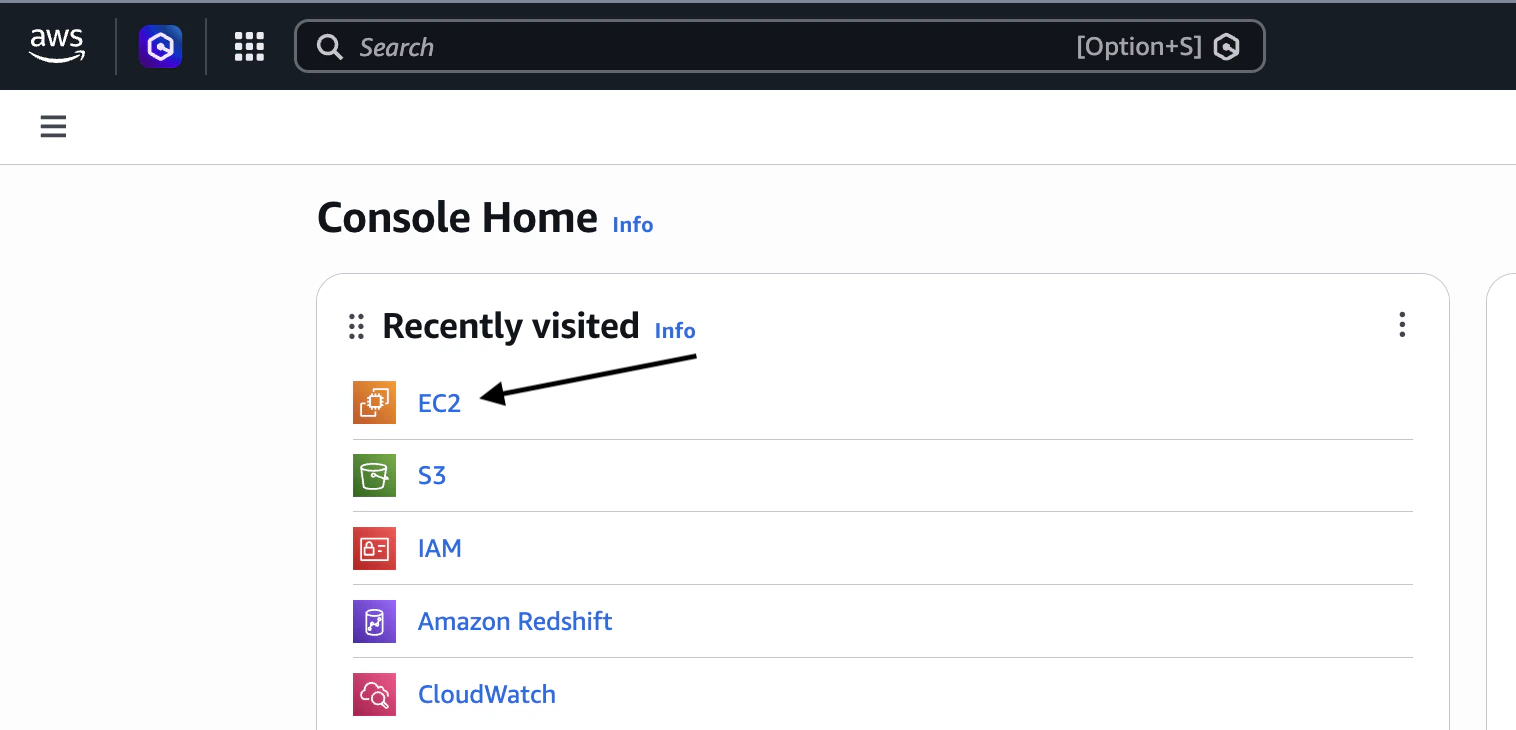 3. Click Instances
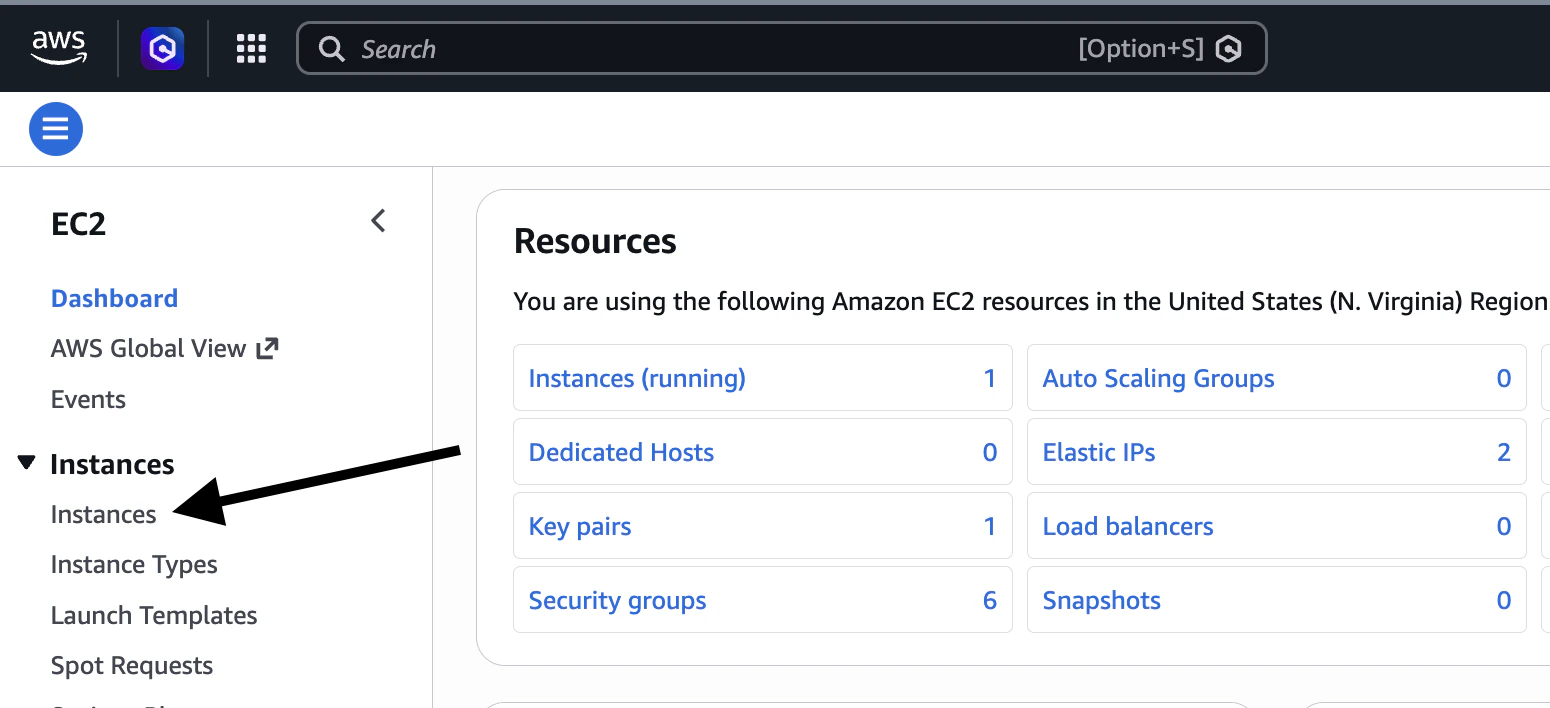 4. Select the bastion host instance
5. Locate Public IPv4 address
4. Select the bastion host instance
5. Locate Public IPv4 address
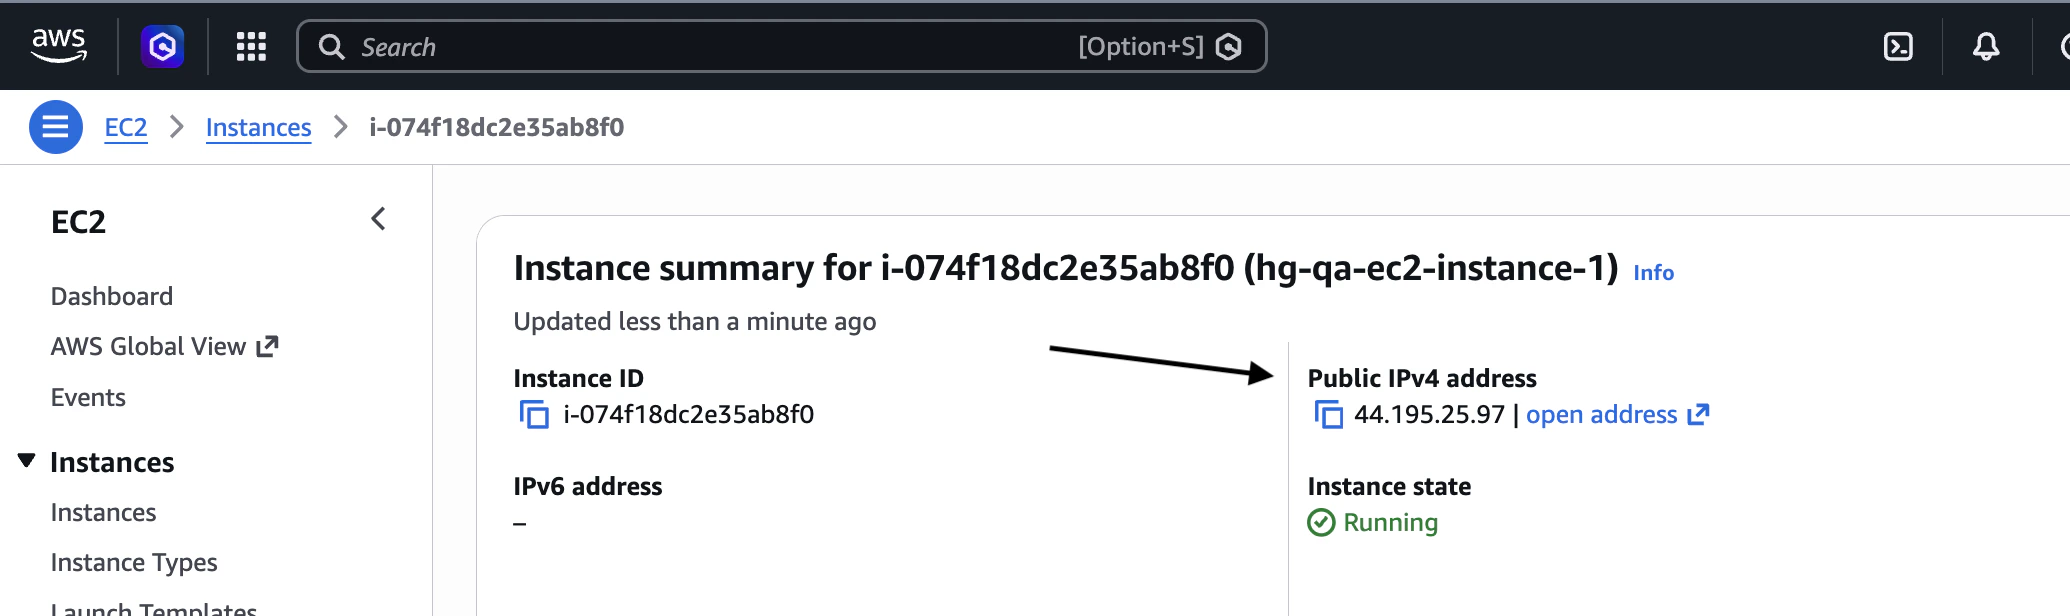 Use this value as the SSH Host.
### 11. `SSH User`
The username depends on the AMI; see [AMI default user names](https://docs.aws.amazon.com/AWSEC2/latest/UserGuide/managing-users.html#ami-default-user-names) in the AWS docs.
**Where to verify:**
Follow steps 1, 2, 3 and 4 for getting **SSH Host** credentials. Then follow these steps:
5. In the **Details** tab, check Platform details/AMI
Use this value as the SSH Host.
### 11. `SSH User`
The username depends on the AMI; see [AMI default user names](https://docs.aws.amazon.com/AWSEC2/latest/UserGuide/managing-users.html#ami-default-user-names) in the AWS docs.
**Where to verify:**
Follow steps 1, 2, 3 and 4 for getting **SSH Host** credentials. Then follow these steps:
5. In the **Details** tab, check Platform details/AMI
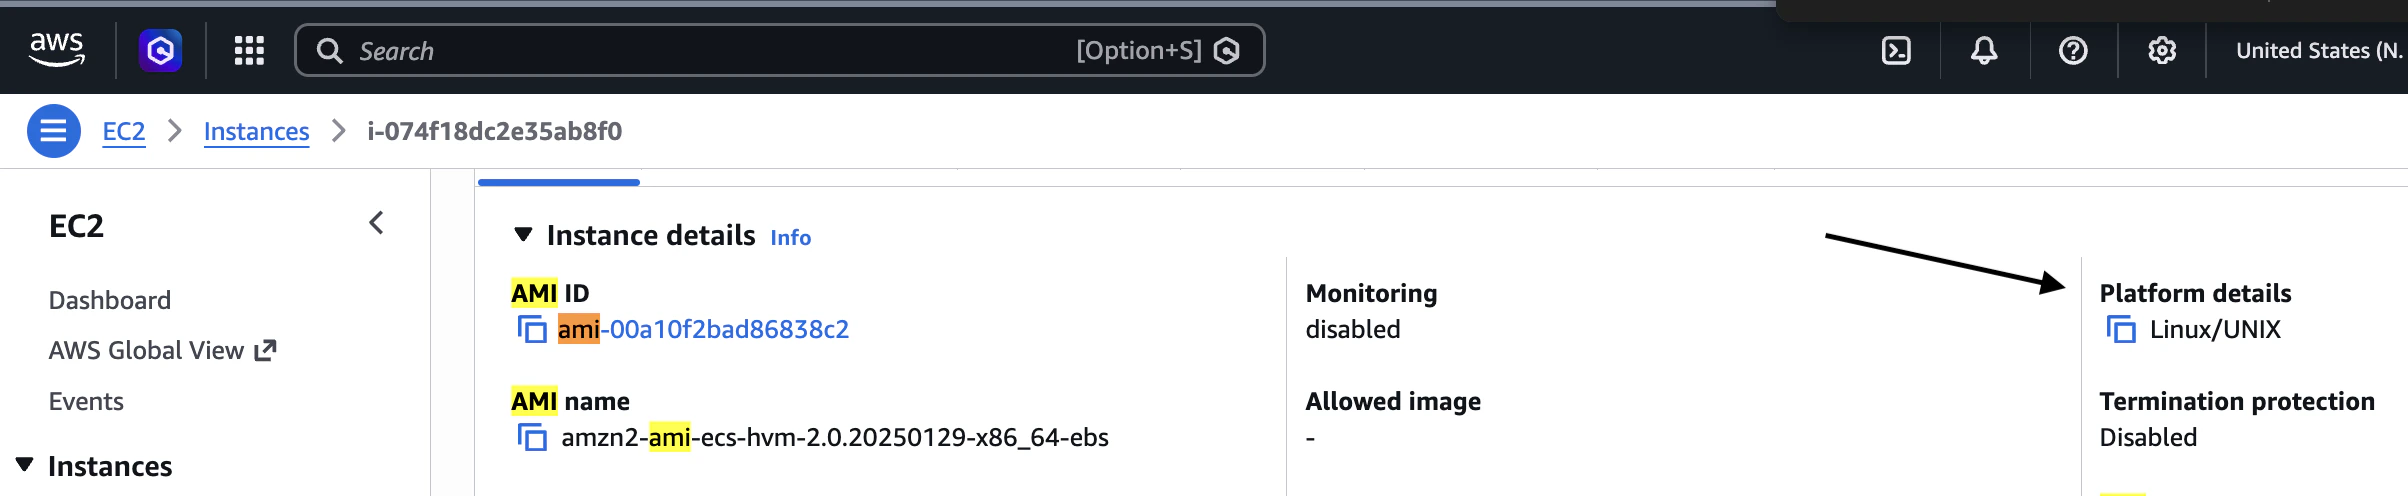 If the instance is running Amazon Linux, the SSH user is ec2-user.
### 12. `SSH Key`
The private key file (.pem) associated with the EC2 key pair used when the bastion host instance was launched.
**Where to find the key pair name:**
Follow steps 1, 2, 3 and 4 for getting **SSH Host** credentials. Then follow these steps:
5. In the **Details** tab, locate Key pair assigned at launch
If the instance is running Amazon Linux, the SSH user is ec2-user.
### 12. `SSH Key`
The private key file (.pem) associated with the EC2 key pair used when the bastion host instance was launched.
**Where to find the key pair name:**
Follow steps 1, 2, 3 and 4 for getting **SSH Host** credentials. Then follow these steps:
5. In the **Details** tab, locate Key pair assigned at launch
 The name under Key pair assigned at launch matches your `.pem` file (for example, `my-bastion-key` → `my-bastion-key.pem`). That file was downloaded when the key pair was created and cannot be retrieved from AWS again.
You can also view the key pair in:
```
EC2 → Network & Security → Key Pairs
```
If the key is lost, a new key pair must be created and associated with the instance.
# Target Changelog
| Version | Notes |
| :-------------------------------------------------------------------------- | :---- |
| [v1.6.3](https://github.com/hotgluexyz/target-redshift/releases/tag/v1.6.3) | |
The name under Key pair assigned at launch matches your `.pem` file (for example, `my-bastion-key` → `my-bastion-key.pem`). That file was downloaded when the key pair was created and cannot be retrieved from AWS again.
You can also view the key pair in:
```
EC2 → Network & Security → Key Pairs
```
If the key is lost, a new key pair must be created and associated with the instance.
# Target Changelog
| Version | Notes |
| :-------------------------------------------------------------------------- | :---- |
| [v1.6.3](https://github.com/hotgluexyz/target-redshift/releases/tag/v1.6.3) | |