> ## Documentation Index
> Fetch the complete documentation index at: https://docs.hotglue.com/llms.txt
> Use this file to discover all available pages before exploring further.
# Shopify
# Connector Details
| Name | Value |
| :------------- | :------------------------------------------------------------------------------------------- |
| Platform | [Shopify](https://shopify.com) |
| Auth Type | API Keys |
| Direction | Bidirectional |
| Triggers | Supported |
| Tap Repo | [https://github.com/hotgluexyz/tap-shopify](https://github.com/hotgluexyz/tap-shopify) |
| Target Repo | [https://gitlab.com/hotglue/target-shopify-v2](https://gitlab.com/hotglue/target-shopify-v2) |
| Tap Metrics | Usage:
|
| Target Metrics | Usage:
|
| Unified Schema | [Supported in Ecommerce Unified Schema.](https://hotglue.com/docs/unified) |
# Credentials Setup
Follow the steps below to get the credentials you need to use the Shopify connector.
There are two ways to use Shopify: either via a Shopify Public App (OAuth) or using a Private App (API keys). hotglue environments will default to private apps, but you can use either. Below are guides to setting up both:
## Public App (OAuth)
When using Public App (OAuth), make sure to use the Shopify OAuth connector in hotglue instead of the API Key based version.
### 1. Register a Shopify Public App
To start, you will need to create a Shopify developer account at [shopify.dev](https://shopify.dev/).
After entering some basic information, you'll be taken to an overview page. There's a tab that says "Build apps for clients or the Shopify App Store." When you click it, you'll see a button to create an app. Click that too.
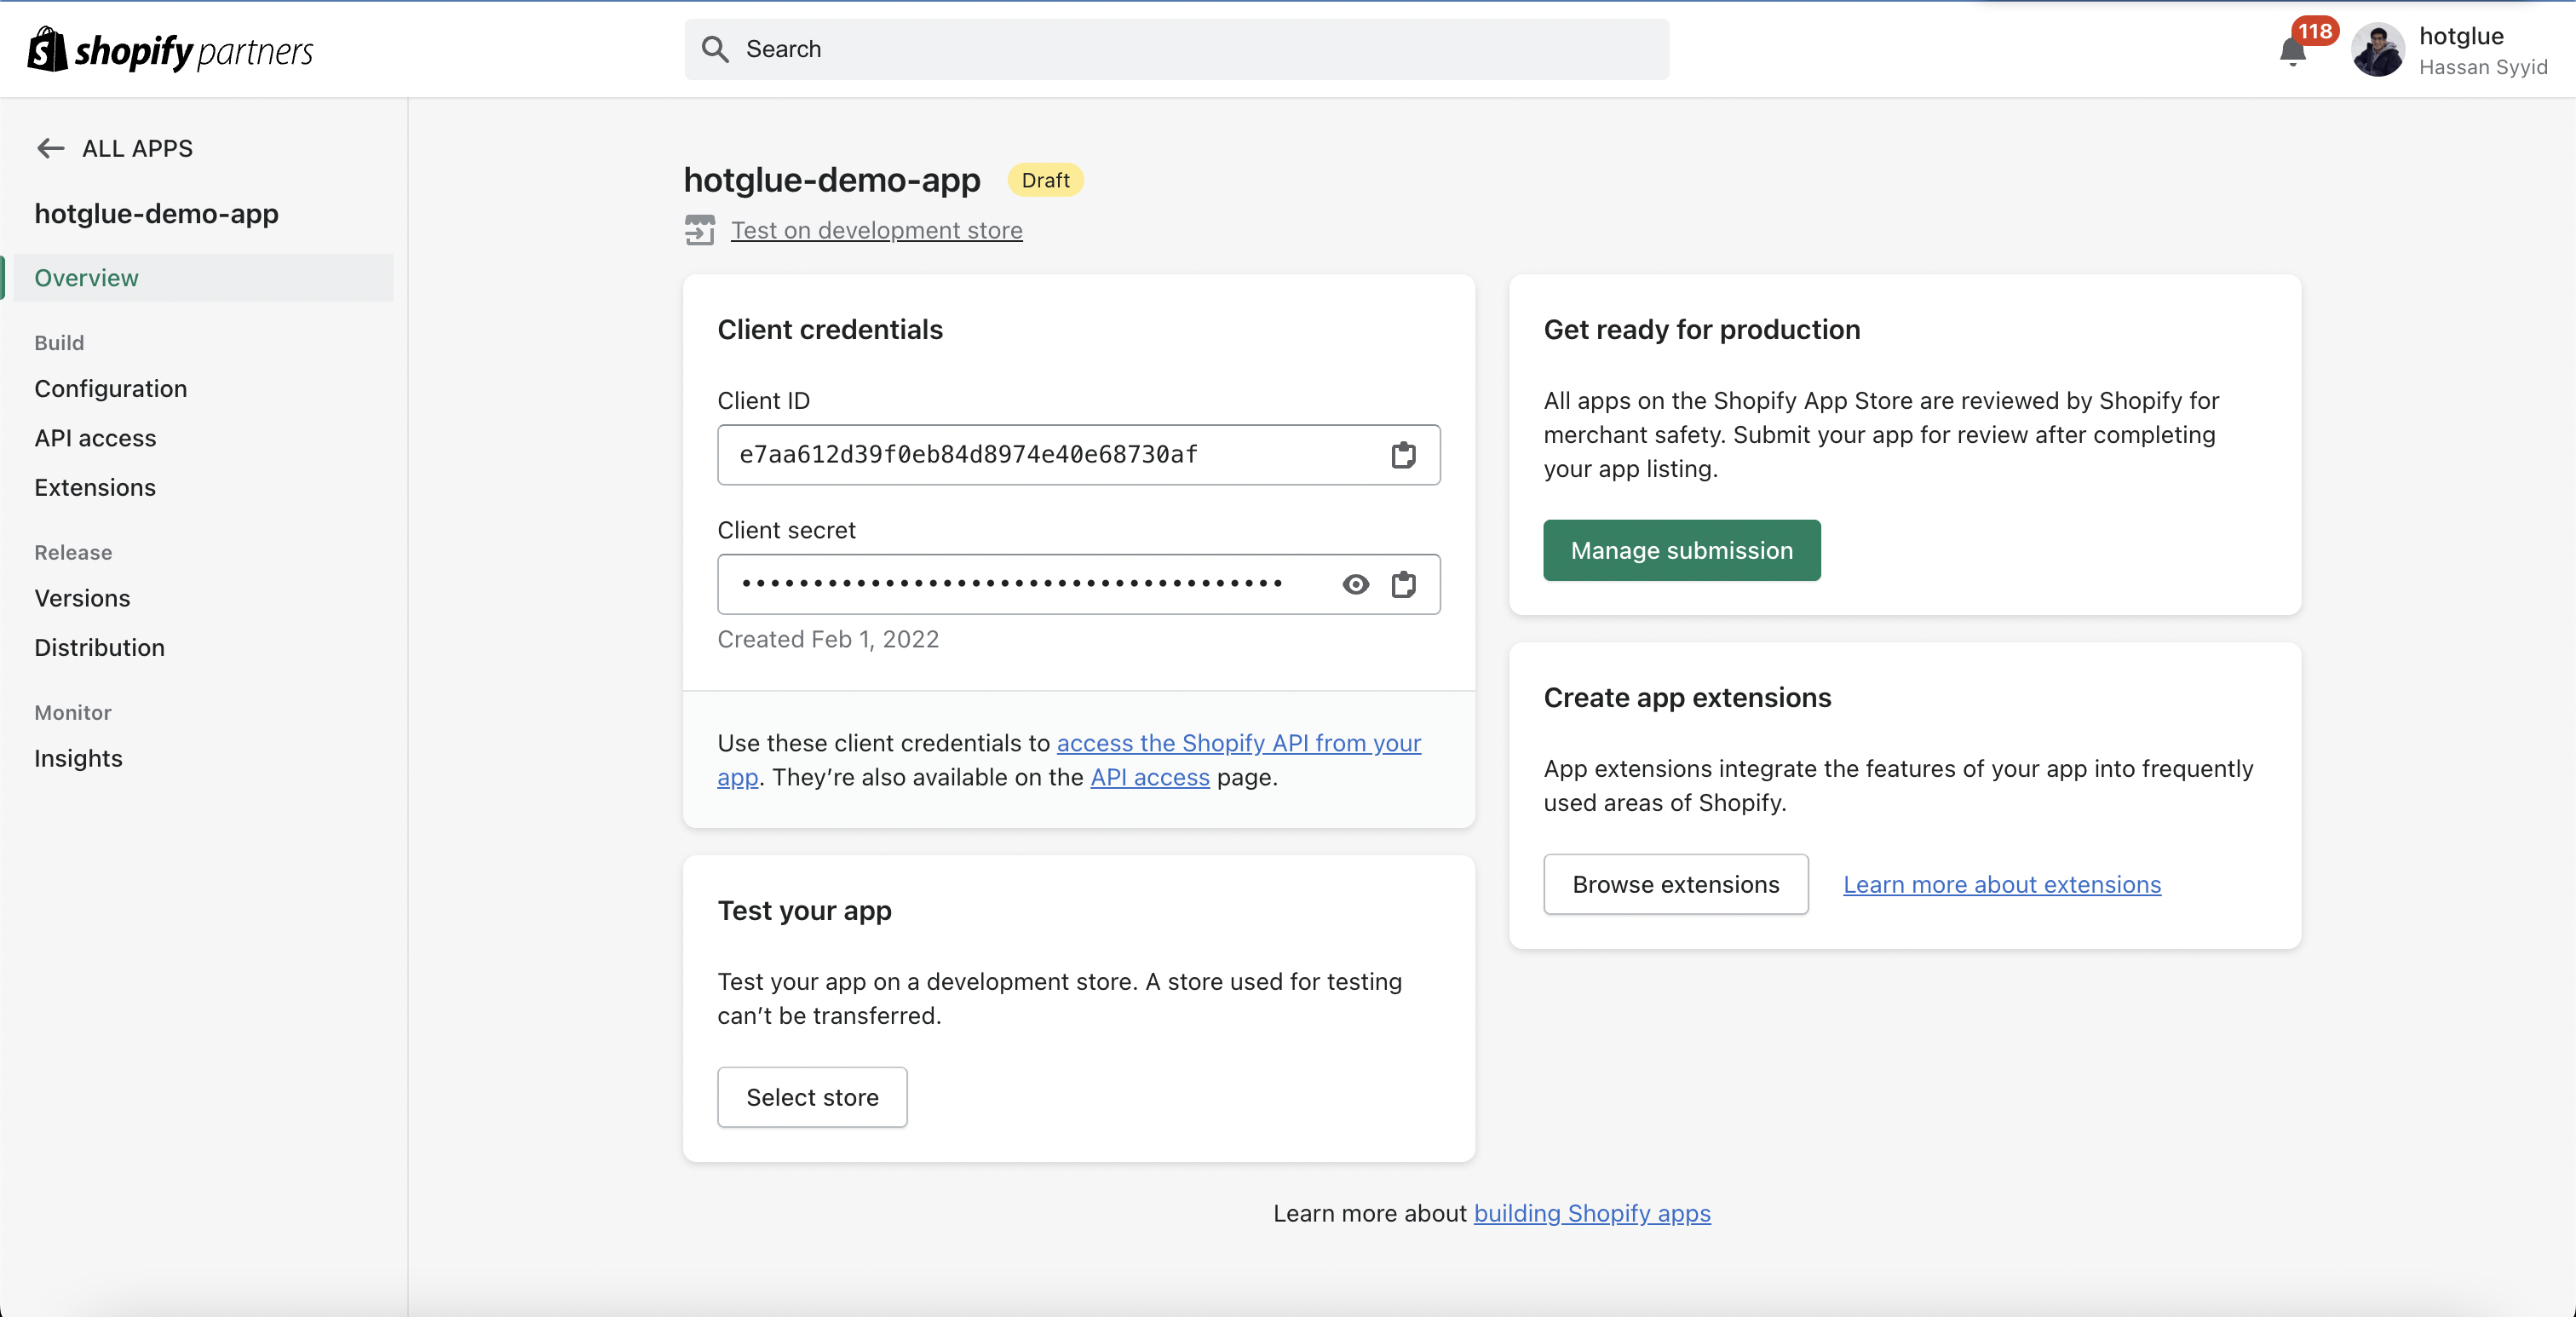
Once you name your app, you'll get the Client ID and Client Secret that you need for hotglue. Add a logo and preferences URL while you're at it.
 ### 2. App Setup
There are two distinct ways to have hotglue manage your Shopify App. See the video walkthrough below explaining each option:
In both scenarios, you must:
1. Add hotglue to the "Allowed redirection URL." This should be set to `https://hotglue.xyz/callback`
### 2. App Setup
There are two distinct ways to have hotglue manage your Shopify App. See the video walkthrough below explaining each option:
In both scenarios, you must:
1. Add hotglue to the "Allowed redirection URL." This should be set to `https://hotglue.xyz/callback` 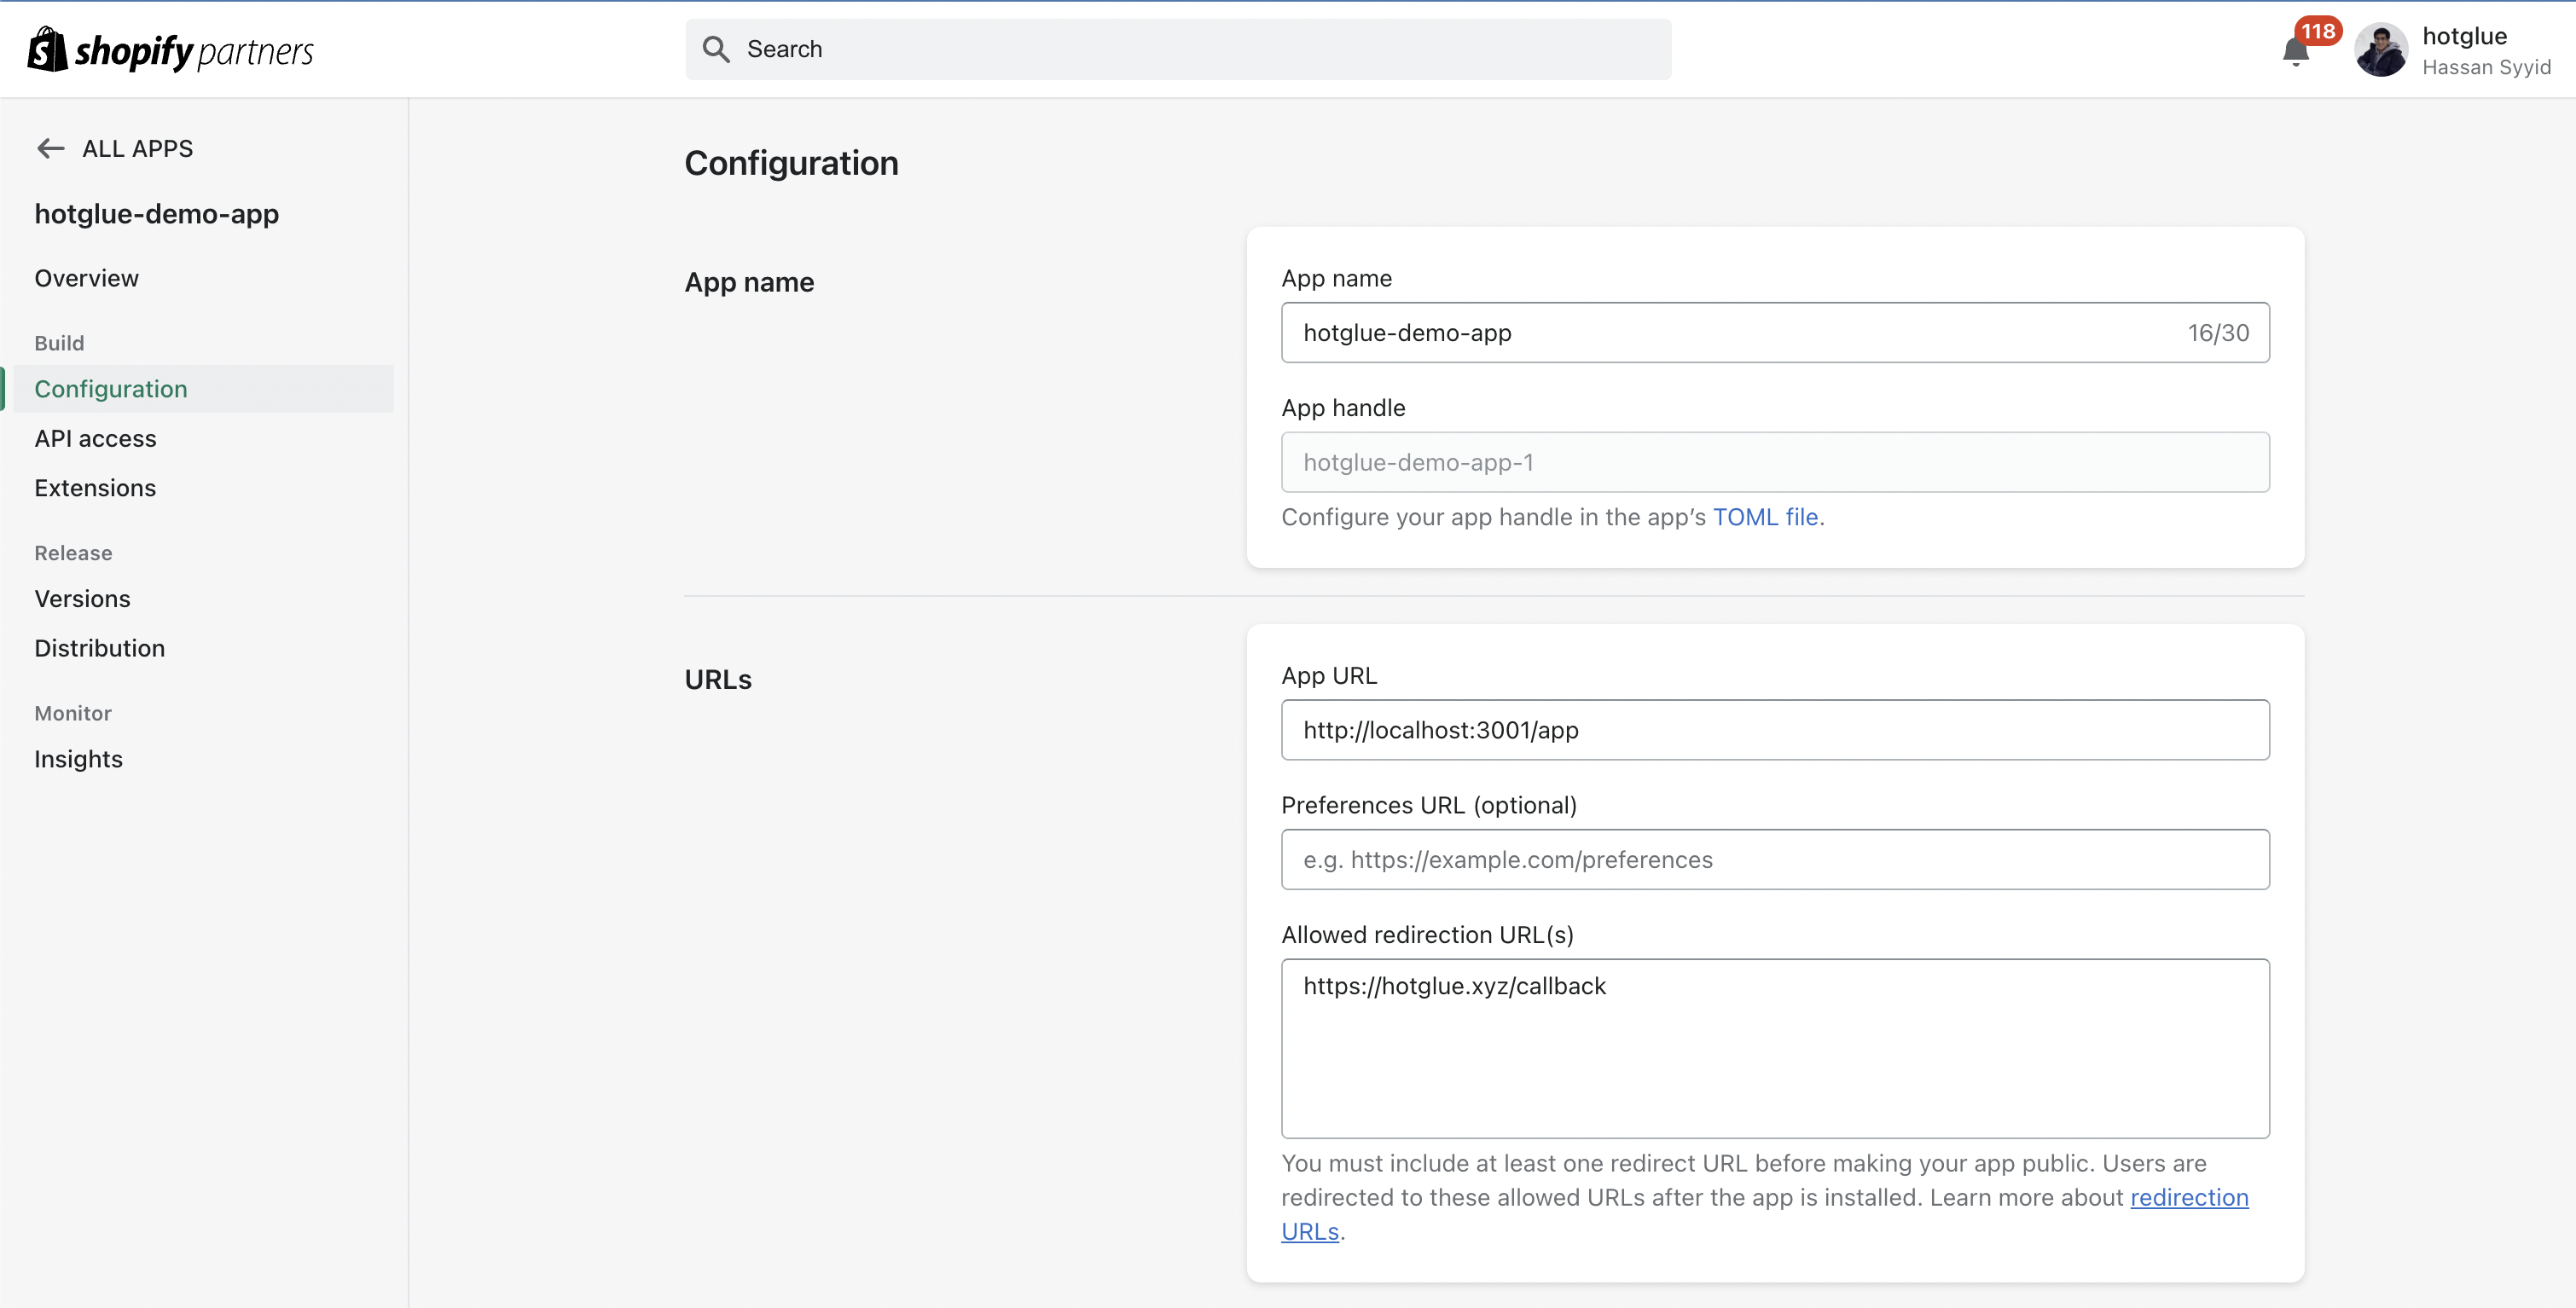 2. Configure a URL to redirect to once the authorization process is complete (`complete_url`). This is done in the JSON definition under Settings -> Connectors -> Sources -> Shopify OAuth. (Or, if using bi-directional flows, via Settings -> Connectors -> Shopify OAuth)
```json theme={null}
{
"tap": "shopify:oauth",
"version": "oauth",
"isForked": true,
"label": "Shopify",
"icon": "https://s3.amazonaws.com/cdn.hotglue.xyz/images/logos/shopify.svg",
"domain": "shopify.com",
// NOTE: You can also customize this list of scopes
"tap_url": "https://{shop}.myshopify.com/admin/oauth/authorize?scope=read_customers,read_inventory,read_orders,read_products",
// NOTE: This is the URL the tenant will be sent to once they complete the OAuth process
"complete_url": "https://app.acme.com/"
}
```
#### 2a. Fully Managed
With this method, hotglue will handle generating the tenant ID + creating the config. To use this method, simply set your app URL to
```
https://api.hotglue.com/shopify/{env_id}/{flow_id}
```
#### 2b. Semi Managed
Set a custom app URL (to your webapp for example), and then "forward" the request to hotglue. With this method you can supply the desired `tenant` id in the query params.
Here's a simplified example using Express to illustrate how the semi-managed flow works:
```javascript theme={null}
app.get('/app', async (req, res, next) => {
// Get the query params
const { shop } = req.query;
// TODO: write some logic to decide what the tenant id should be
const tenantId = "magic-ruffalo-123";
// Redirect the tenant to complete the Shopify OAuth process (notice we are forwarding the shop and tenant query params)
const url = `${HG_API_URL}/shopify/${HG_ENV_ID}/${HG_FLOW_ID}?shop=${shop}&tenant=${tenantId}`
console.log("Redirecting to: ", url);
res.redirect(302, url);
});
```
### 3. API Access
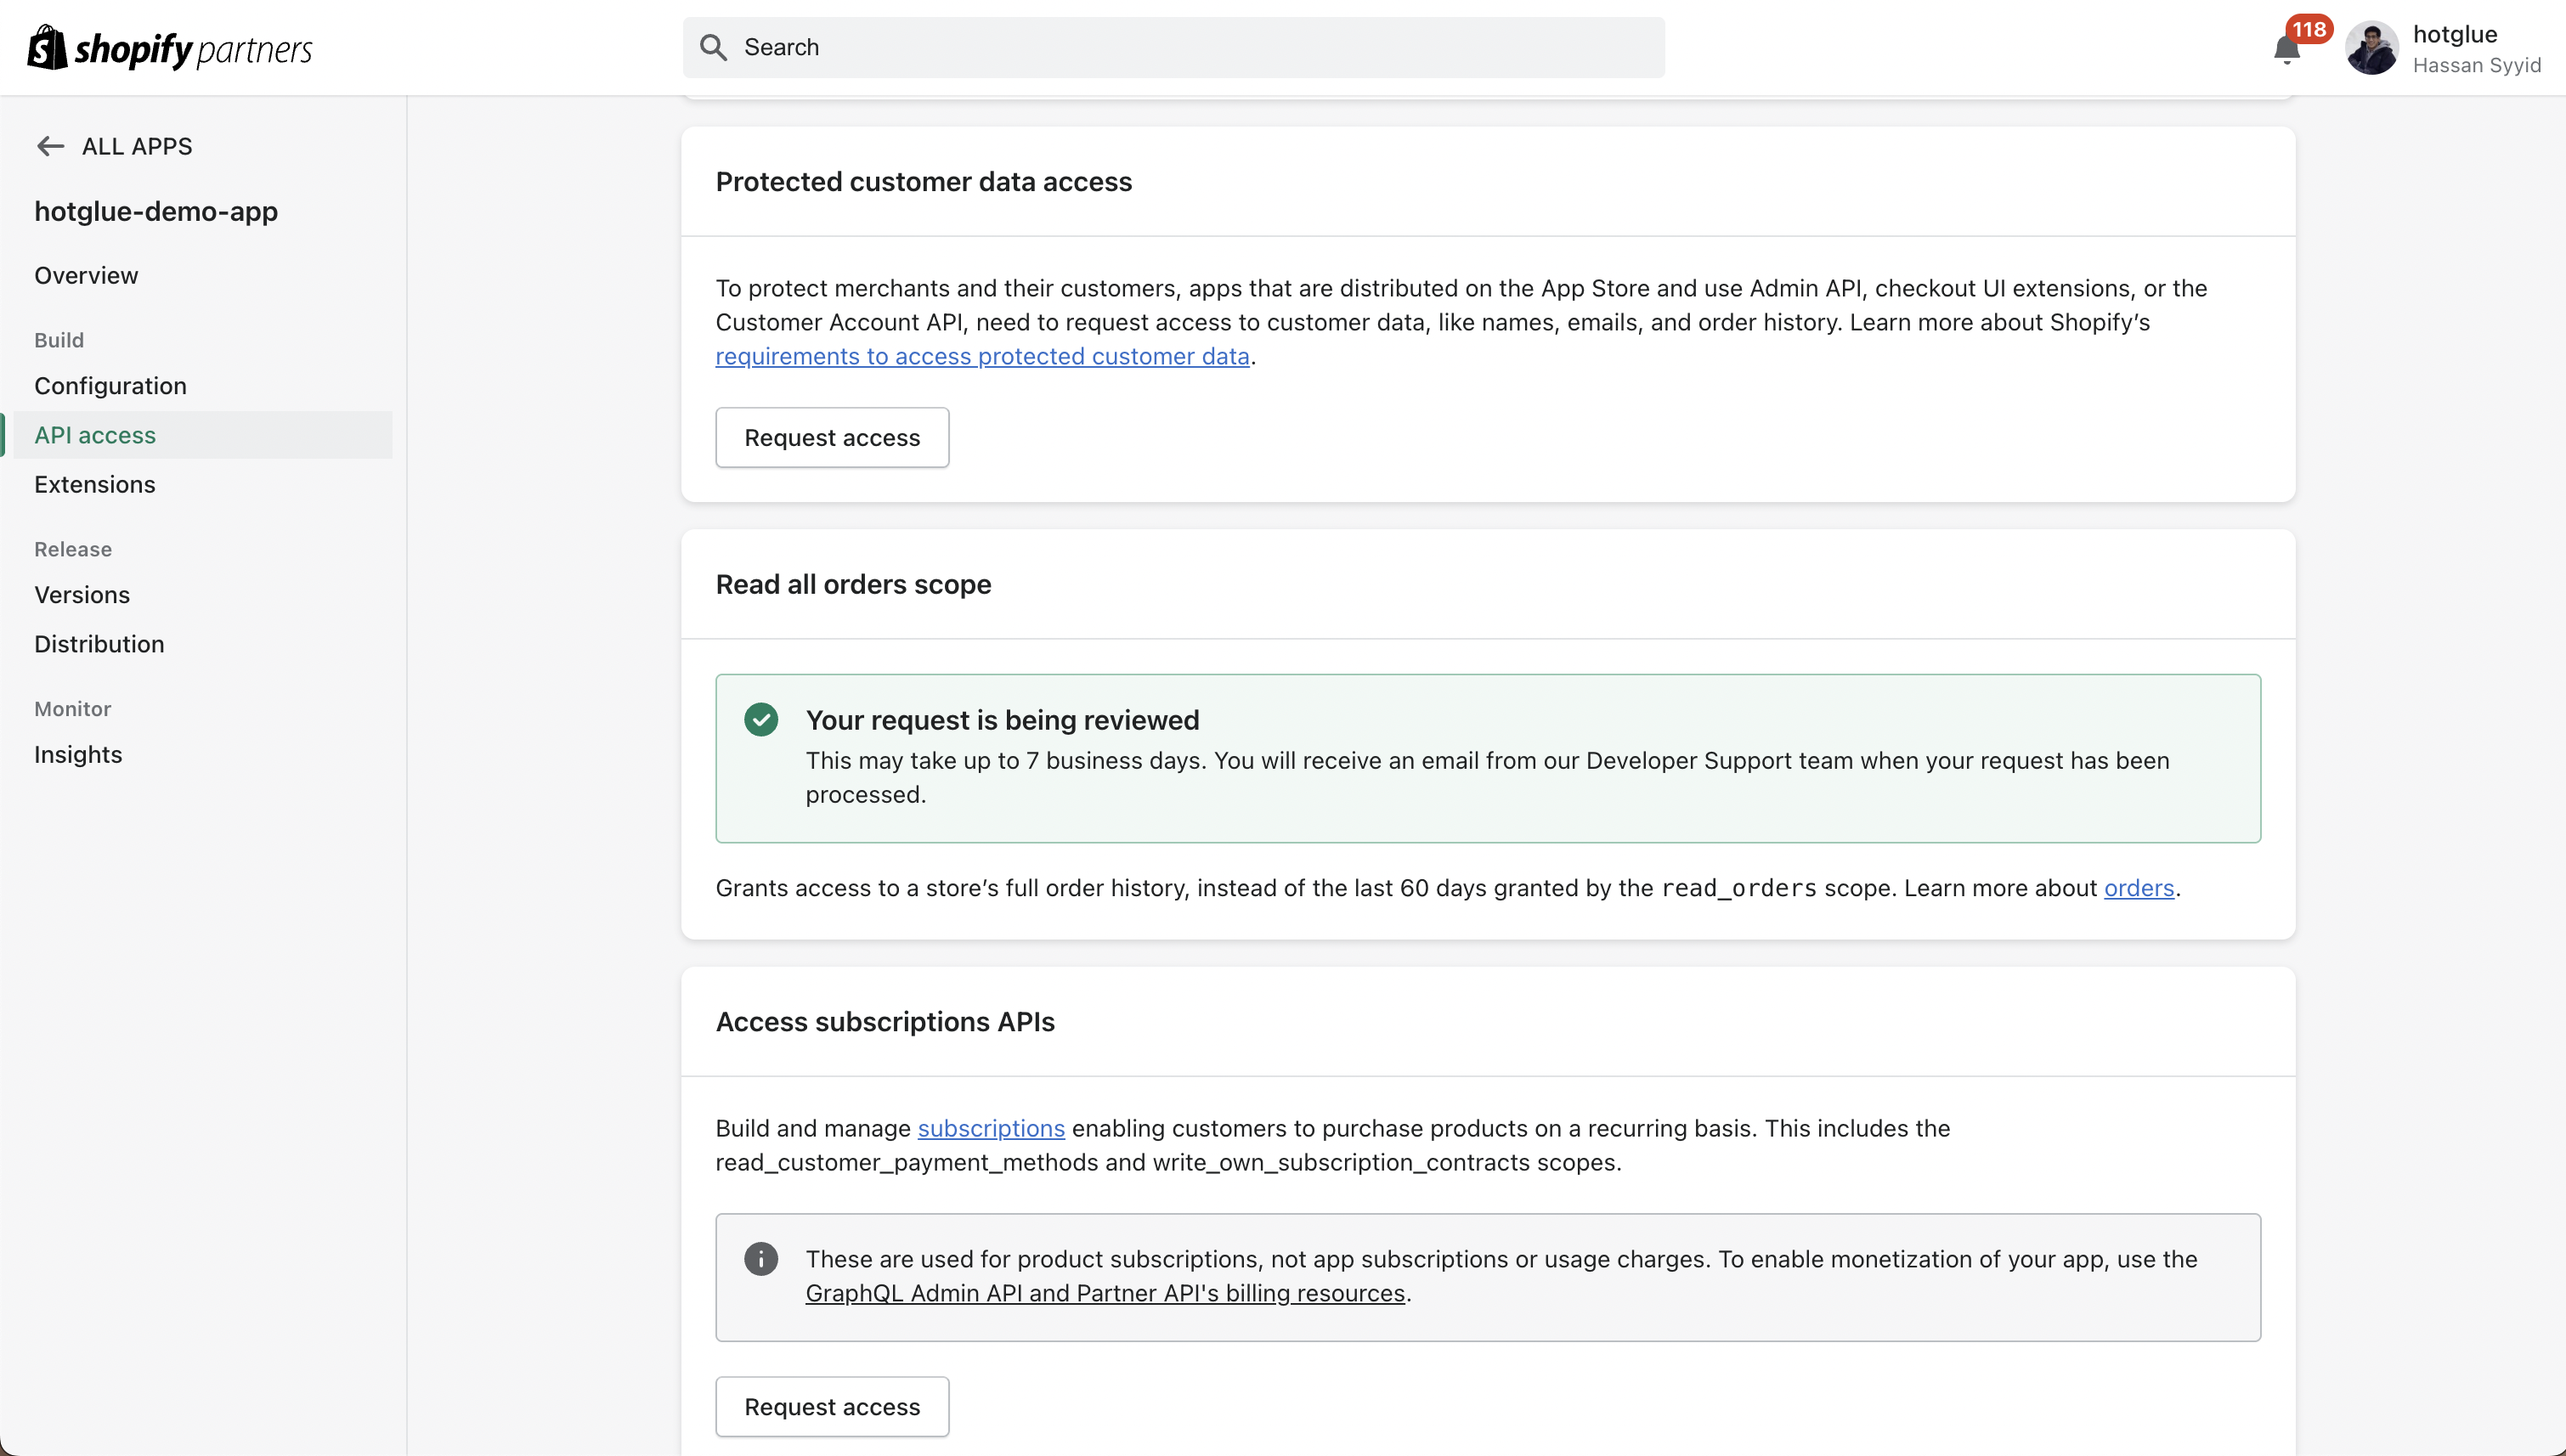
Depending on your use case, you may need to request permissions for access to certain scopes.
Most use cases will require the "Read all orders" scope, which you can request on this page. If it's relevant to your app, it isn't too hard to get this access. You may also be interested in requesting subscription APIs and protected customer data.
2. Configure a URL to redirect to once the authorization process is complete (`complete_url`). This is done in the JSON definition under Settings -> Connectors -> Sources -> Shopify OAuth. (Or, if using bi-directional flows, via Settings -> Connectors -> Shopify OAuth)
```json theme={null}
{
"tap": "shopify:oauth",
"version": "oauth",
"isForked": true,
"label": "Shopify",
"icon": "https://s3.amazonaws.com/cdn.hotglue.xyz/images/logos/shopify.svg",
"domain": "shopify.com",
// NOTE: You can also customize this list of scopes
"tap_url": "https://{shop}.myshopify.com/admin/oauth/authorize?scope=read_customers,read_inventory,read_orders,read_products",
// NOTE: This is the URL the tenant will be sent to once they complete the OAuth process
"complete_url": "https://app.acme.com/"
}
```
#### 2a. Fully Managed
With this method, hotglue will handle generating the tenant ID + creating the config. To use this method, simply set your app URL to
```
https://api.hotglue.com/shopify/{env_id}/{flow_id}
```
#### 2b. Semi Managed
Set a custom app URL (to your webapp for example), and then "forward" the request to hotglue. With this method you can supply the desired `tenant` id in the query params.
Here's a simplified example using Express to illustrate how the semi-managed flow works:
```javascript theme={null}
app.get('/app', async (req, res, next) => {
// Get the query params
const { shop } = req.query;
// TODO: write some logic to decide what the tenant id should be
const tenantId = "magic-ruffalo-123";
// Redirect the tenant to complete the Shopify OAuth process (notice we are forwarding the shop and tenant query params)
const url = `${HG_API_URL}/shopify/${HG_ENV_ID}/${HG_FLOW_ID}?shop=${shop}&tenant=${tenantId}`
console.log("Redirecting to: ", url);
res.redirect(302, url);
});
```
### 3. API Access
Depending on your use case, you may need to request permissions for access to certain scopes.
Most use cases will require the "Read all orders" scope, which you can request on this page. If it's relevant to your app, it isn't too hard to get this access. You may also be interested in requesting subscription APIs and protected customer data.
 ### 4. Distribution
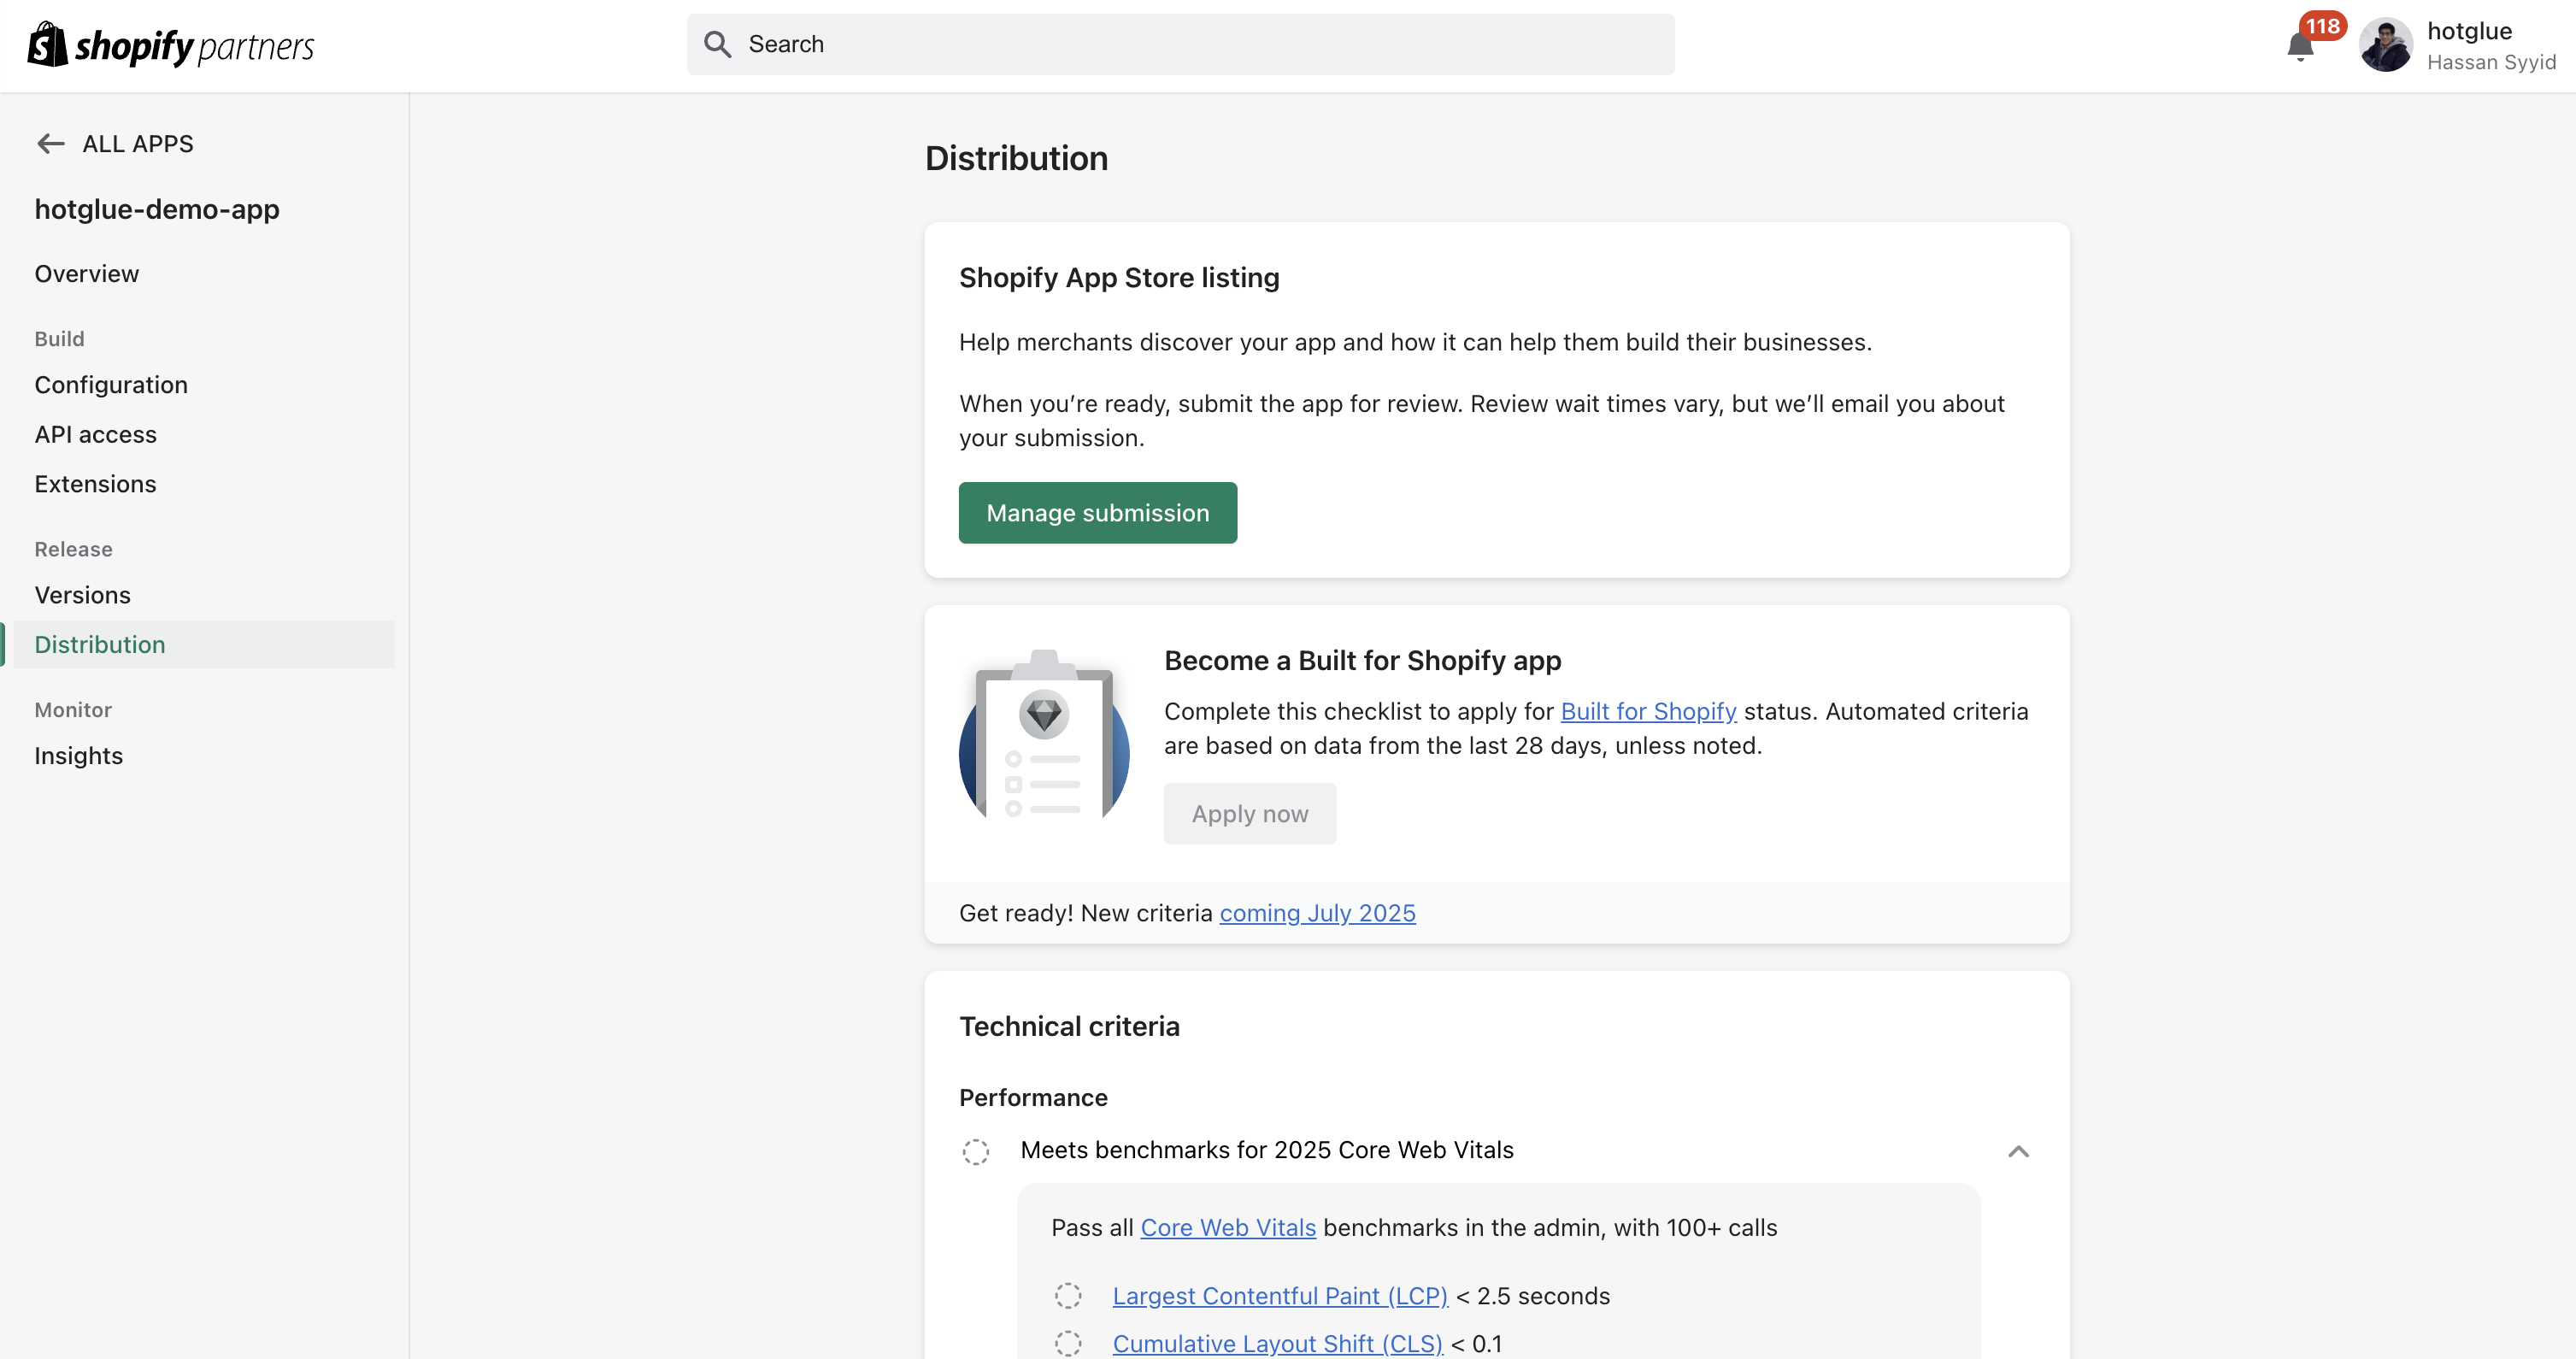
Once you finish configuring your app and confirming that it works for your own account, you can begin the app registration process.
You will want to make your app publicly available, so this can't be a Single Merchant Install. There is a one-time \$99 fee associated with registering to be on the Shopify app store.
### 4. Distribution
Once you finish configuring your app and confirming that it works for your own account, you can begin the app registration process.
You will want to make your app publicly available, so this can't be a Single Merchant Install. There is a one-time \$99 fee associated with registering to be on the Shopify app store.
 ## Custom Apps (OAuth)
If you are creating a one-off connection to one shop or a small number of shops, you can create an OAuth Custom App.
The benefits of this approach are that:
* You do not need to worry about unknown merchants installing your application.
* You can avoid the drawn-out approval process that comes with public apps.
The drawbacks are that:
* Shopify does not allow you to use this approach as a full "workaround" for obtaining a public app. If you are connecting many tenants, Shopify expects you to build a public app.
* You will need to manually generate the app for each user, then send the installation links to customers individually.
### Setup
The process to create a custom app is very similar to creating a public app. All of the steps for Custom Apps are the same as those listed above for public apps, with the exceptions of:
* `3a` / `3b` -> Instead of opting for Semi-Managed, you should always stick to Fully managed. Since you are creating the app for a specific customer, you can just add the tenant ID to your `App URL` that you configure in Shopify. This will look like the below:
```
https://api.hotglue.com/shopify/{env_id}/{flow_id}?tenant=
```
* `Distribution` -> Instead of creating a public app, you will create your app for a specific store. You will need to obtain the shop URL from your customer. Once you assign the app to that specific store, you will obtain an authorization link, which much be manually shared with the customer.
With those two changes, the customer will click on the installation link and go through authorization like normal. The tenant will be linked in hotglue, with an access token, once they successfully complete the authorization workflow.
## Custom Apps (Client Credentials)
Custom Apps are limited to a single store, which means these steps need to be performed for **each of your customers**.
### Register the app
The first thing you need to do is log in to [Shopify](https://shopify.com). If you're just testing you can create a free partner account.
Once logged in, on the left side of the screen, select the Apps option in the navigation bar. From there, select "Build apps in Dev Dashboard"
## Custom Apps (OAuth)
If you are creating a one-off connection to one shop or a small number of shops, you can create an OAuth Custom App.
The benefits of this approach are that:
* You do not need to worry about unknown merchants installing your application.
* You can avoid the drawn-out approval process that comes with public apps.
The drawbacks are that:
* Shopify does not allow you to use this approach as a full "workaround" for obtaining a public app. If you are connecting many tenants, Shopify expects you to build a public app.
* You will need to manually generate the app for each user, then send the installation links to customers individually.
### Setup
The process to create a custom app is very similar to creating a public app. All of the steps for Custom Apps are the same as those listed above for public apps, with the exceptions of:
* `3a` / `3b` -> Instead of opting for Semi-Managed, you should always stick to Fully managed. Since you are creating the app for a specific customer, you can just add the tenant ID to your `App URL` that you configure in Shopify. This will look like the below:
```
https://api.hotglue.com/shopify/{env_id}/{flow_id}?tenant=
```
* `Distribution` -> Instead of creating a public app, you will create your app for a specific store. You will need to obtain the shop URL from your customer. Once you assign the app to that specific store, you will obtain an authorization link, which much be manually shared with the customer.
With those two changes, the customer will click on the installation link and go through authorization like normal. The tenant will be linked in hotglue, with an access token, once they successfully complete the authorization workflow.
## Custom Apps (Client Credentials)
Custom Apps are limited to a single store, which means these steps need to be performed for **each of your customers**.
### Register the app
The first thing you need to do is log in to [Shopify](https://shopify.com). If you're just testing you can create a free partner account.
Once logged in, on the left side of the screen, select the Apps option in the navigation bar. From there, select "Build apps in Dev Dashboard"
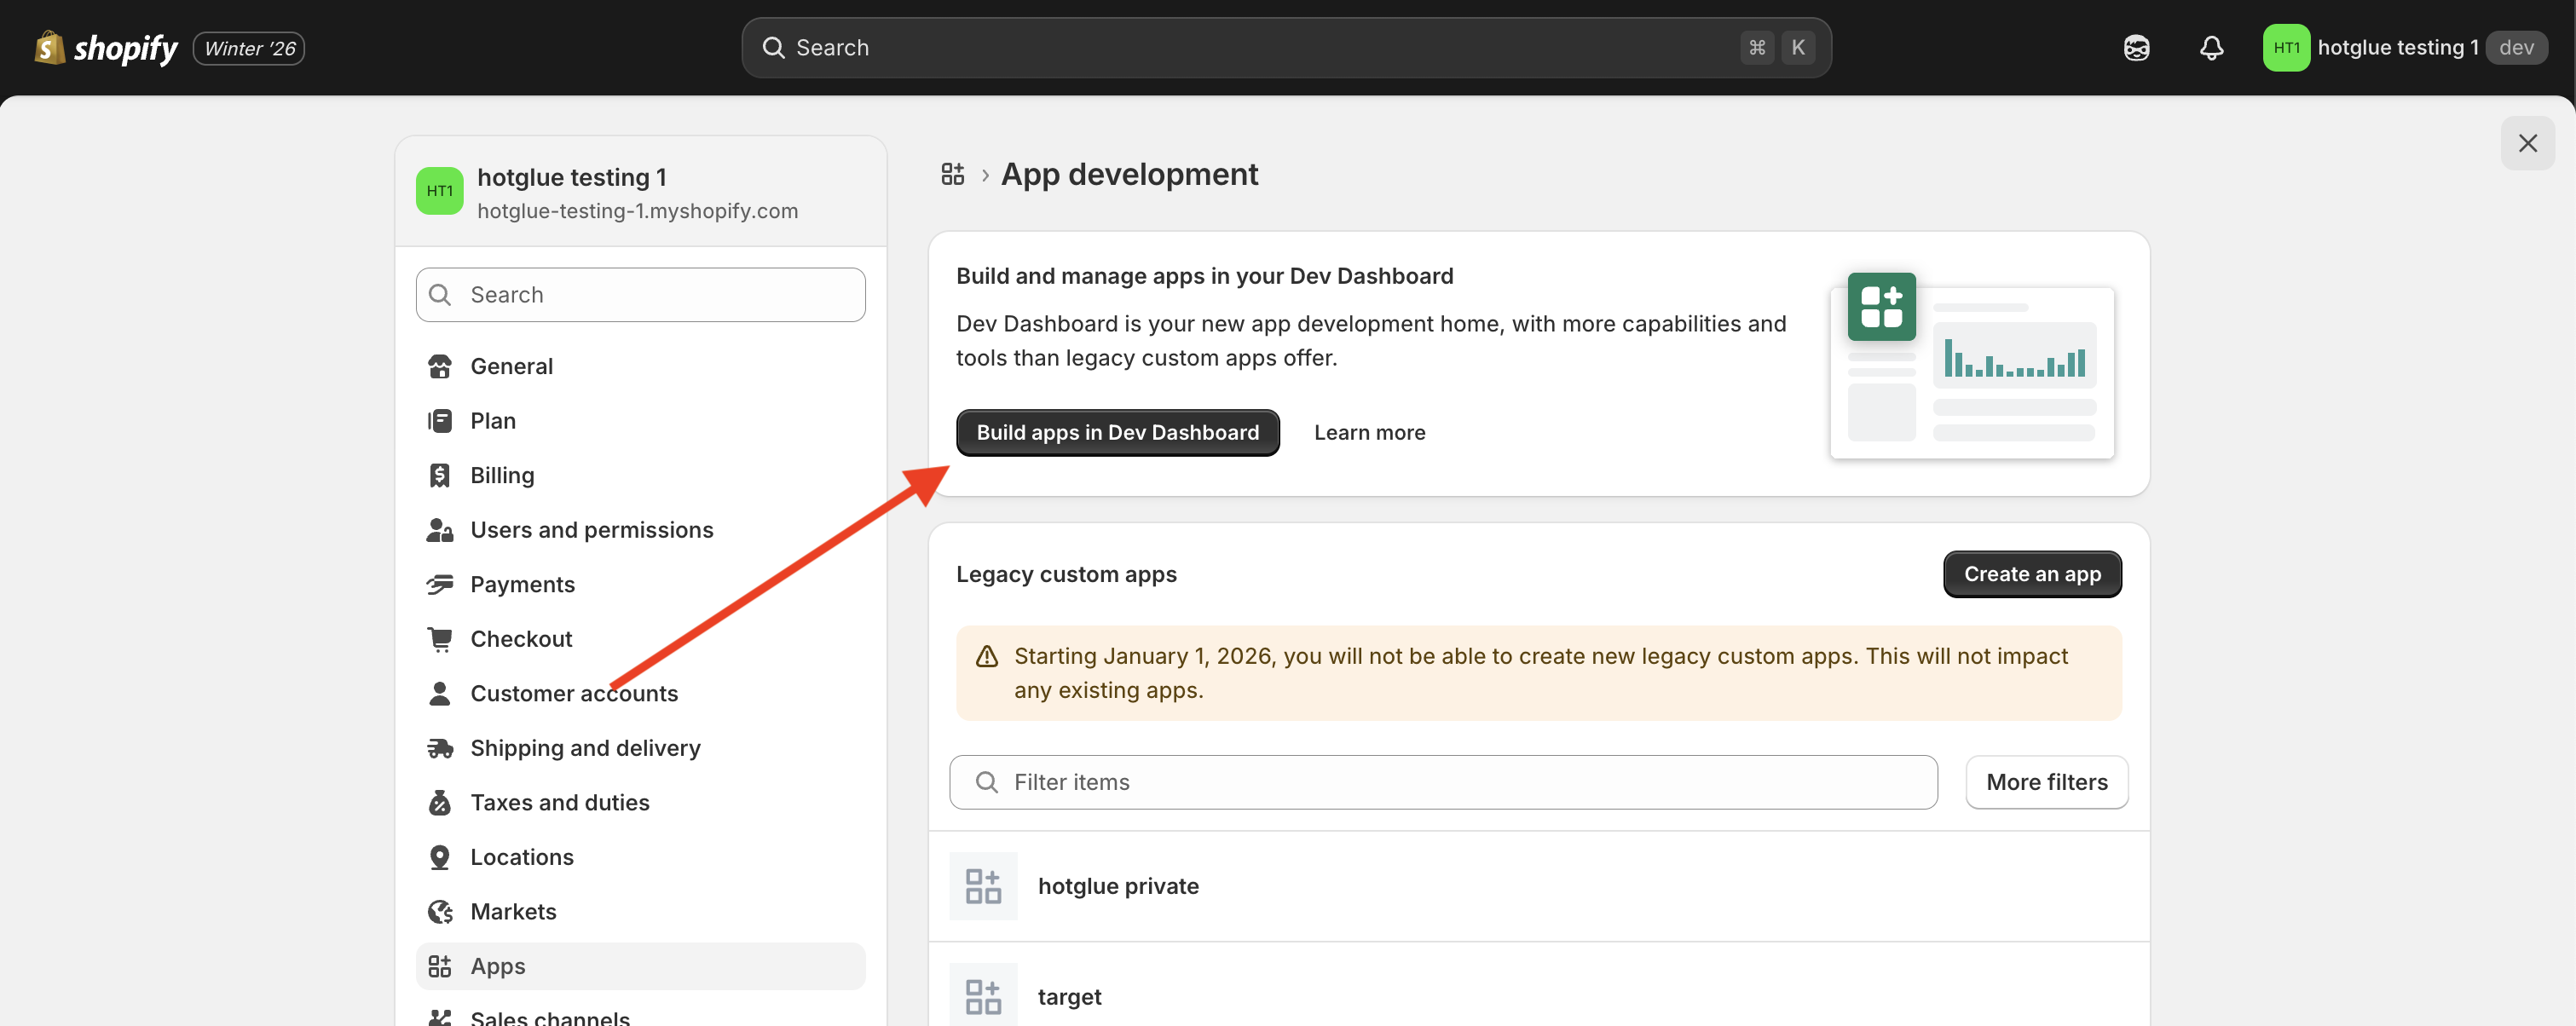 Once you're in the Shopify Dev Dashboard, create an app.
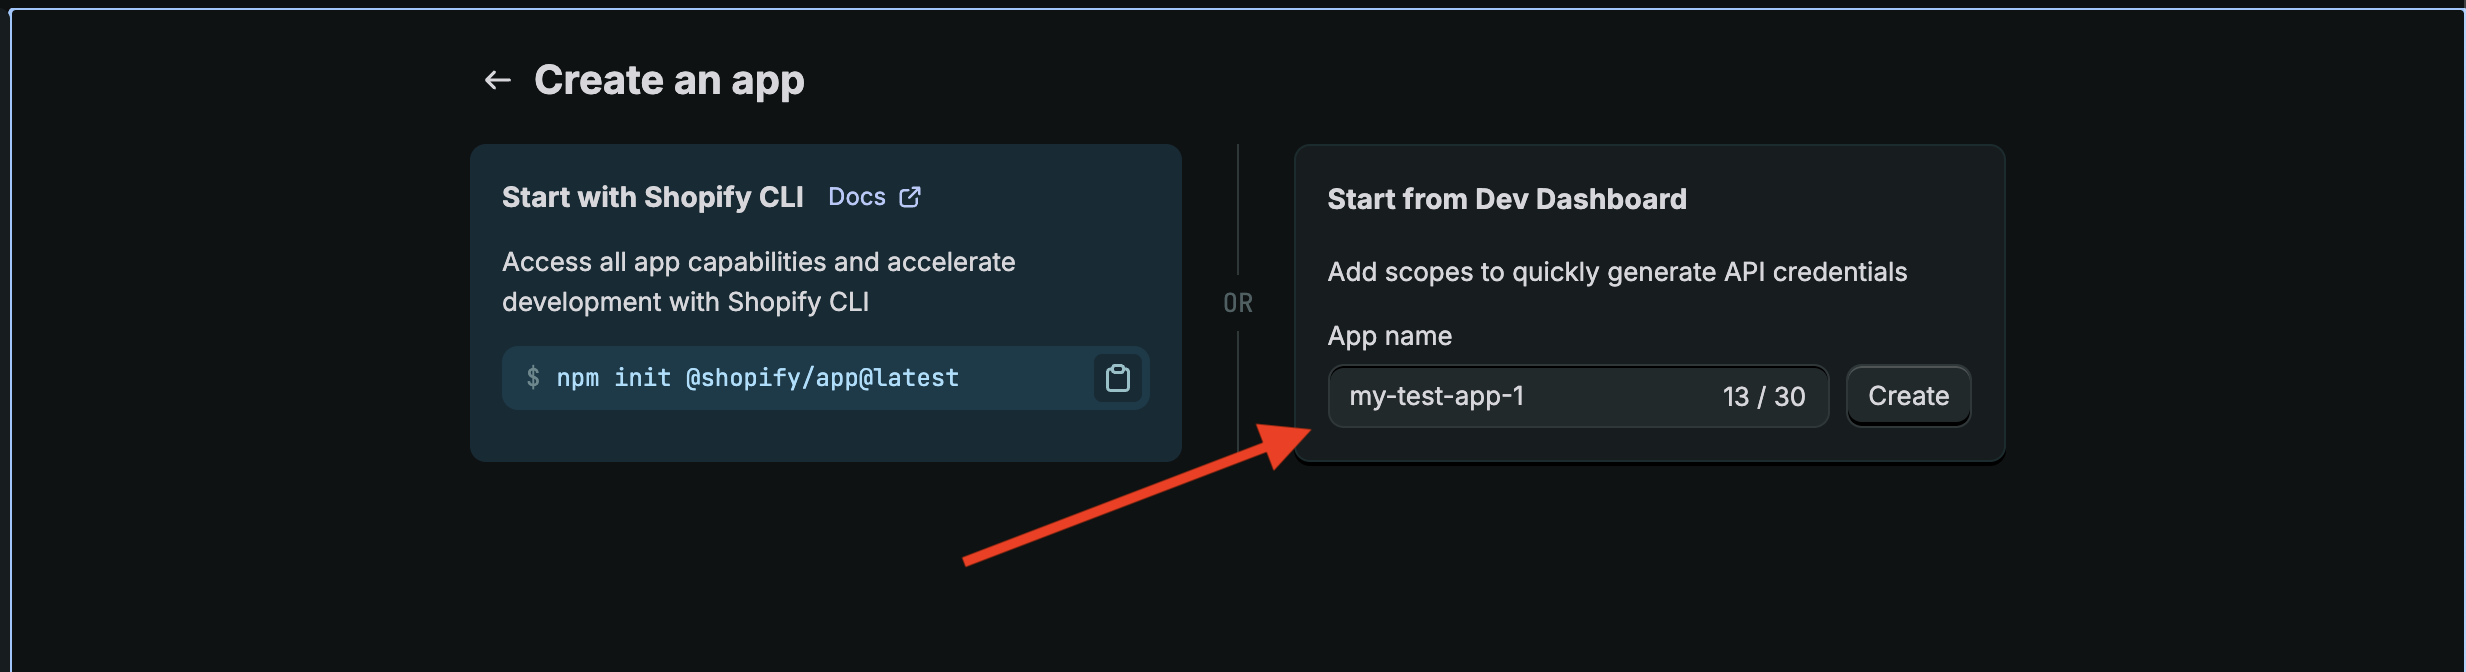
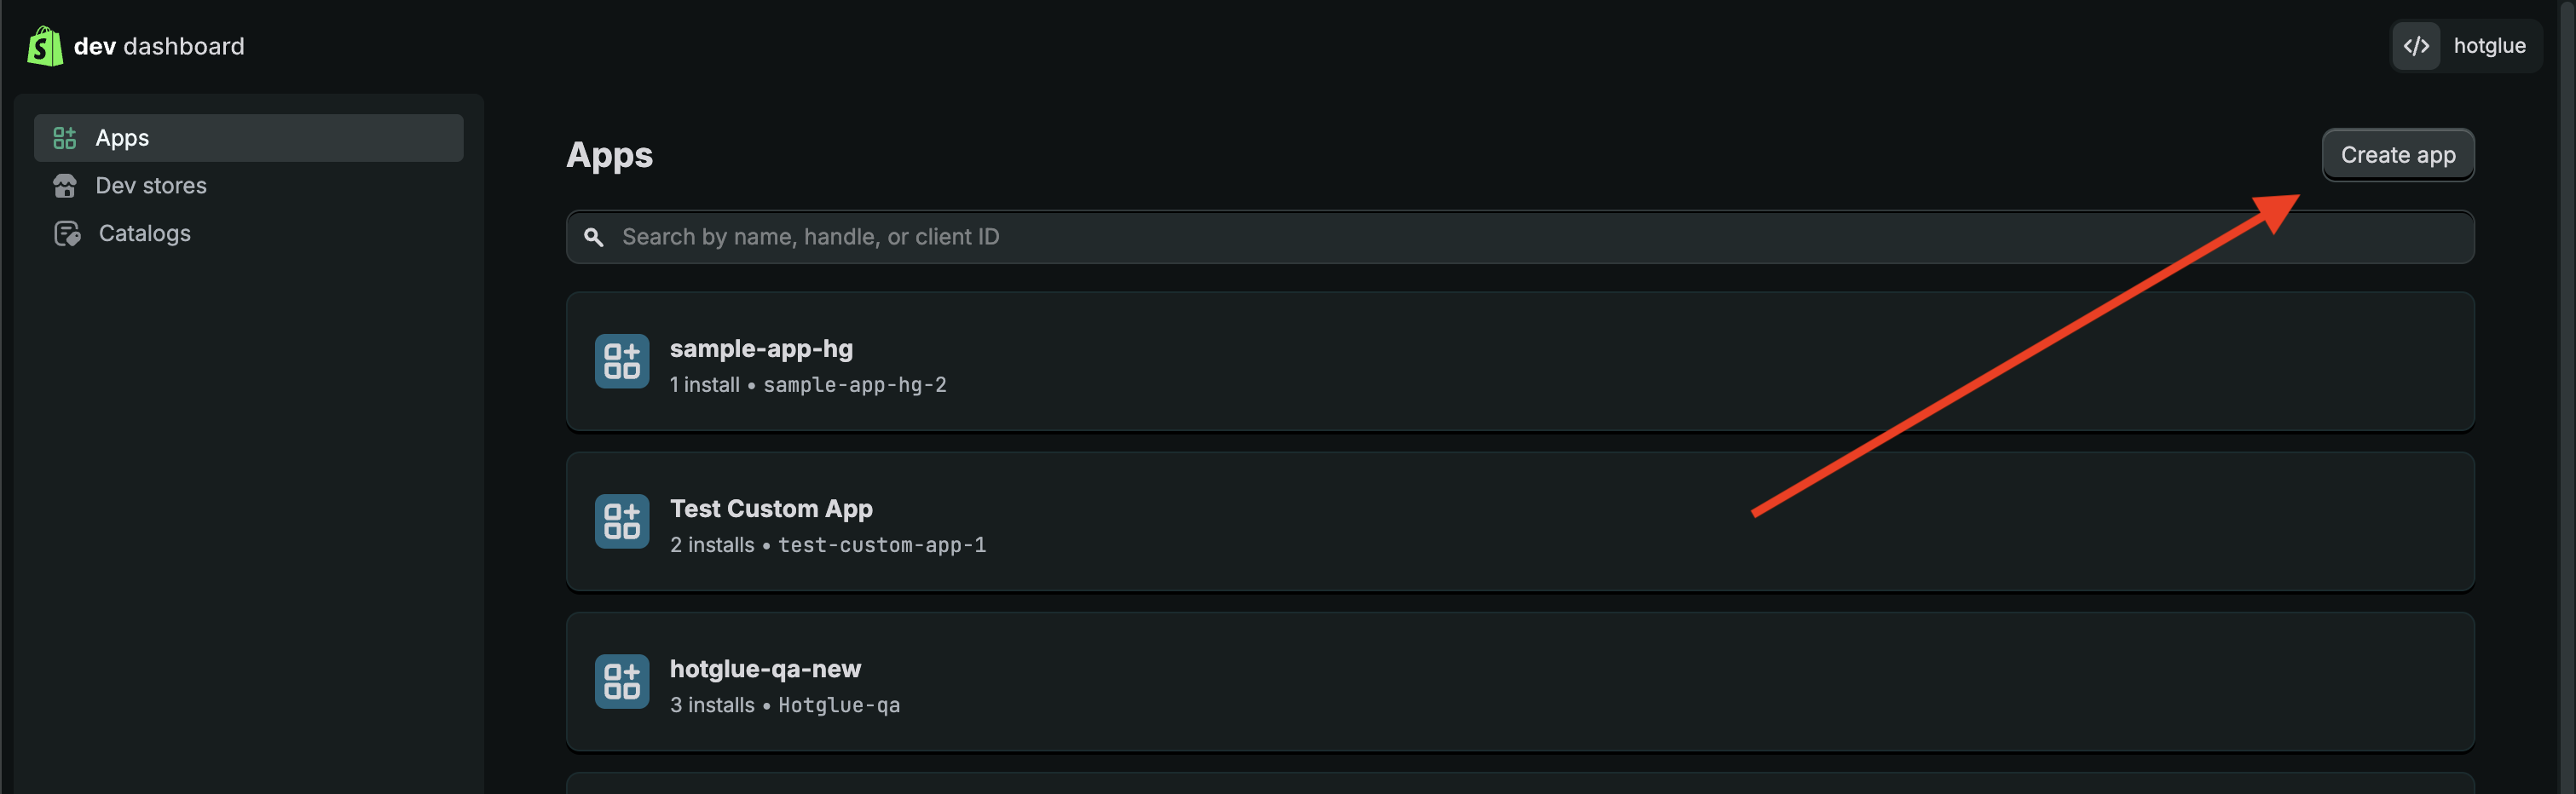 We will create the app directly in the dashboard – give your app a name.
 ### Configure distribution
Now we will set the app distribution settings. The easiest way to do this is to scroll down to the Access section, and click "Request access". This will redirect you to the Shopify Partner dashboard.
### Configure distribution
Now we will set the app distribution settings. The easiest way to do this is to scroll down to the Access section, and click "Request access". This will redirect you to the Shopify Partner dashboard.
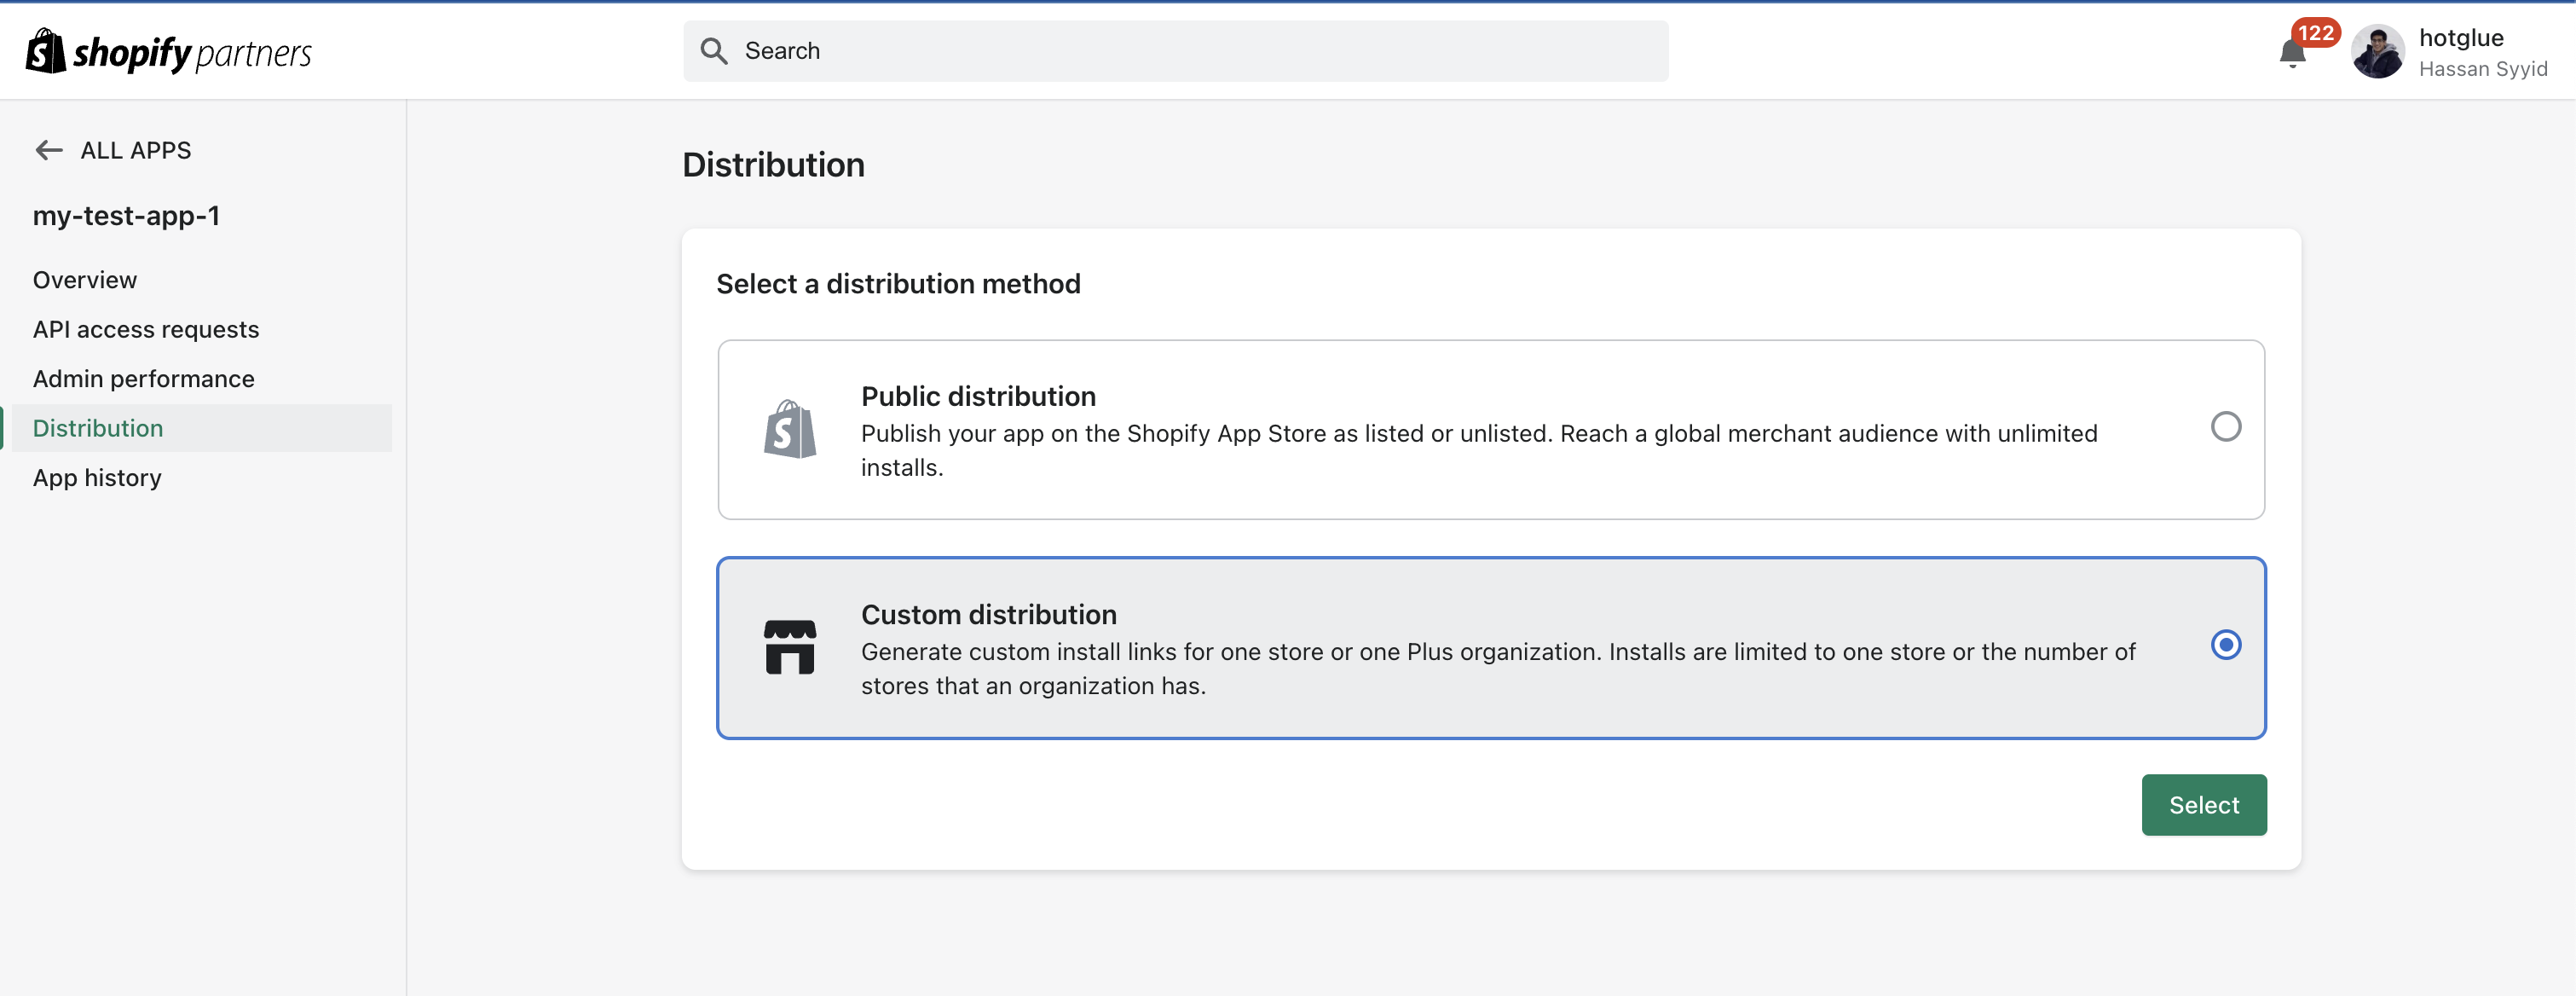
 Select Distribution in the left side nav. Choose Custom distribution and "Select" to continue.
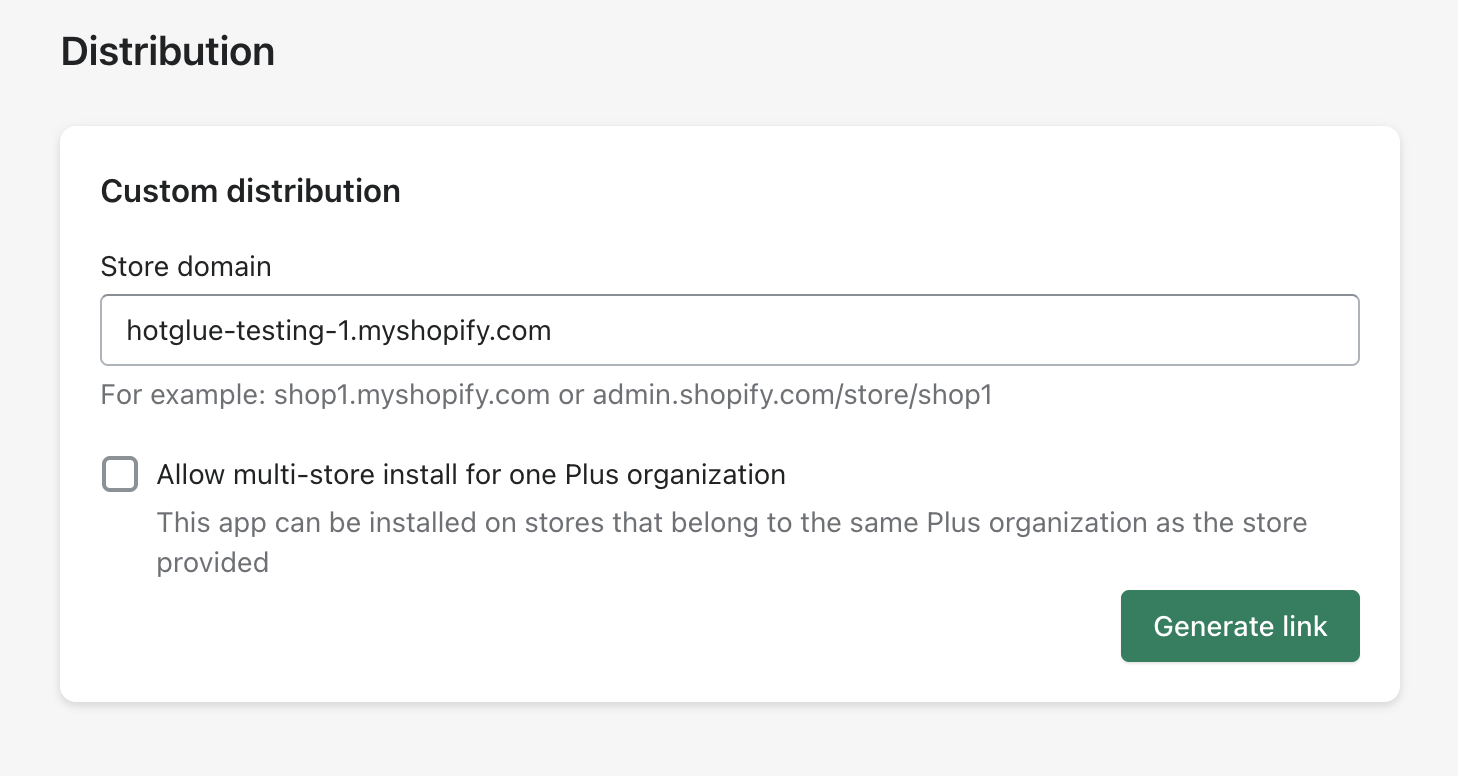
 This restricts your app to a single store. Input your store domain as requested. Click Generate Link.
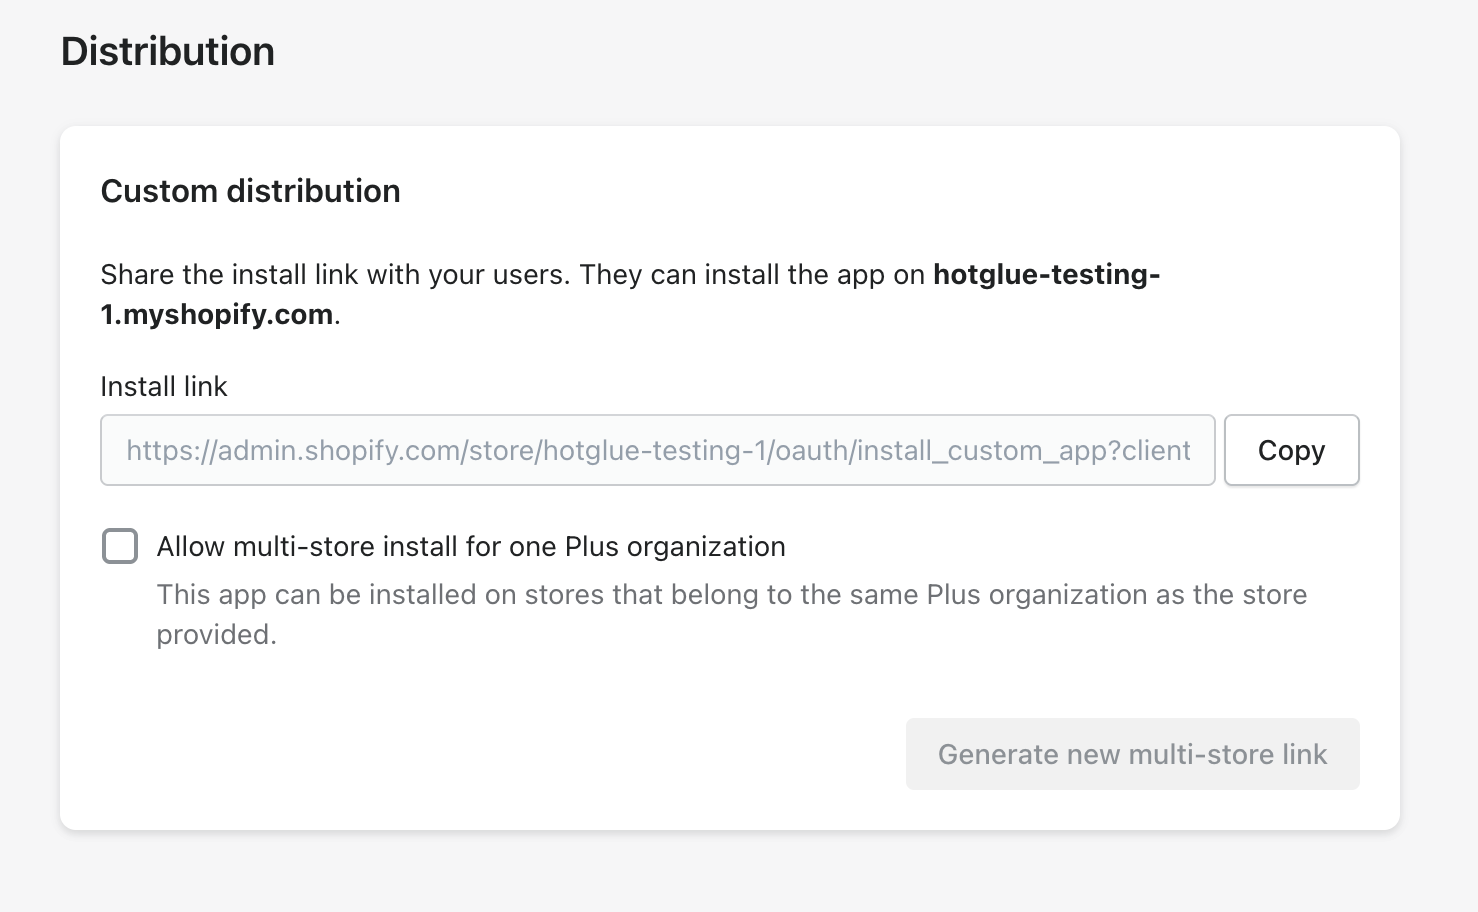
 You can now use the resulting link to install the app. We will do this after we select permissions. For now, just note it.
 ### Configure permissions
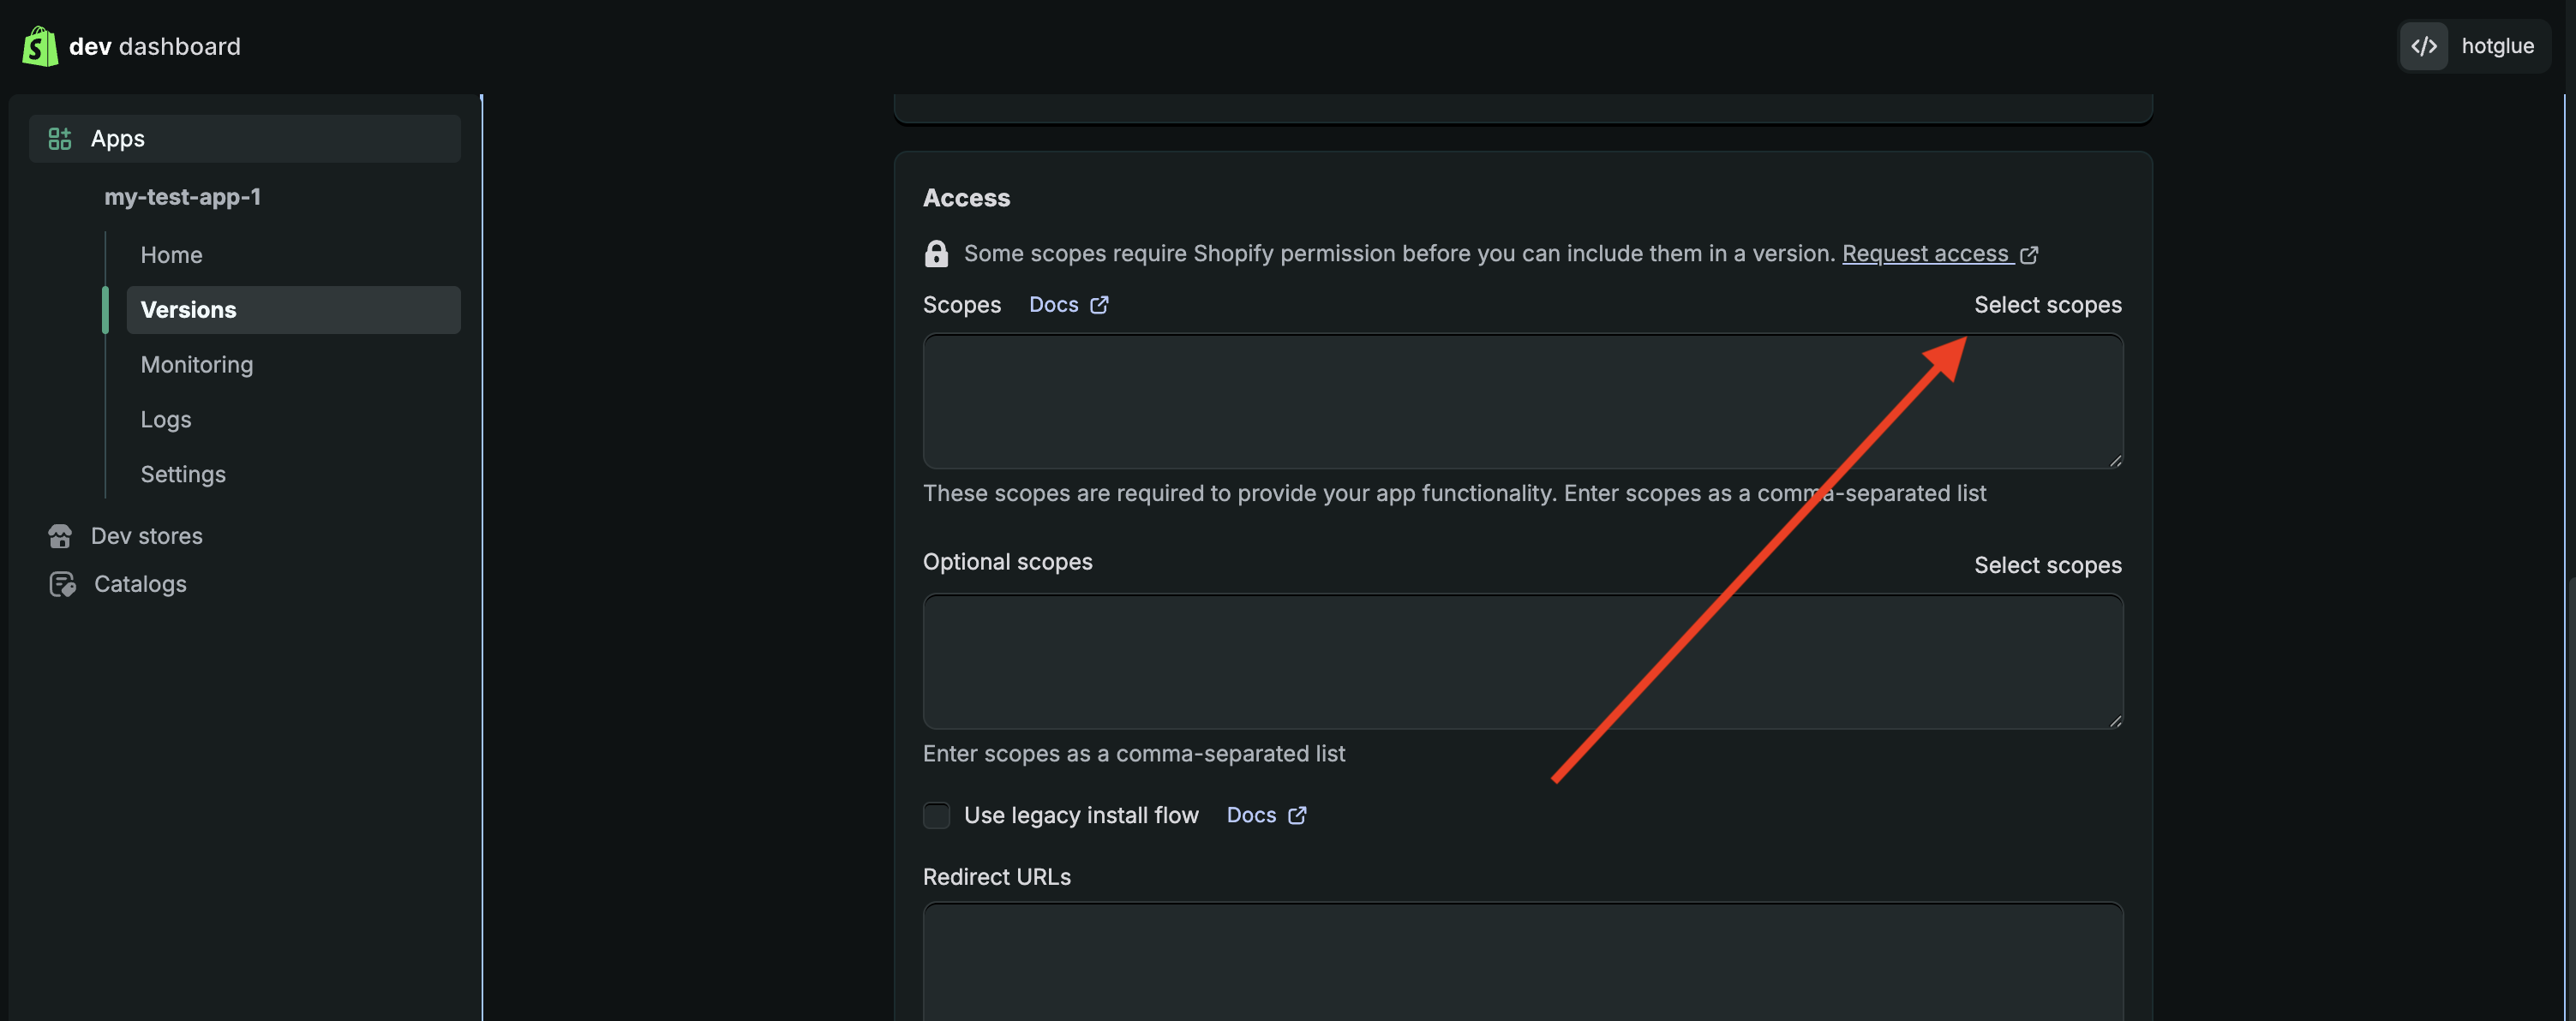
Now you need to enable permissions. Head back to the Shopify Dev Dashboard and scroll down to the Access section, and click "Select scopes"
### Configure permissions
Now you need to enable permissions. Head back to the Shopify Dev Dashboard and scroll down to the Access section, and click "Select scopes"
 From the resulting menu, select the relevant scopes.
If you plan to both read and write data with Shopify, make sure to enable **Read and write** access. Otherwise, **Read** access is sufficient.
From the resulting menu, select the relevant scopes.
If you plan to both read and write data with Shopify, make sure to enable **Read and write** access. Otherwise, **Read** access is sufficient.
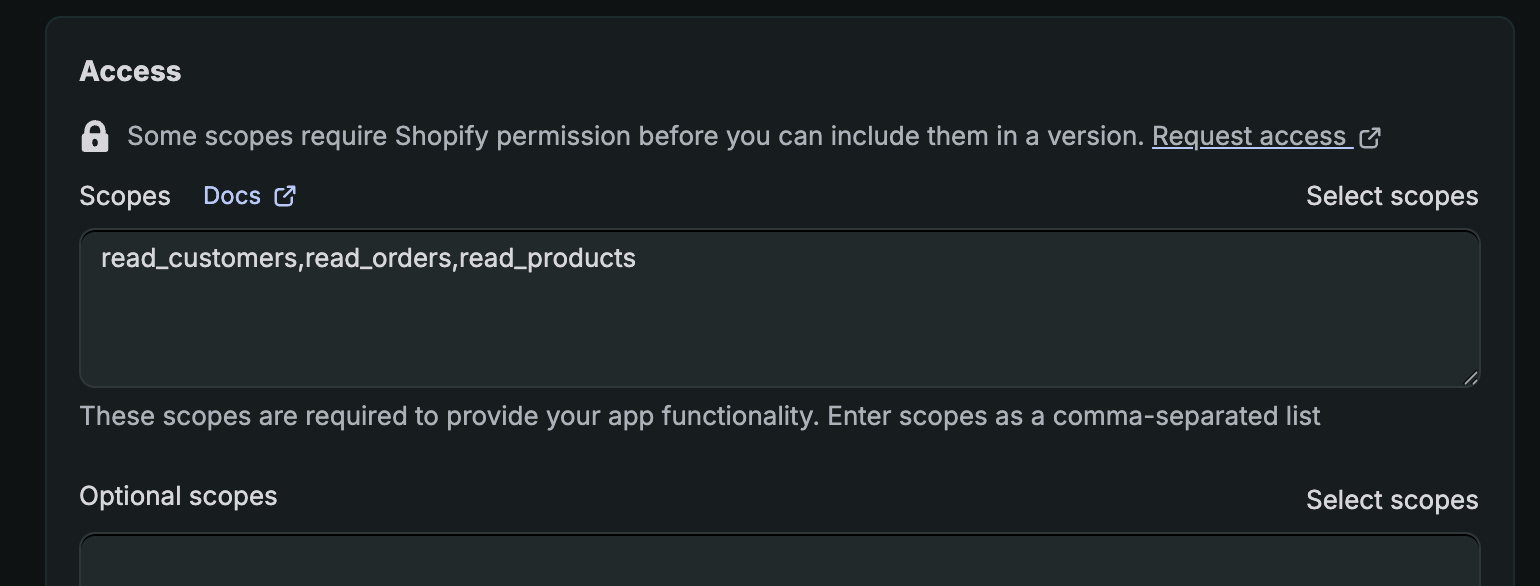
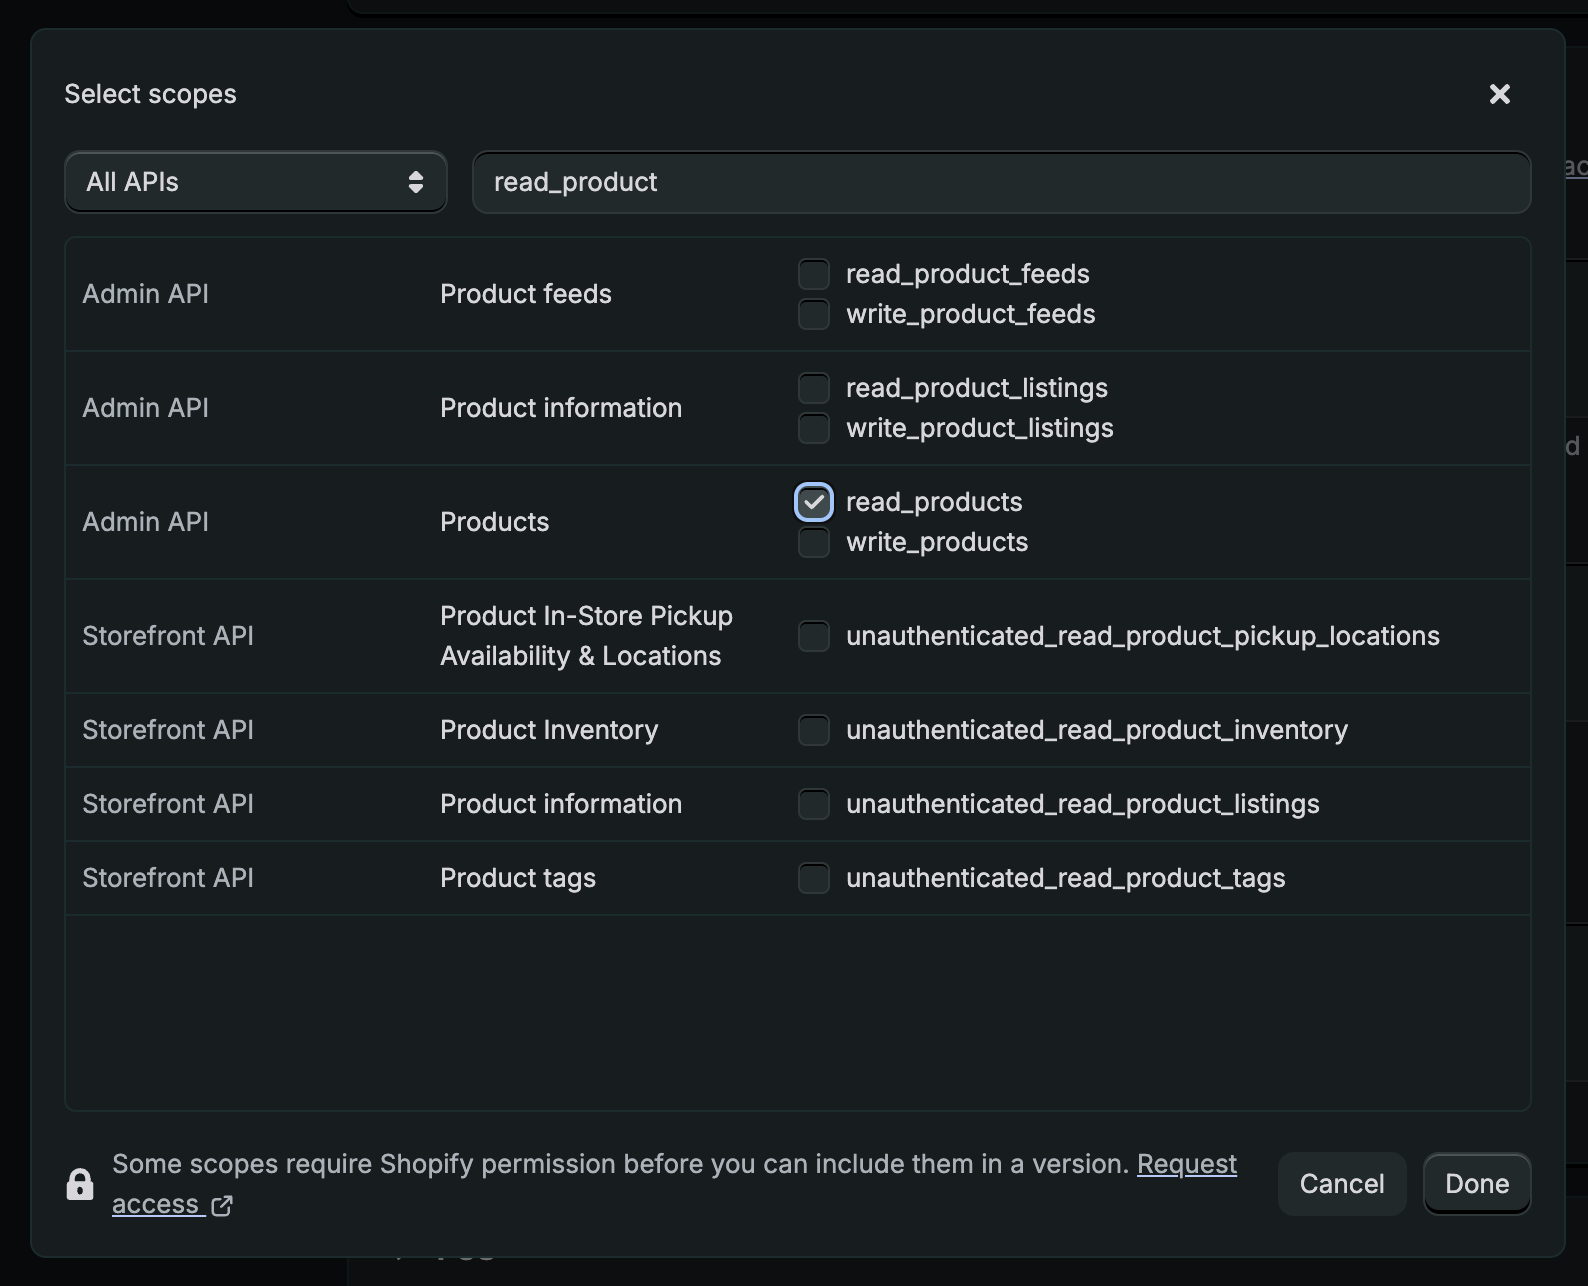 Once you select the relevant scopes, click Done. You should see the selected scopes listed in the Access section.
 ### Release
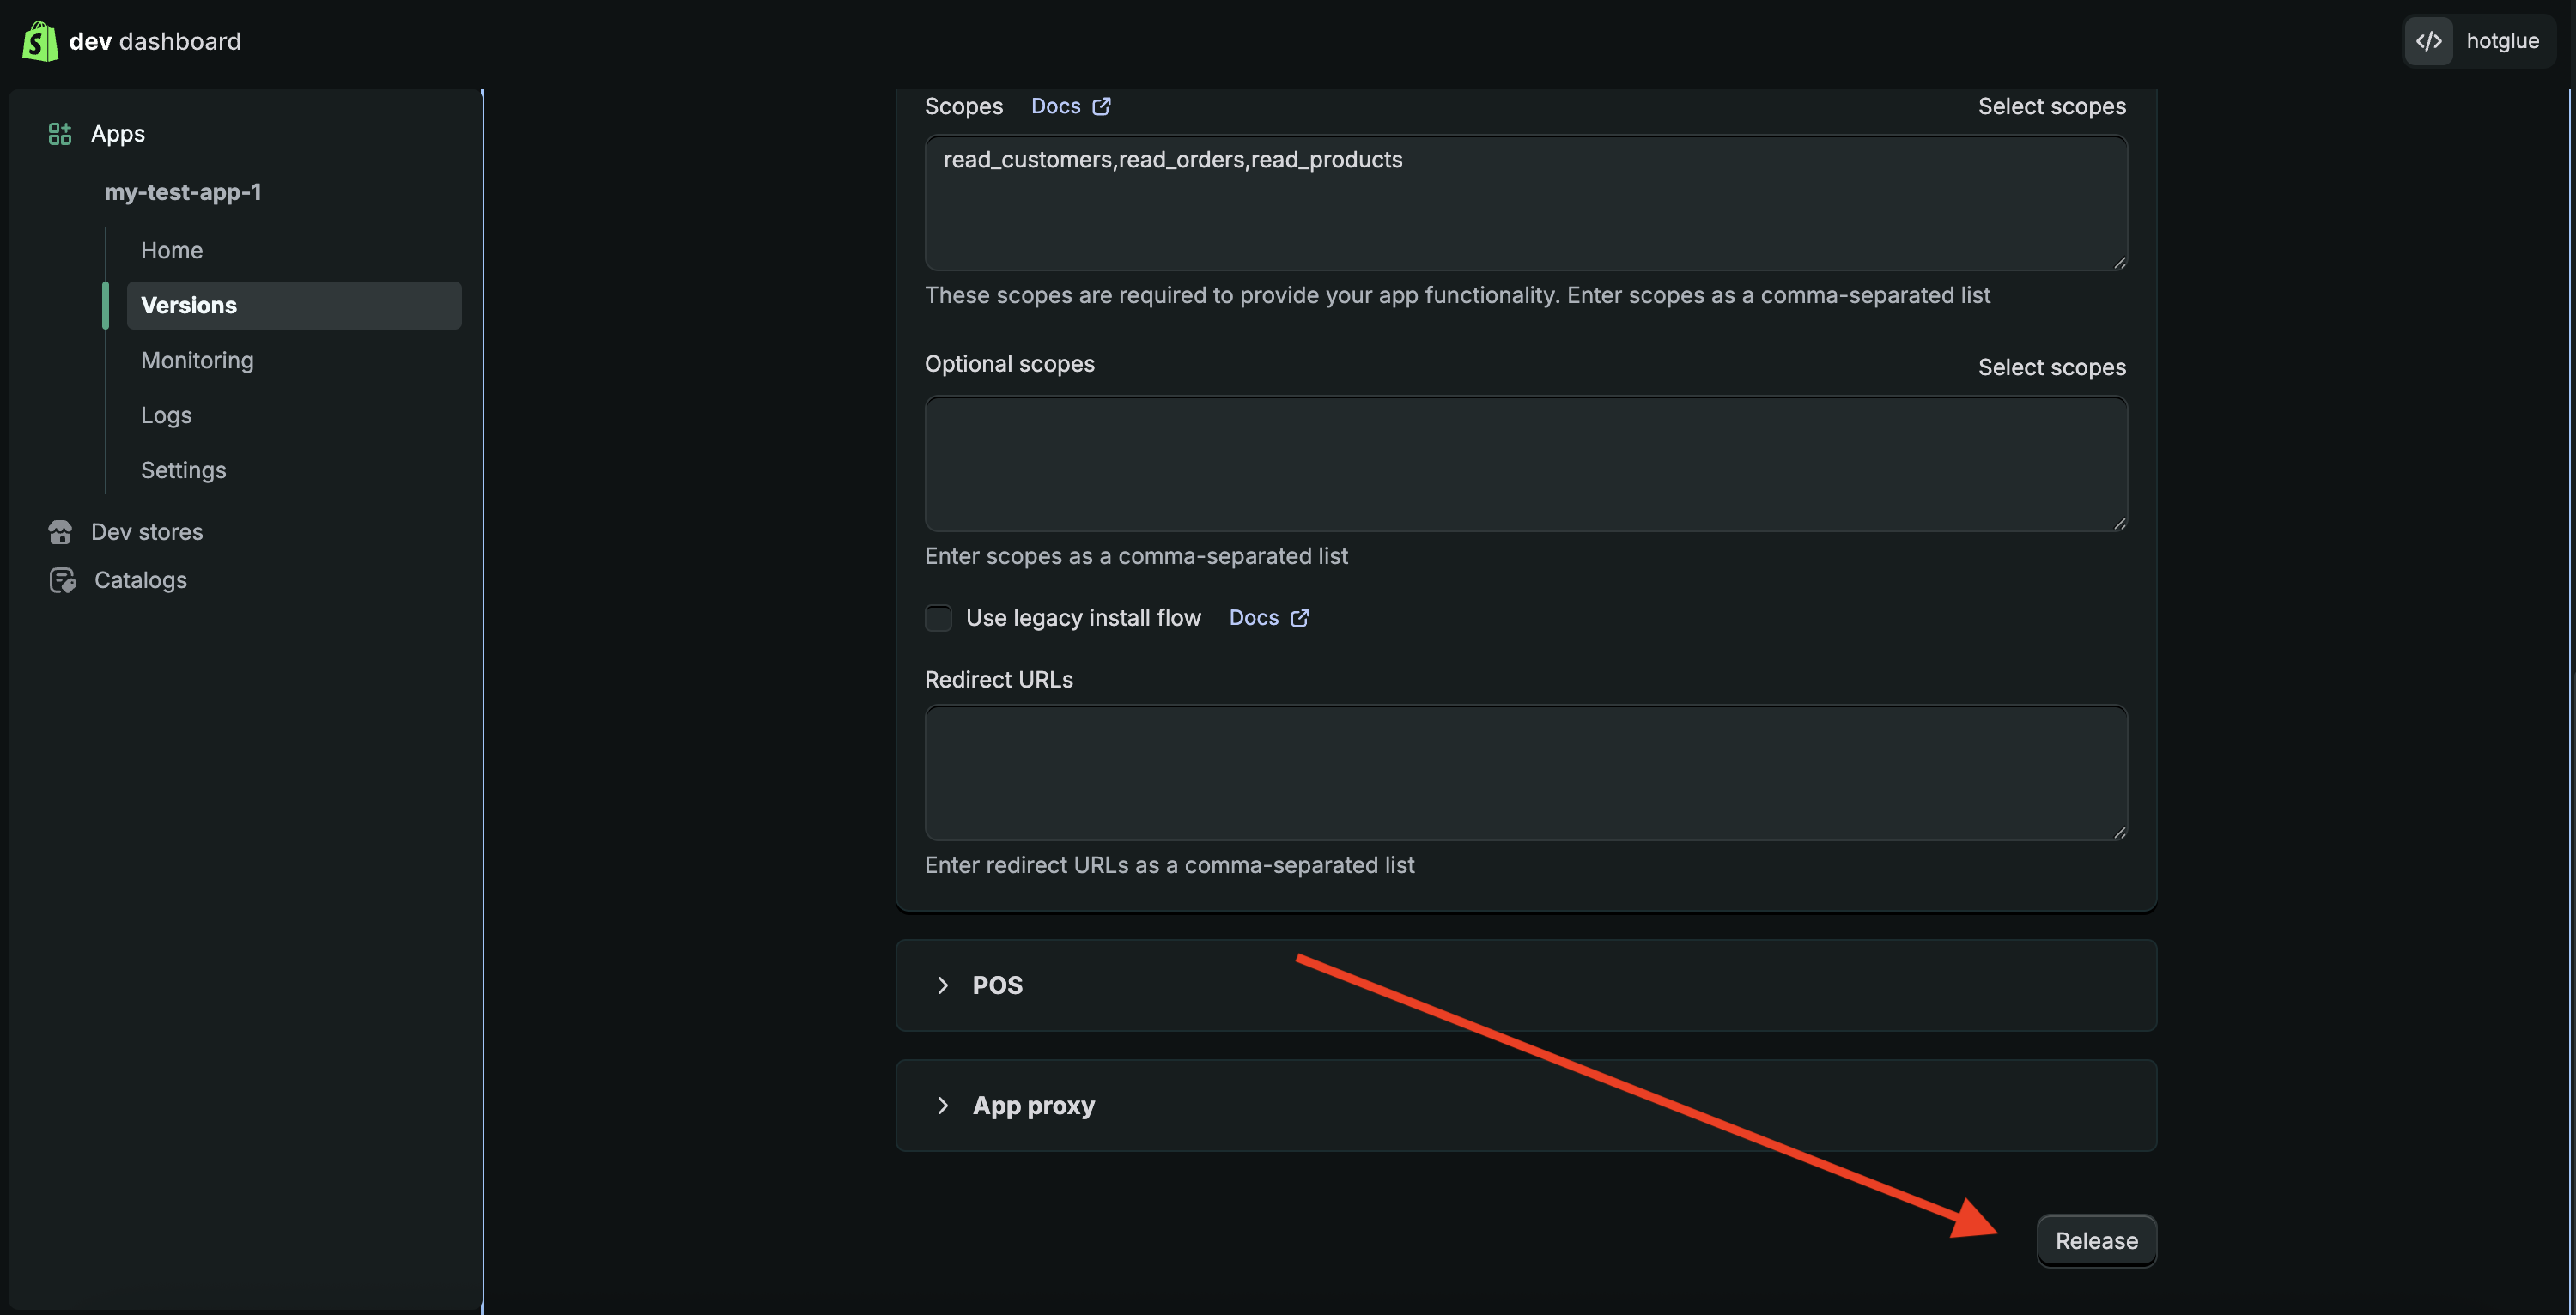
We will now click Release to save our first version of the app.
### Release
We will now click Release to save our first version of the app.
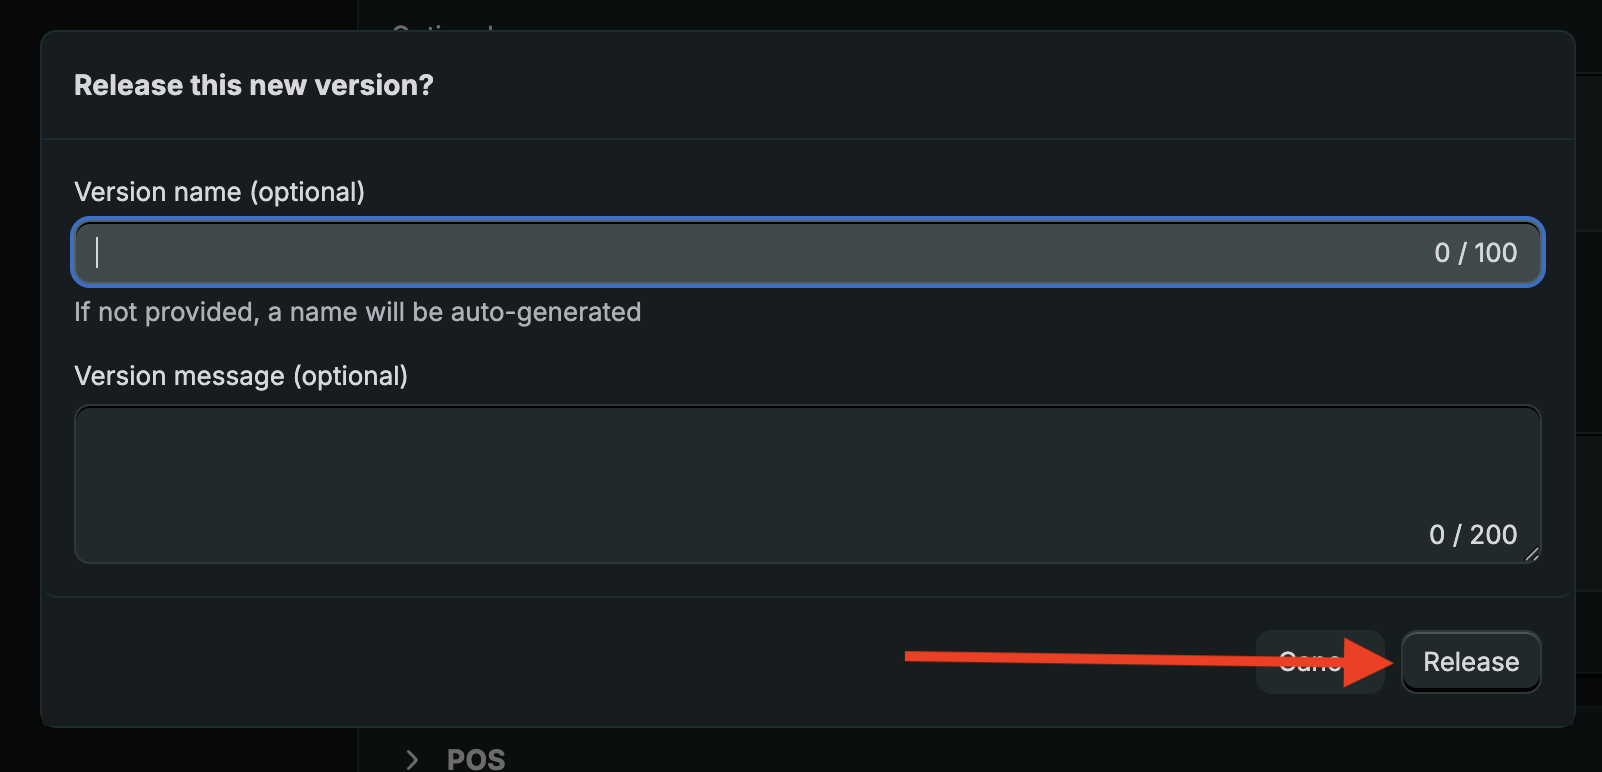
 You can leave the version name blank and confirm by clicking Release.
 ### Install the app
There are two ways to install this app. You can use the link we generated earlier, or directly in the Shopify Dev Dashboard you can click Home -> Install -> Select the store.
### Install the app
There are two ways to install this app. You can use the link we generated earlier, or directly in the Shopify Dev Dashboard you can click Home -> Install -> Select the store.
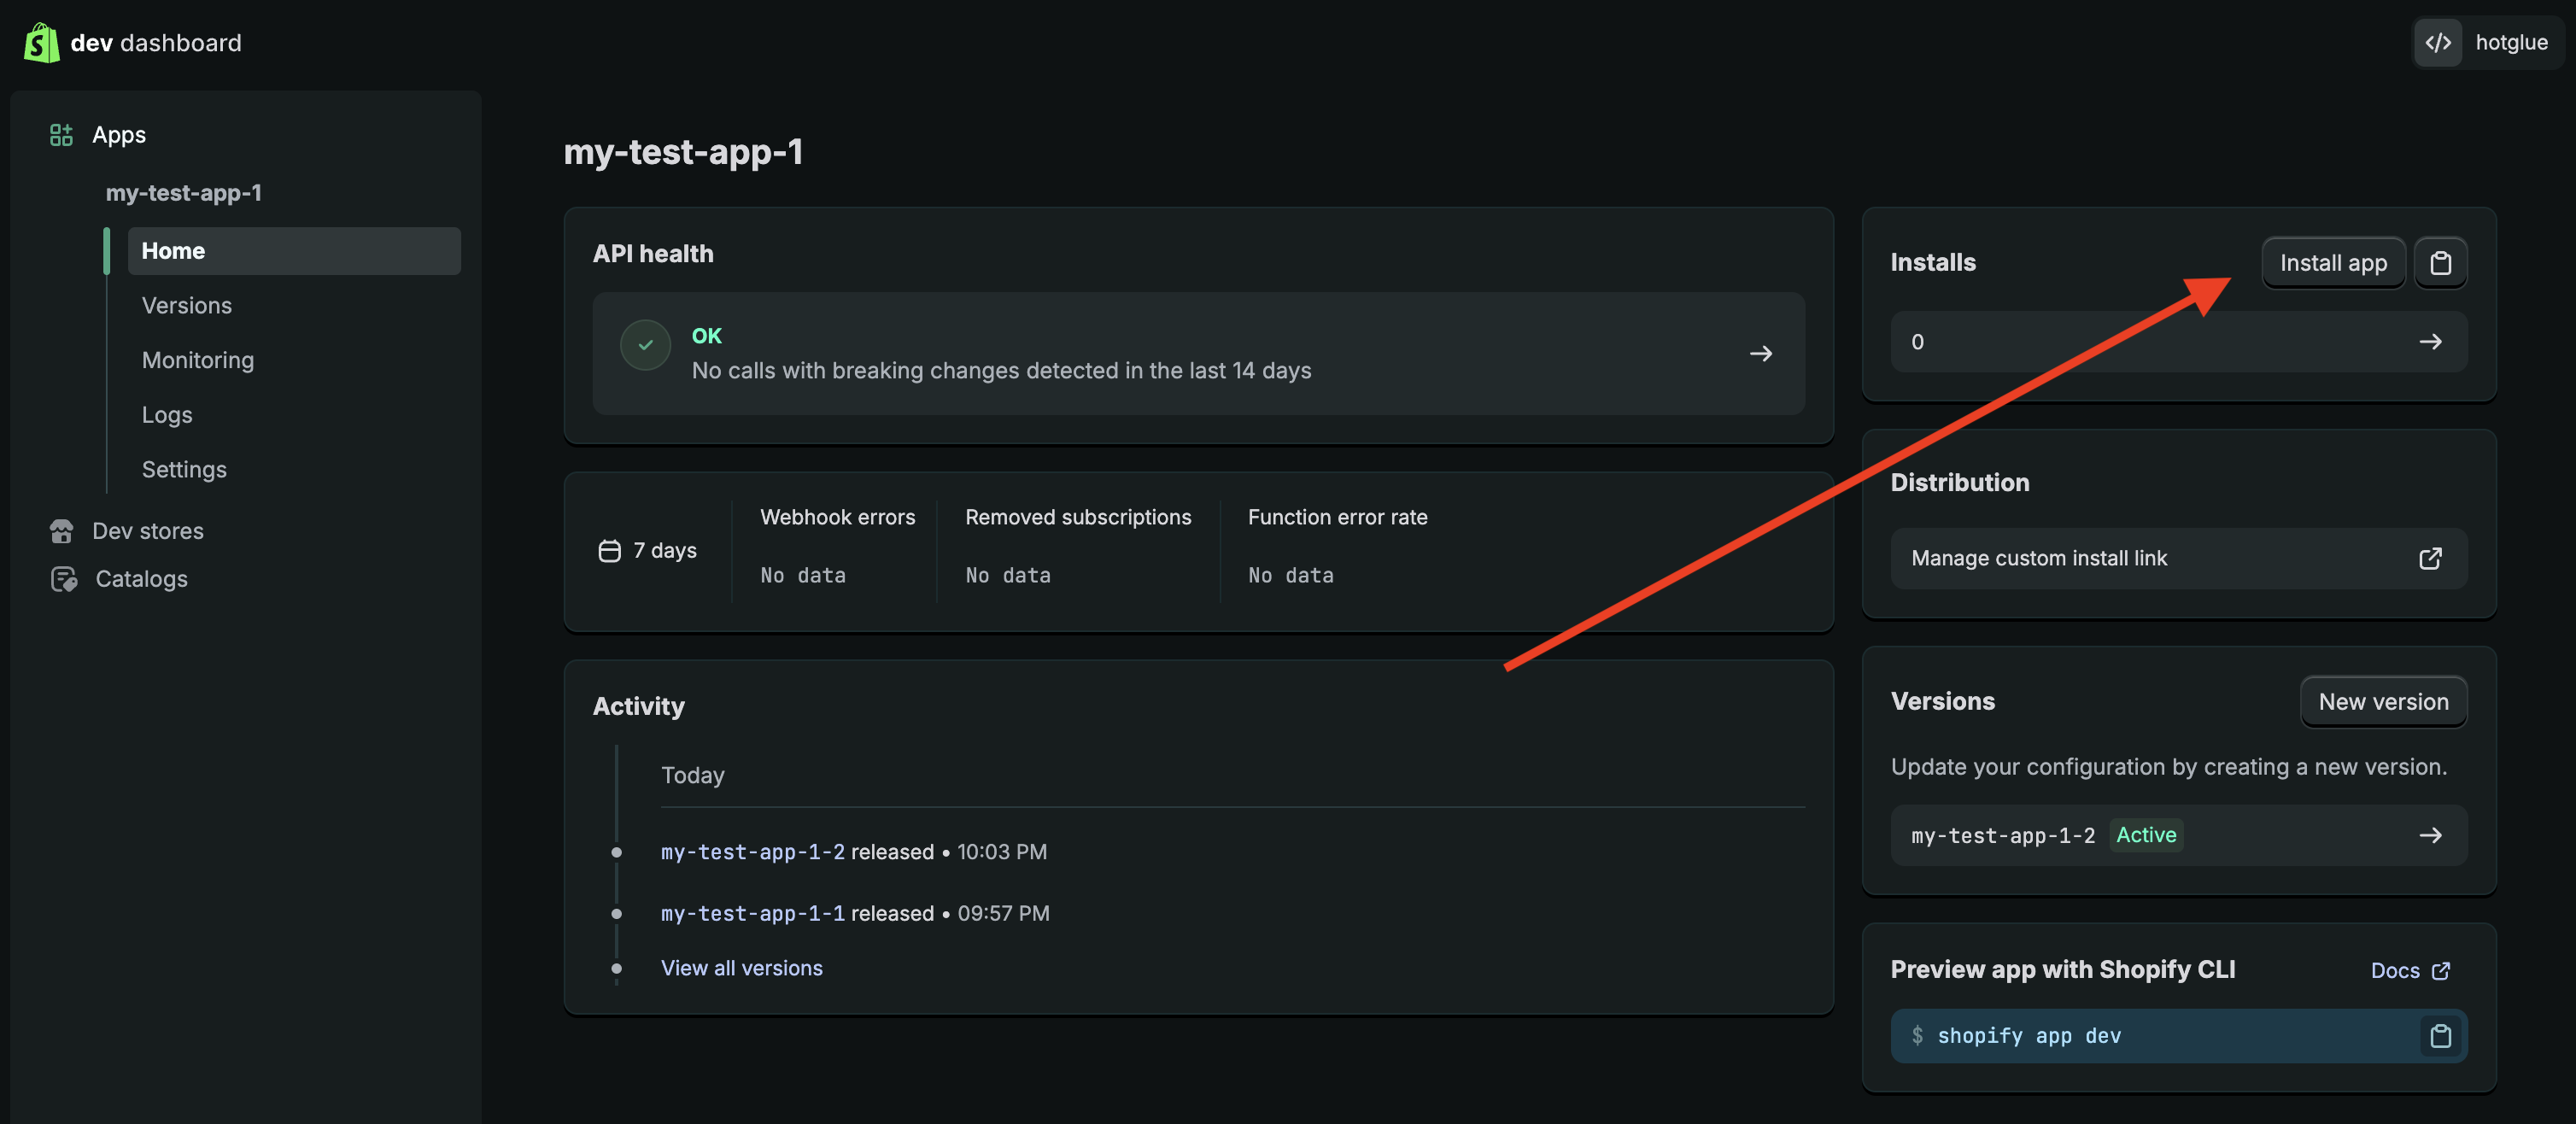 Once you go through this flow, the user will be prompted to grant the requested permissions:
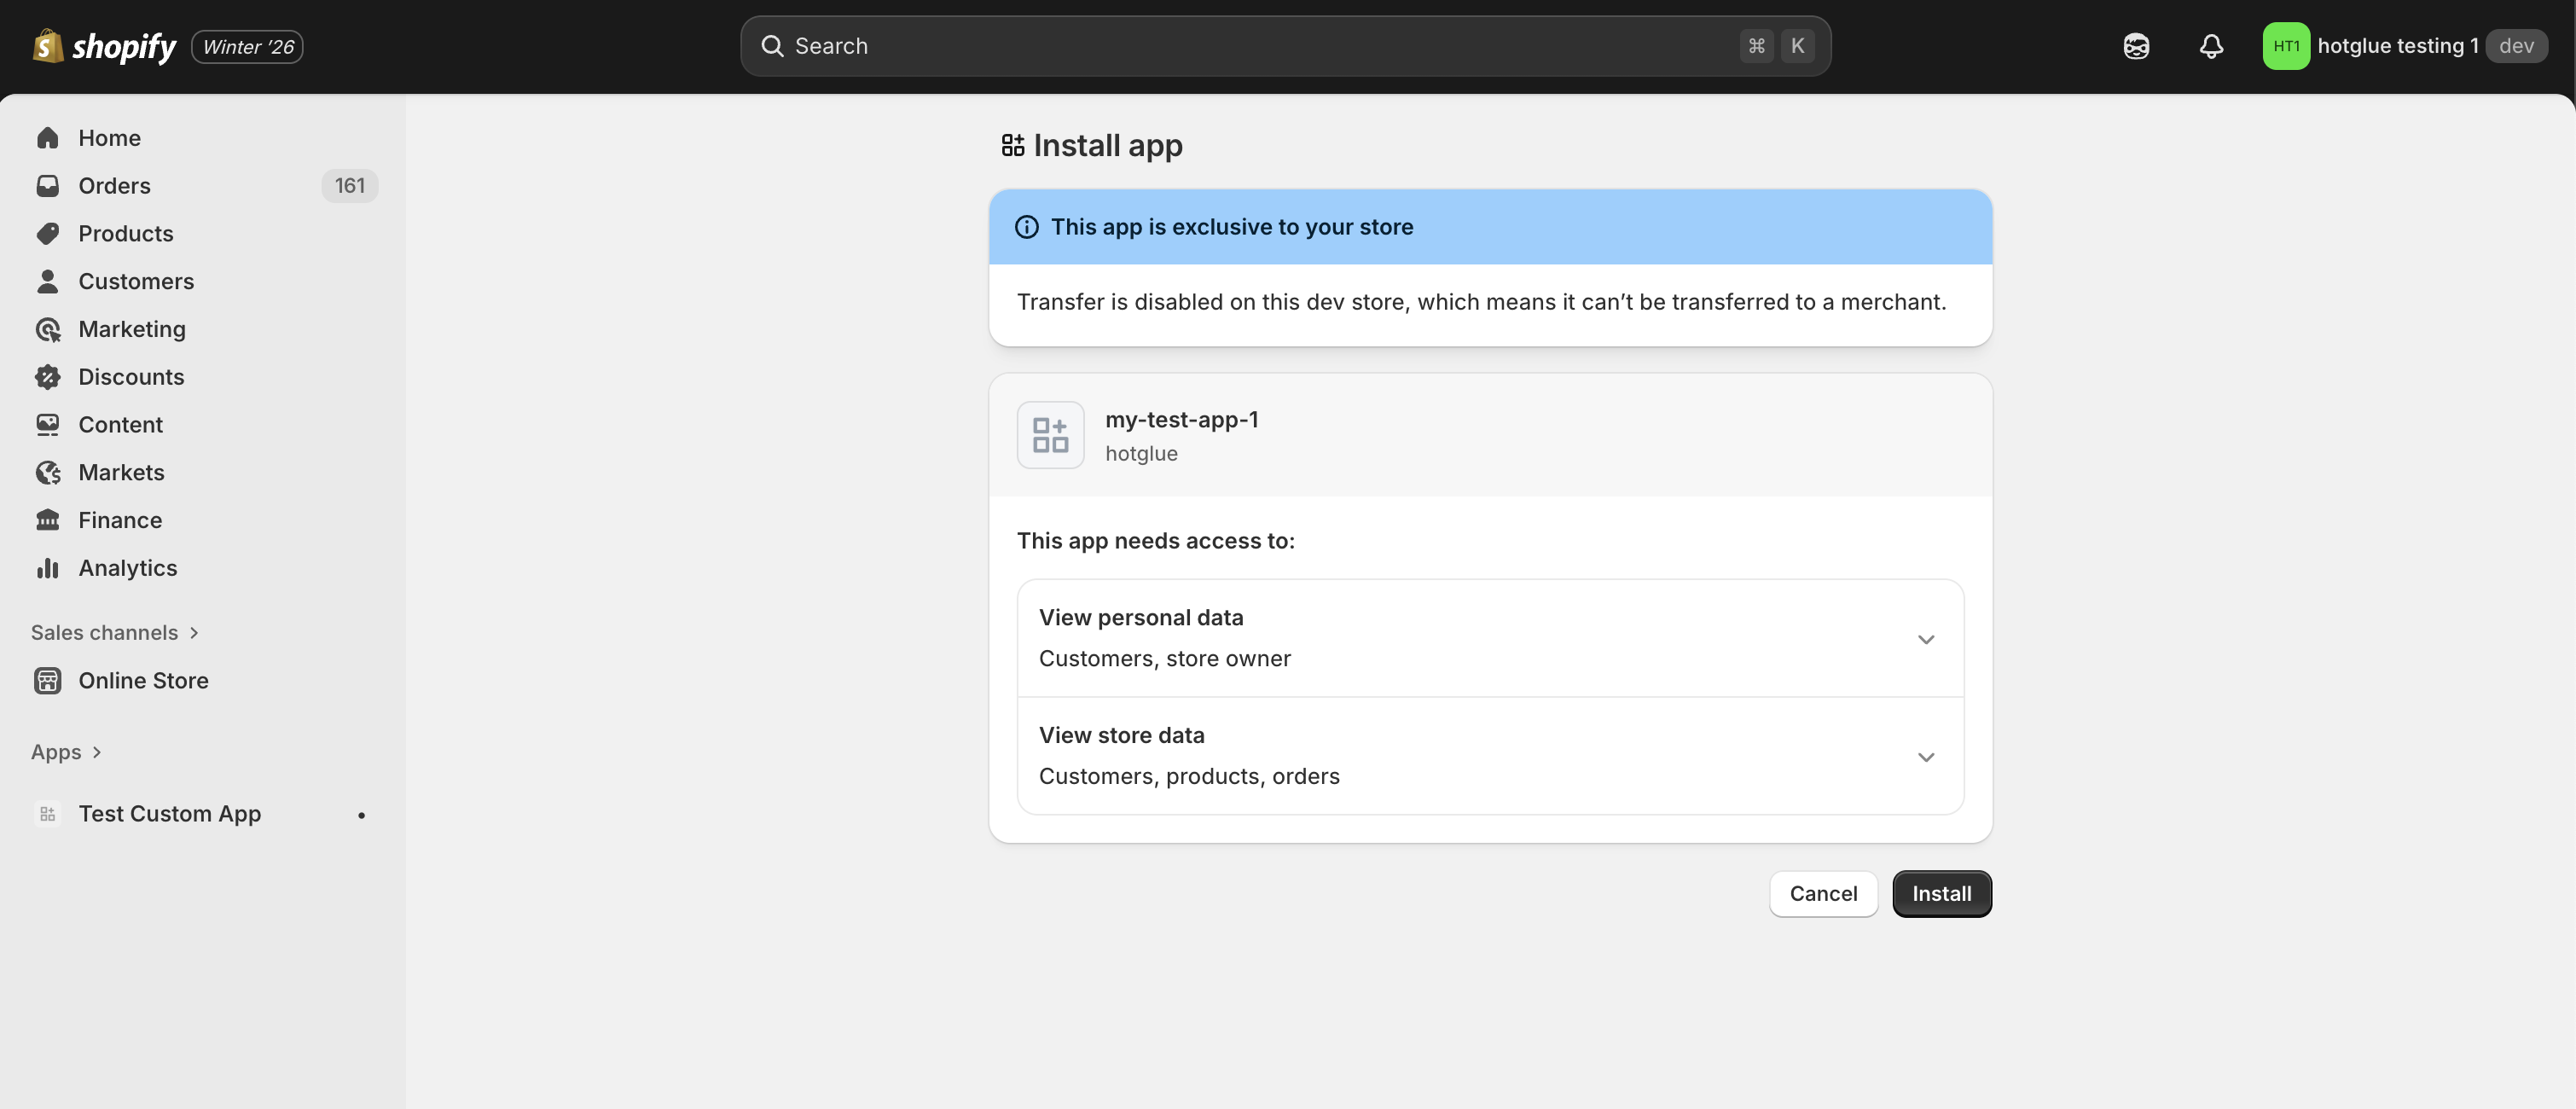 ### Get credentials
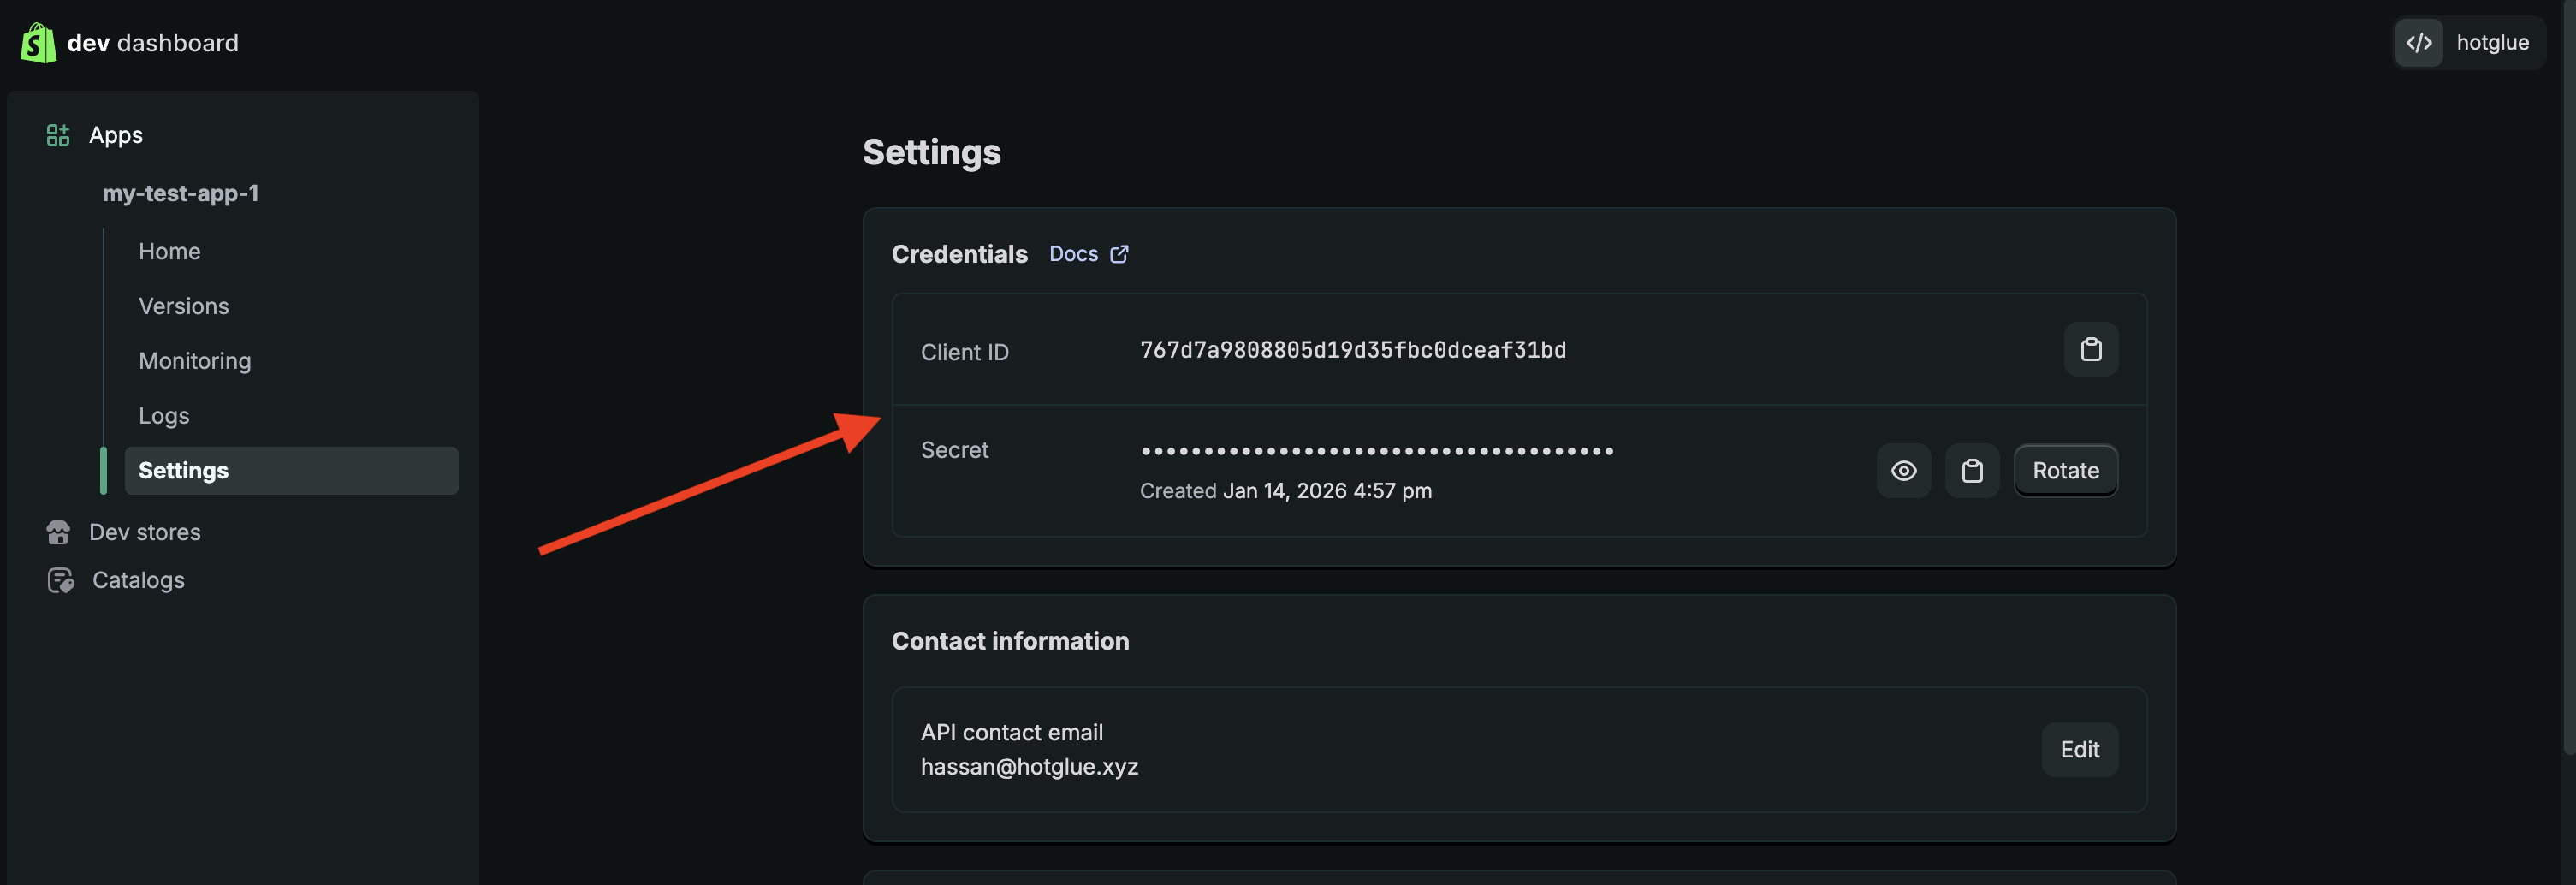
Now that the app is installed on the store, you can use the **Client Id** and **Client Secret** pair in Hotglue!
To view the **Client Id** and **Client Secret** of our new app click on Settings in the left side nav.
### Get credentials
Now that the app is installed on the store, you can use the **Client Id** and **Client Secret** pair in Hotglue!
To view the **Client Id** and **Client Secret** of our new app click on Settings in the left side nav.
 # Tap Changelog
| Version | Notes |
| :------------------------------------------------------------------------------------------------------ | :--------------------------------------------------------------------------------- |
| [v1.4.13](https://github.com/hotgluexyz/tap-shopify/releases/tag/v1.4.13) | |
| [v1.4.12](https://github.com/hotgluexyz/tap-shopify/releases/tag/v1.4.12) | |
| | |
| [v1.4.10](https://github.com/hotgluexyz/tap-shopify/releases/tag/v1.4.10) | |
| [v1.4.9](https://github.com/hotgluexyz/tap-shopify/releases/tag/v1.4.9) | |
| [v1.4.8](https://github.com/hotgluexyz/tap-shopify/releases/tag/v1.4.8) | |
| [v1.4.7](https://github.com/hotgluexyz/tap-shopify/releases/tag/v1.4.7) | |
| [v1.4.6](https://github.com/hotgluexyz/tap-shopify/releases/tag/v1.4.6) | |
| [v1.4.5](https://github.com/hotgluexyz/tap-shopify/releases/tag/v1.4.5) | - Update retry logic |
| [v1.4.4](https://github.com/hotgluexyz/tap-shopify/releases/tag/v1.4.4) | - Add new streams
# Tap Changelog
| Version | Notes |
| :------------------------------------------------------------------------------------------------------ | :--------------------------------------------------------------------------------- |
| [v1.4.13](https://github.com/hotgluexyz/tap-shopify/releases/tag/v1.4.13) | |
| [v1.4.12](https://github.com/hotgluexyz/tap-shopify/releases/tag/v1.4.12) | |
| | |
| [v1.4.10](https://github.com/hotgluexyz/tap-shopify/releases/tag/v1.4.10) | |
| [v1.4.9](https://github.com/hotgluexyz/tap-shopify/releases/tag/v1.4.9) | |
| [v1.4.8](https://github.com/hotgluexyz/tap-shopify/releases/tag/v1.4.8) | |
| [v1.4.7](https://github.com/hotgluexyz/tap-shopify/releases/tag/v1.4.7) | |
| [v1.4.6](https://github.com/hotgluexyz/tap-shopify/releases/tag/v1.4.6) | |
| [v1.4.5](https://github.com/hotgluexyz/tap-shopify/releases/tag/v1.4.5) | - Update retry logic |
| [v1.4.4](https://github.com/hotgluexyz/tap-shopify/releases/tag/v1.4.4) | - Add new streams
- Optimize tap performance |
| [v1.4.3 - Add shop stream](https://github.com/hotgluexyz/tap-shopify/releases/tag/v1.4.3) | - Added `shop` stream |
| [v1.4.2 - Add support for incoming](https://github.com/hotgluexyz/tap-shopify/releases/tag/v1.4.2) | Added support for `incoming` orders |
| [v1.4.1 - Add support for access\_token](https://github.com/hotgluexyz/tap-shopify/releases/tag/v1.4.1) | Added support to use the key `access_token` in the config in addition to `api_key` |