Getting Started
The Connector Builder is a great way to build taps without writing any code! We highly recommend starting with the walkthrough below:Open the builder
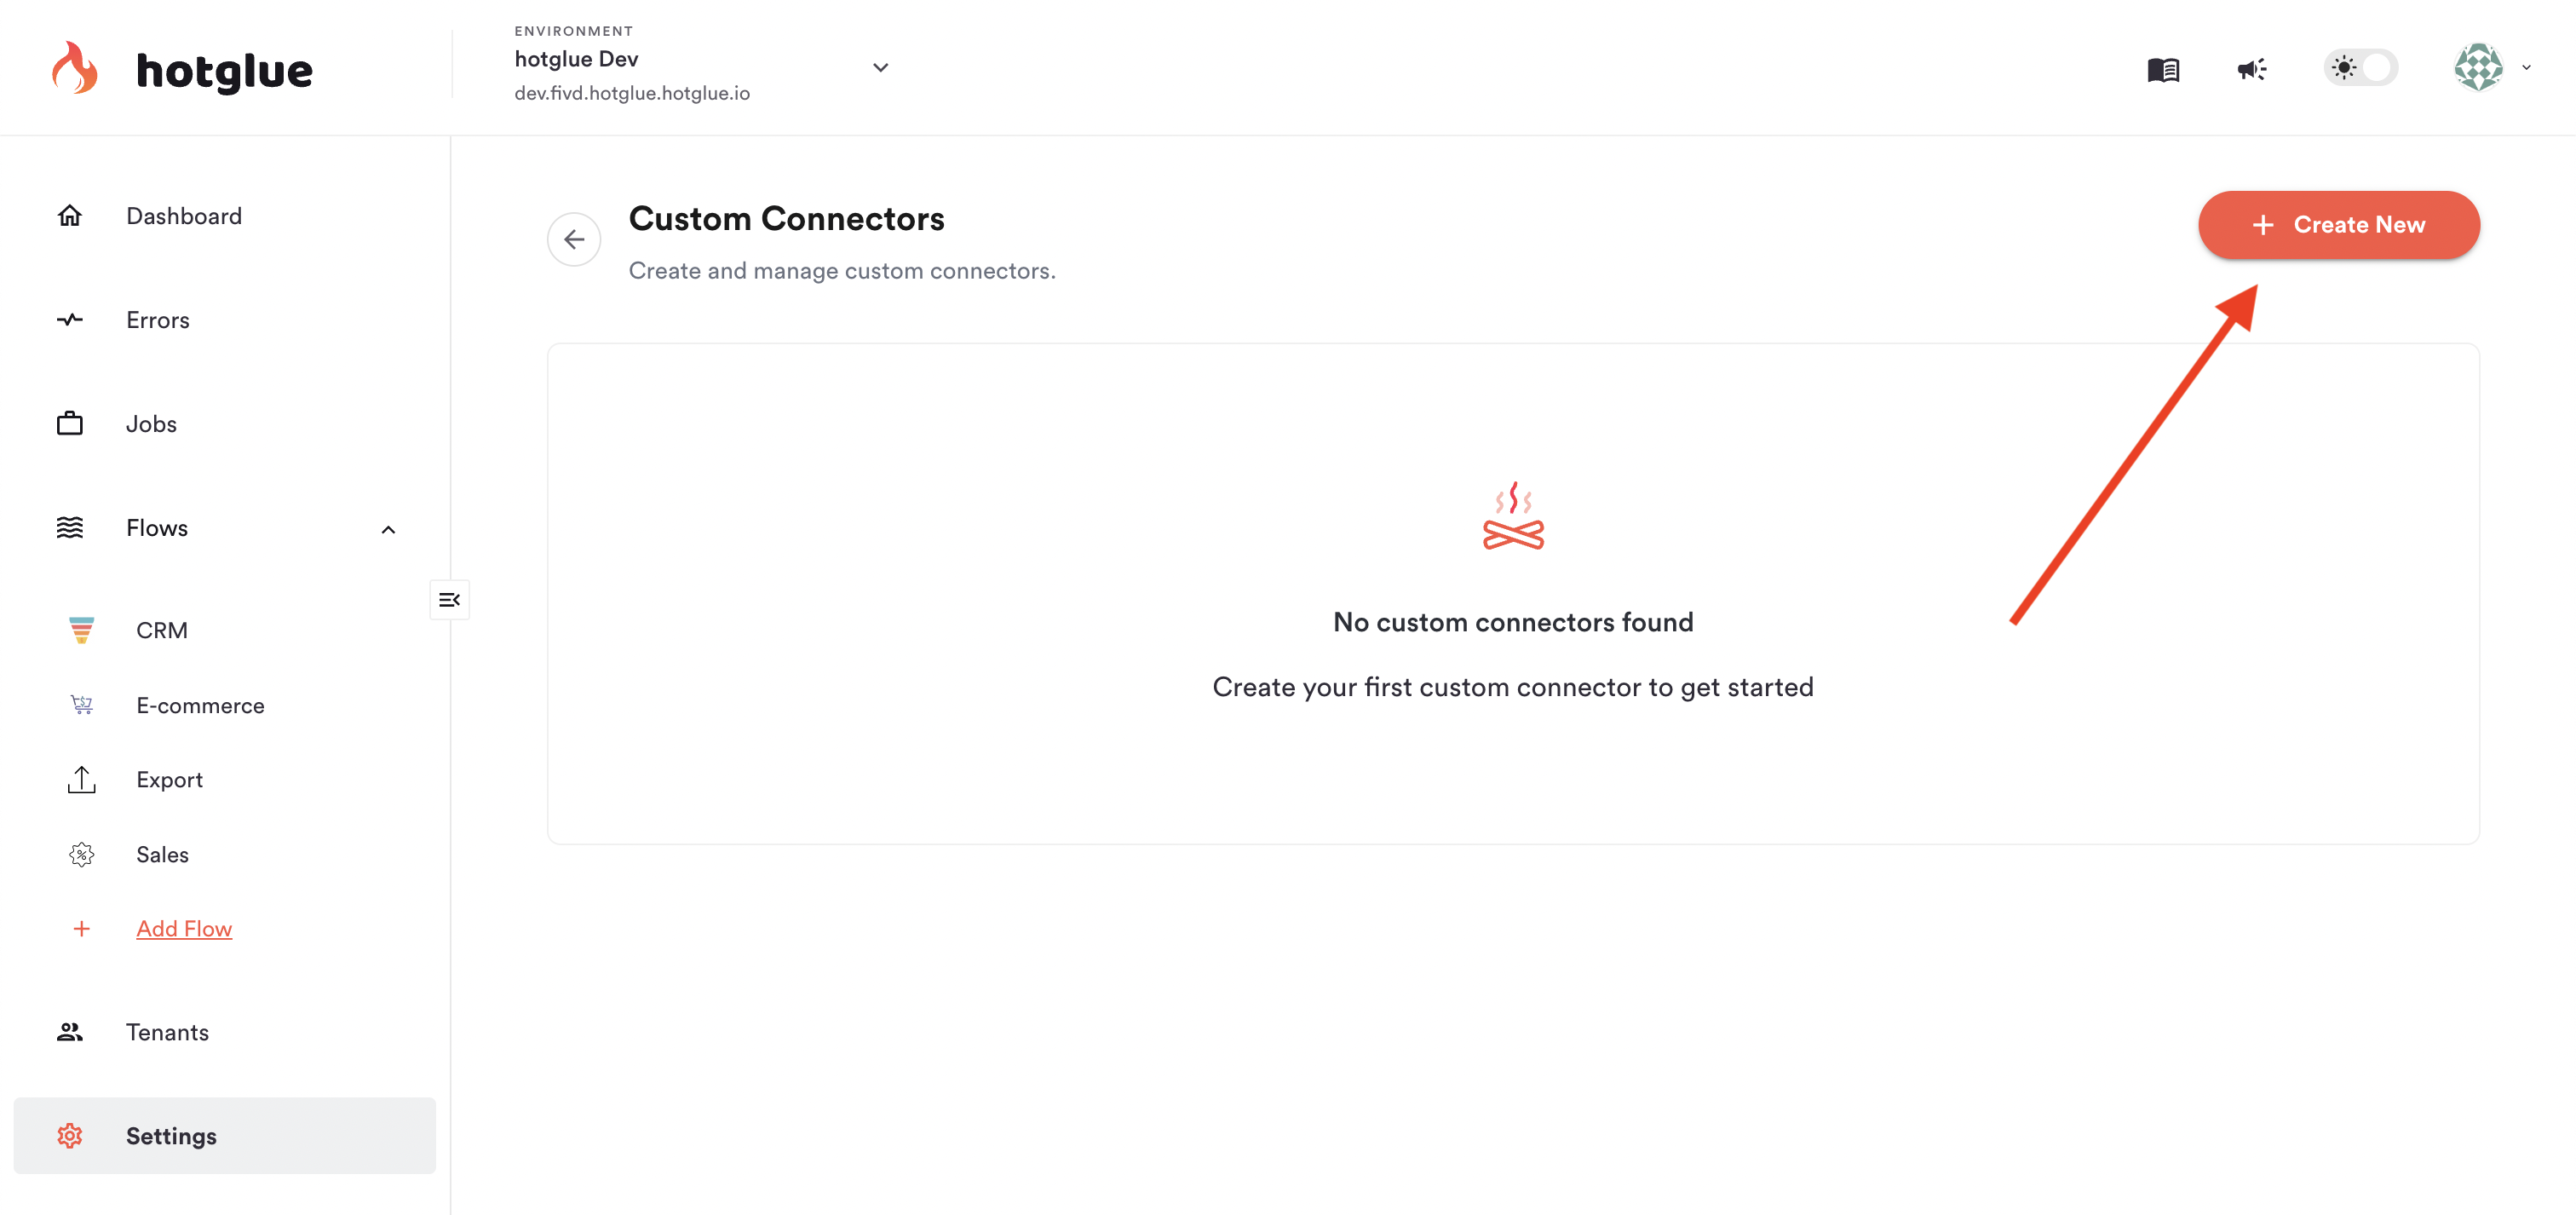
To open the Connector Builder, head to your Environment Settings -> Connectors -> Build a Connector, as shown below: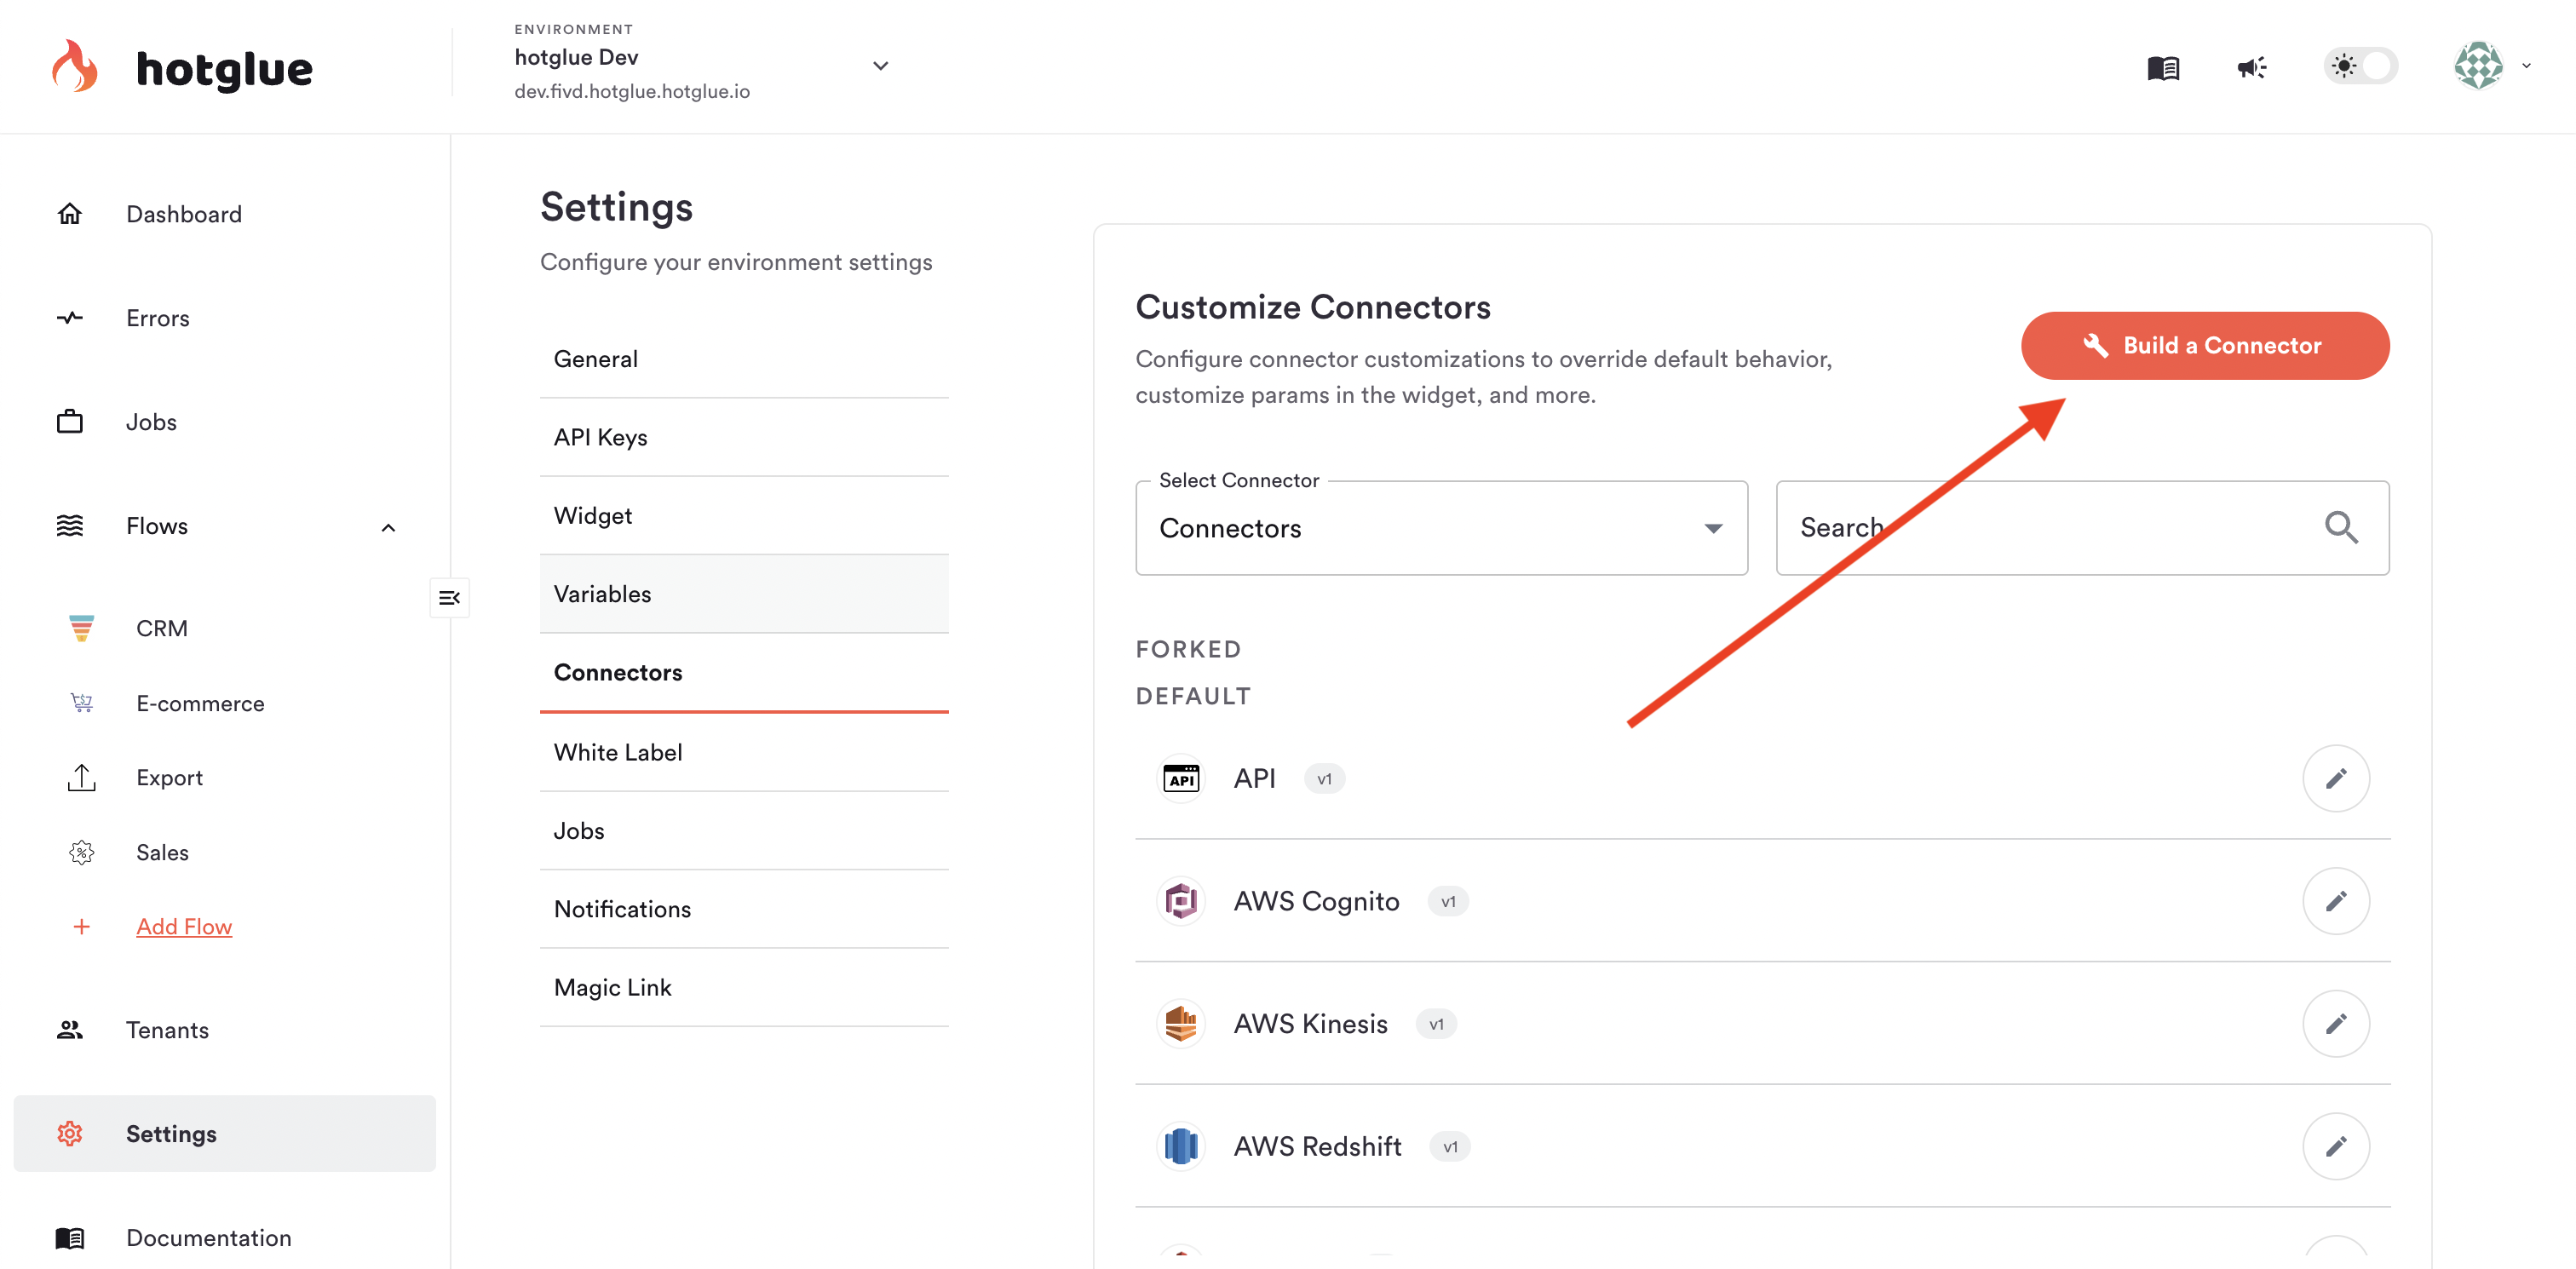
Define basic details
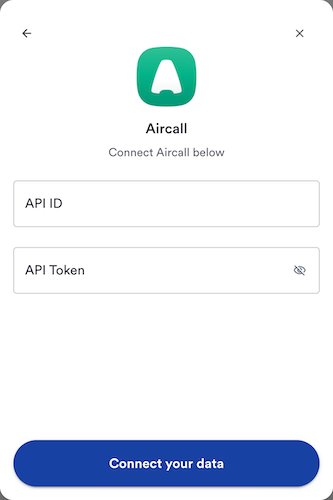
Now we can define our connector’s basic details:- Name: this is the name that will appear when a tenant goes to connect the connector
- Tap ID: this is the ID of the connector, will be used in API calls. It should be all lowercase, and hyphenated.
For example,
sage-intacctorchargebee - Domain: the domain of the product (
intacct.com). This is only used to load a default logo - Logo: logo for the connector. Will be shown in the hotglue admin panel and in widget.

Authentication
API Base URL
The first step of configuring authentication is to define the base API URL. This can include variables. For example, for Shopify we could define the following, wherestore_name is a parameter the tenant will configure:
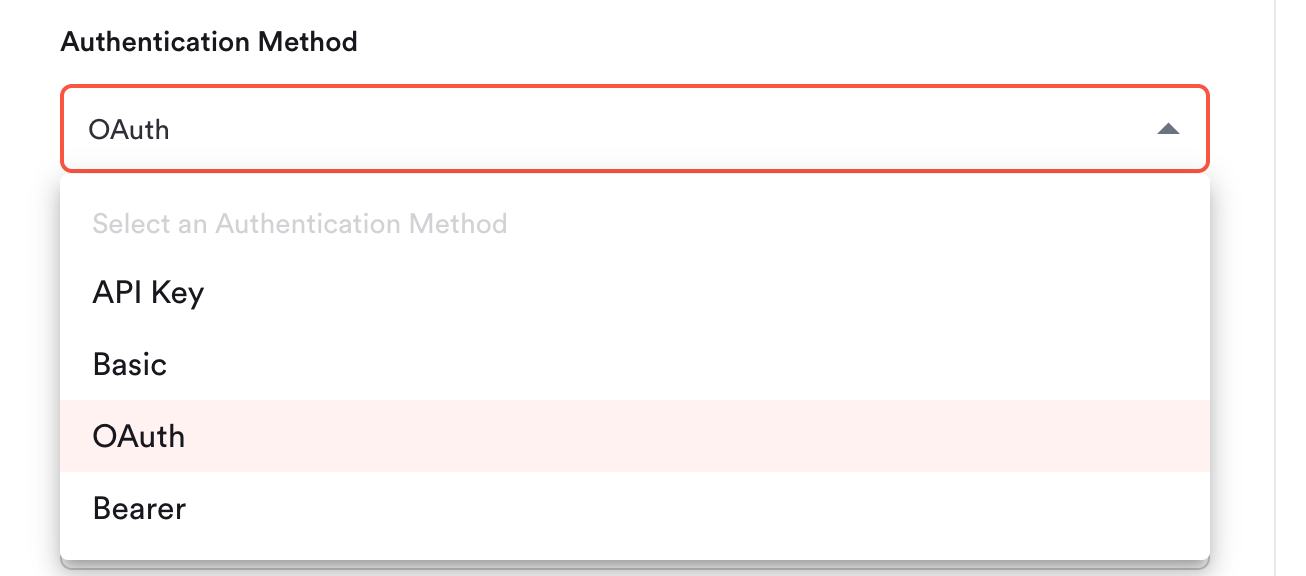
Authentication Method
The Connector Builder currently supports the following authentication methods:- API Key
- Basic
- OAuth
- Bearer
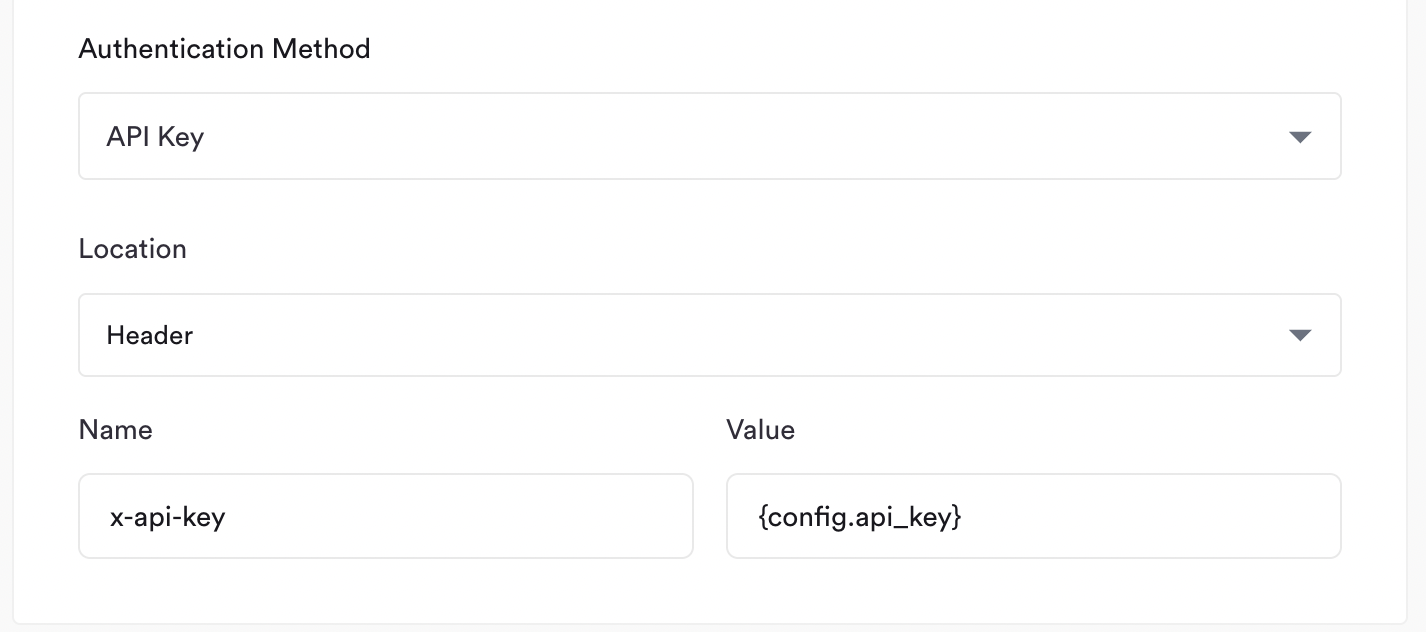
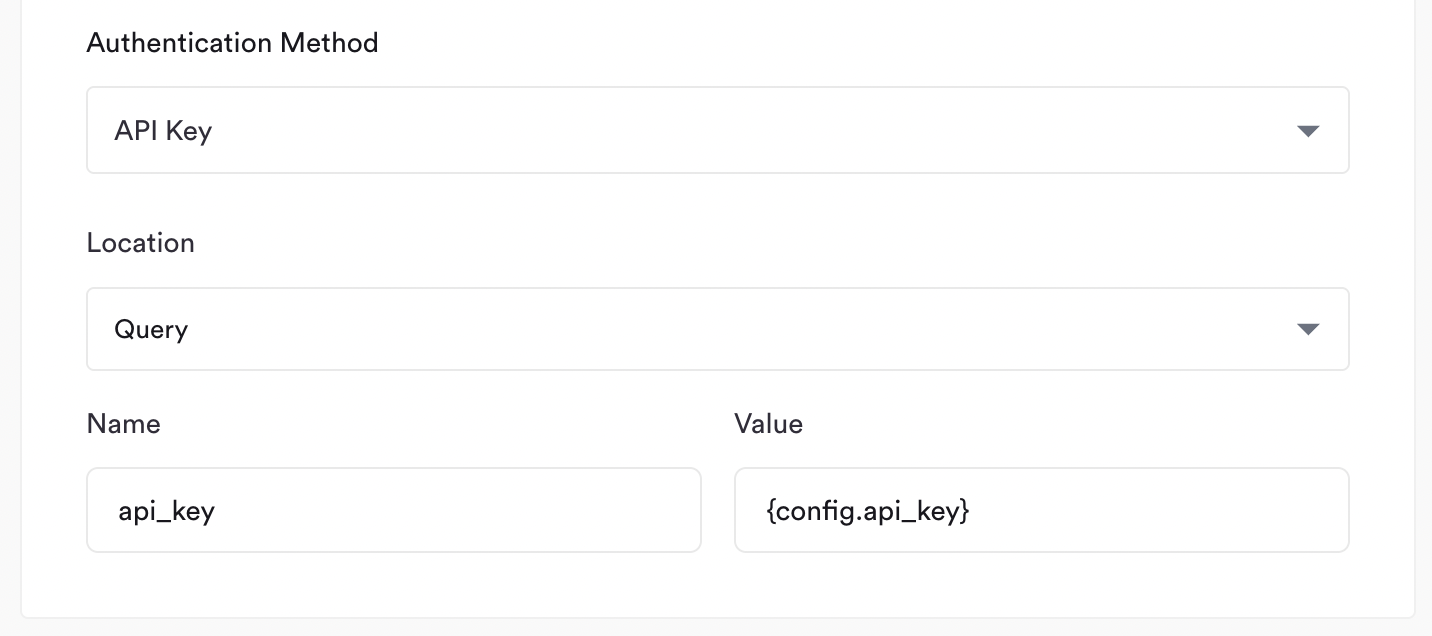
API Key
For API Key based authentication, you need to specify the following:- Location: where should the API Key be injected in the request? Options are Header or Query
- Name: what is the name of the Header or Query paramter?
- Value: this is the API Key value. In most cases you should just point this to the config:
{config.api_key}
x-api-key header, I’d define the following:
api_key query parameter (meaning the request will have ?api_key={api_key} in the URL), I’d define:
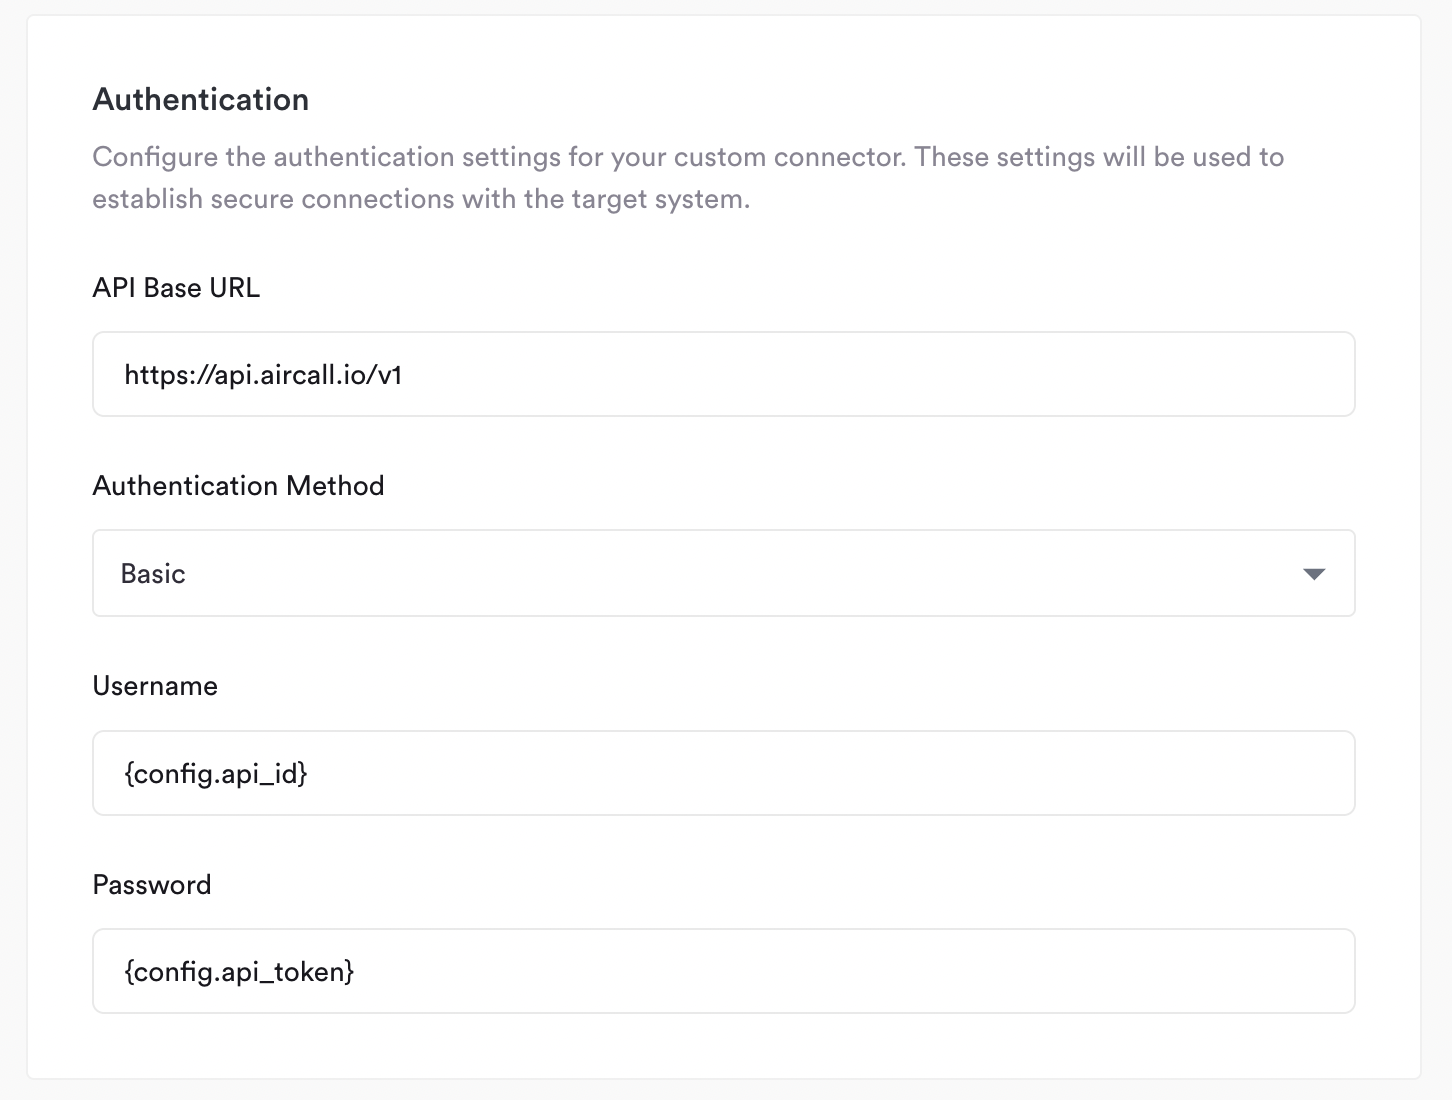
Basic
For Basic authentication, you need to define the Username and Password. Following standard Basic auth convention, these will be concatenated with a colonusername:password and then base64 encoded.
In many cases, Password will be an empty string, in which case you can leave Password blank. See example below:
OAuth
For OAuth authentication, select OAuth from the Authentication Method dropdown: This reveals the following fields: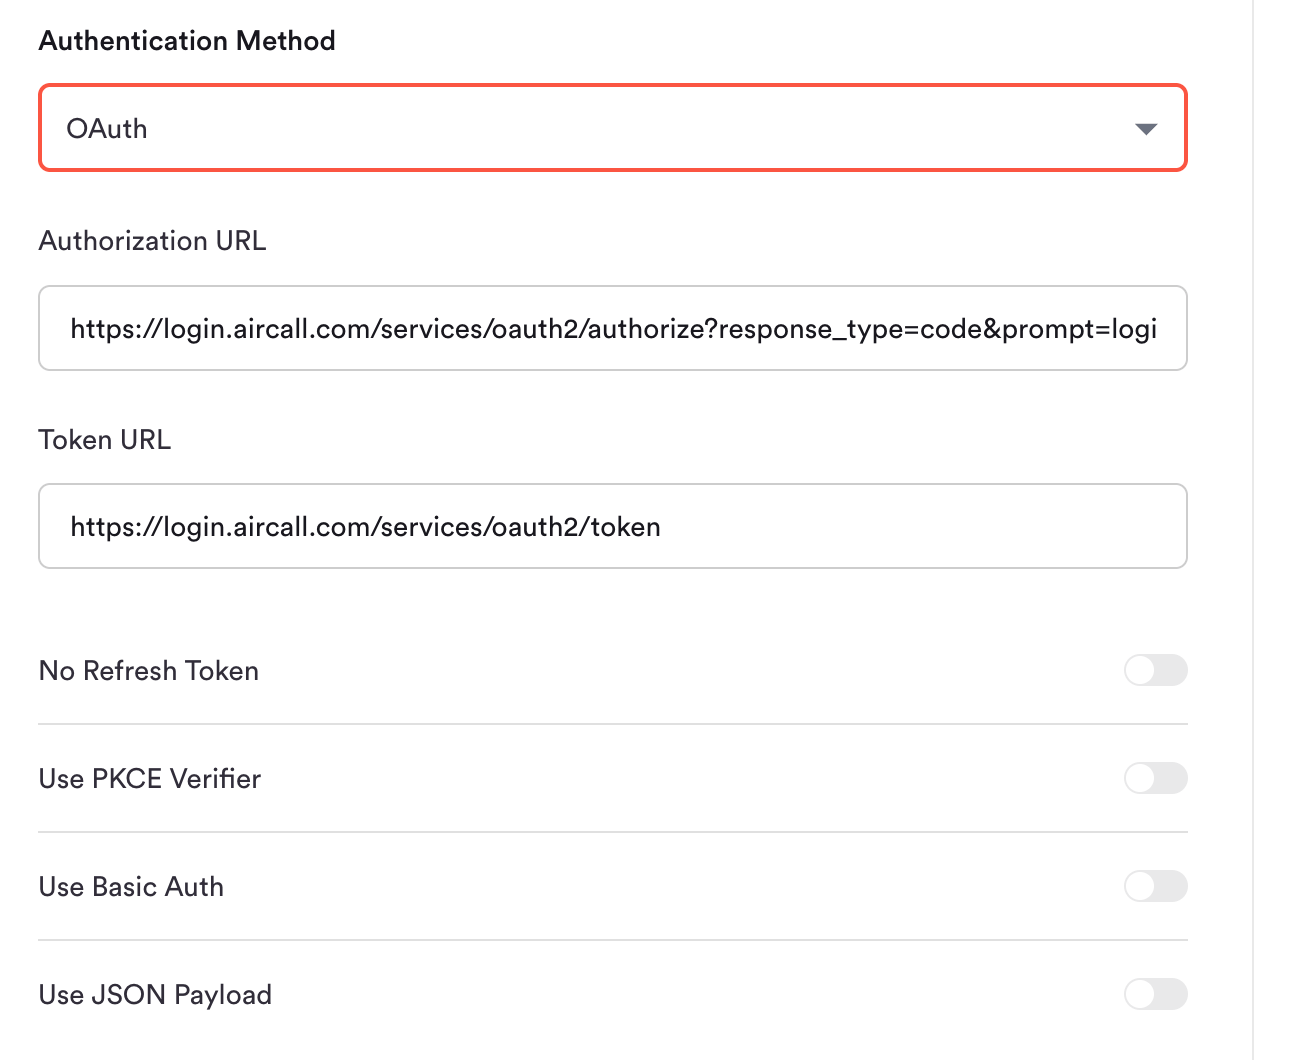
- Authorization URL: The URL tenants are redirected to in order to grant access. This maps to
tap_urlin the connector definition. Hotglue automatically appendsclient_id,state, andredirect_uri— do not include them manually. - Token URL: The endpoint Hotglue calls to exchange the authorization code for an access token. This maps to
auth_urlin the connector definition. - No Refresh Token: Enable if the provider does not issue a refresh token (the access token is long-lived or must be re-authorized manually).
- Use PKCE Verifier: Enable to add a PKCE
code_verifierto the token exchange request. - Use Basic Auth: Enable to send
client_idandclient_secretas an HTTP Basic Auth header on the token request. When enabled, setInclude Client Credentials in Bodyto off if the provider rejects credentials in the request body (see below). - Use JSON Payload: Enable to send the token request body as JSON instead of the default form-encoded format.
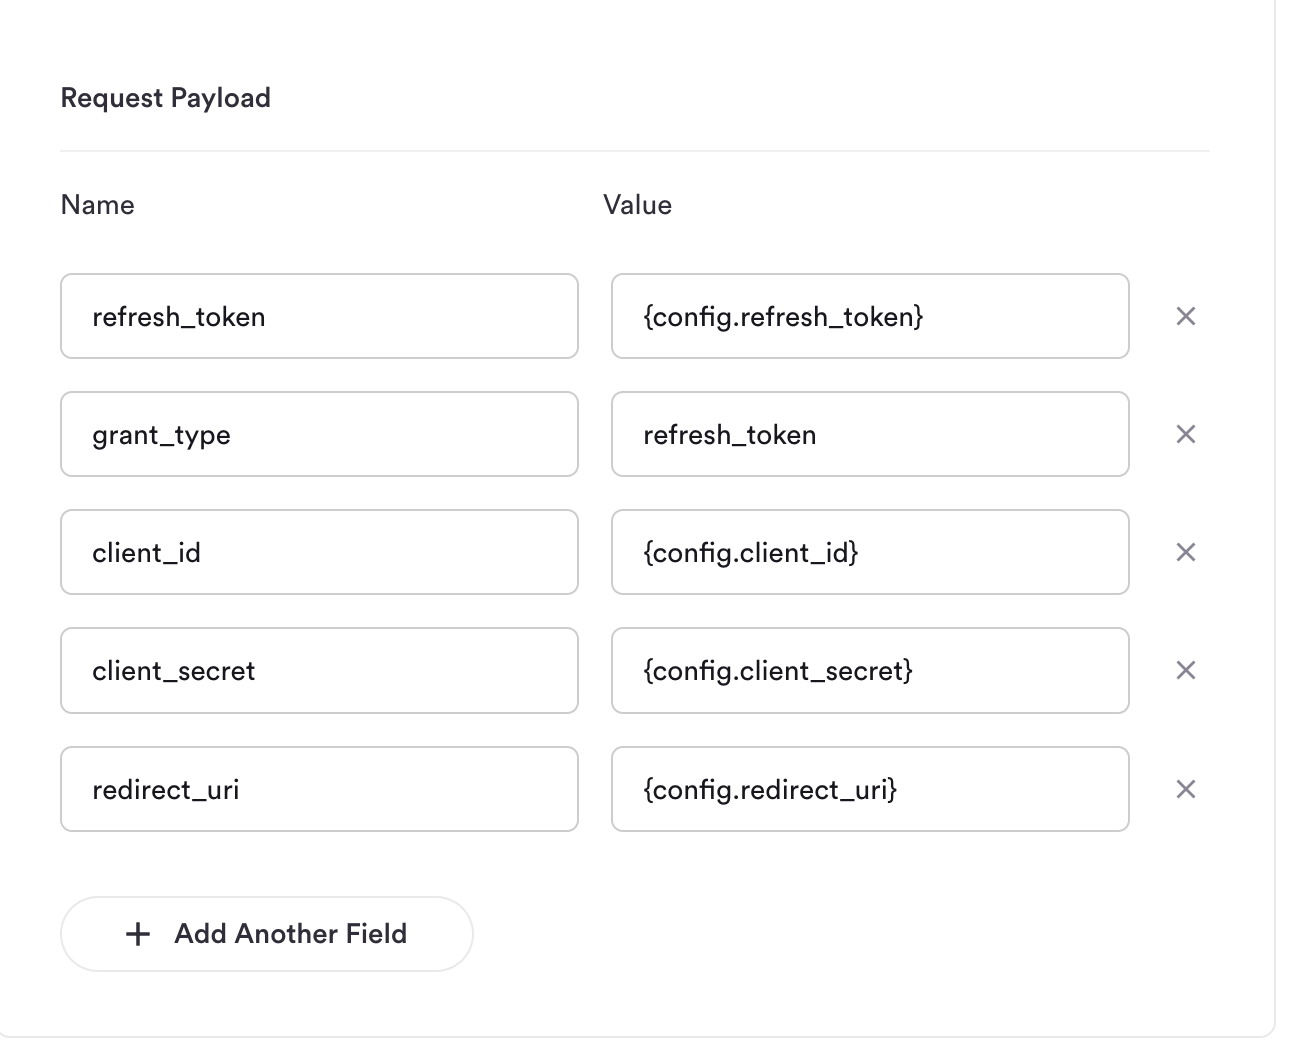
client_id, client_secret, redirect_uri, refresh_token, and grant_type from the tenant’s config. You can override these defaults by setting authentication.refresh_request_body in your tap definition.
Parameters
In the parameters section, you can define the fields tenants will need to fill in when they link this connector. Any of the parameters you define can be used in other sections (such as the Authentication step) by using the variable syntax. Such as: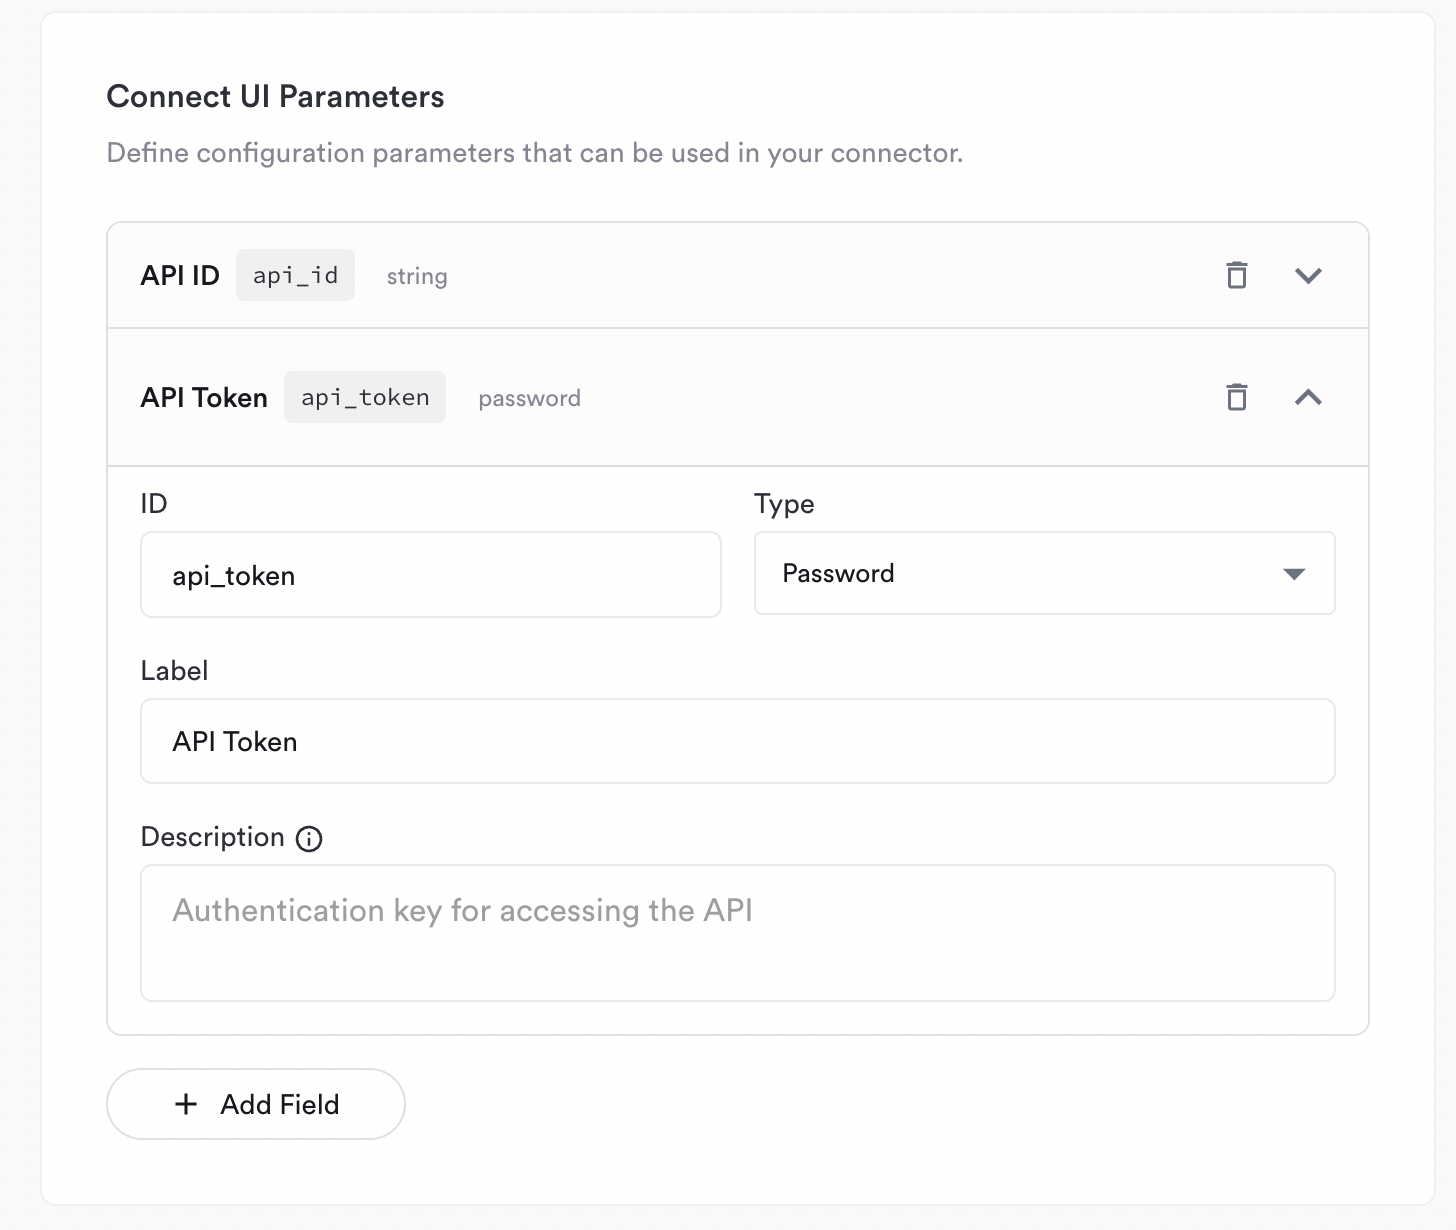
Streams
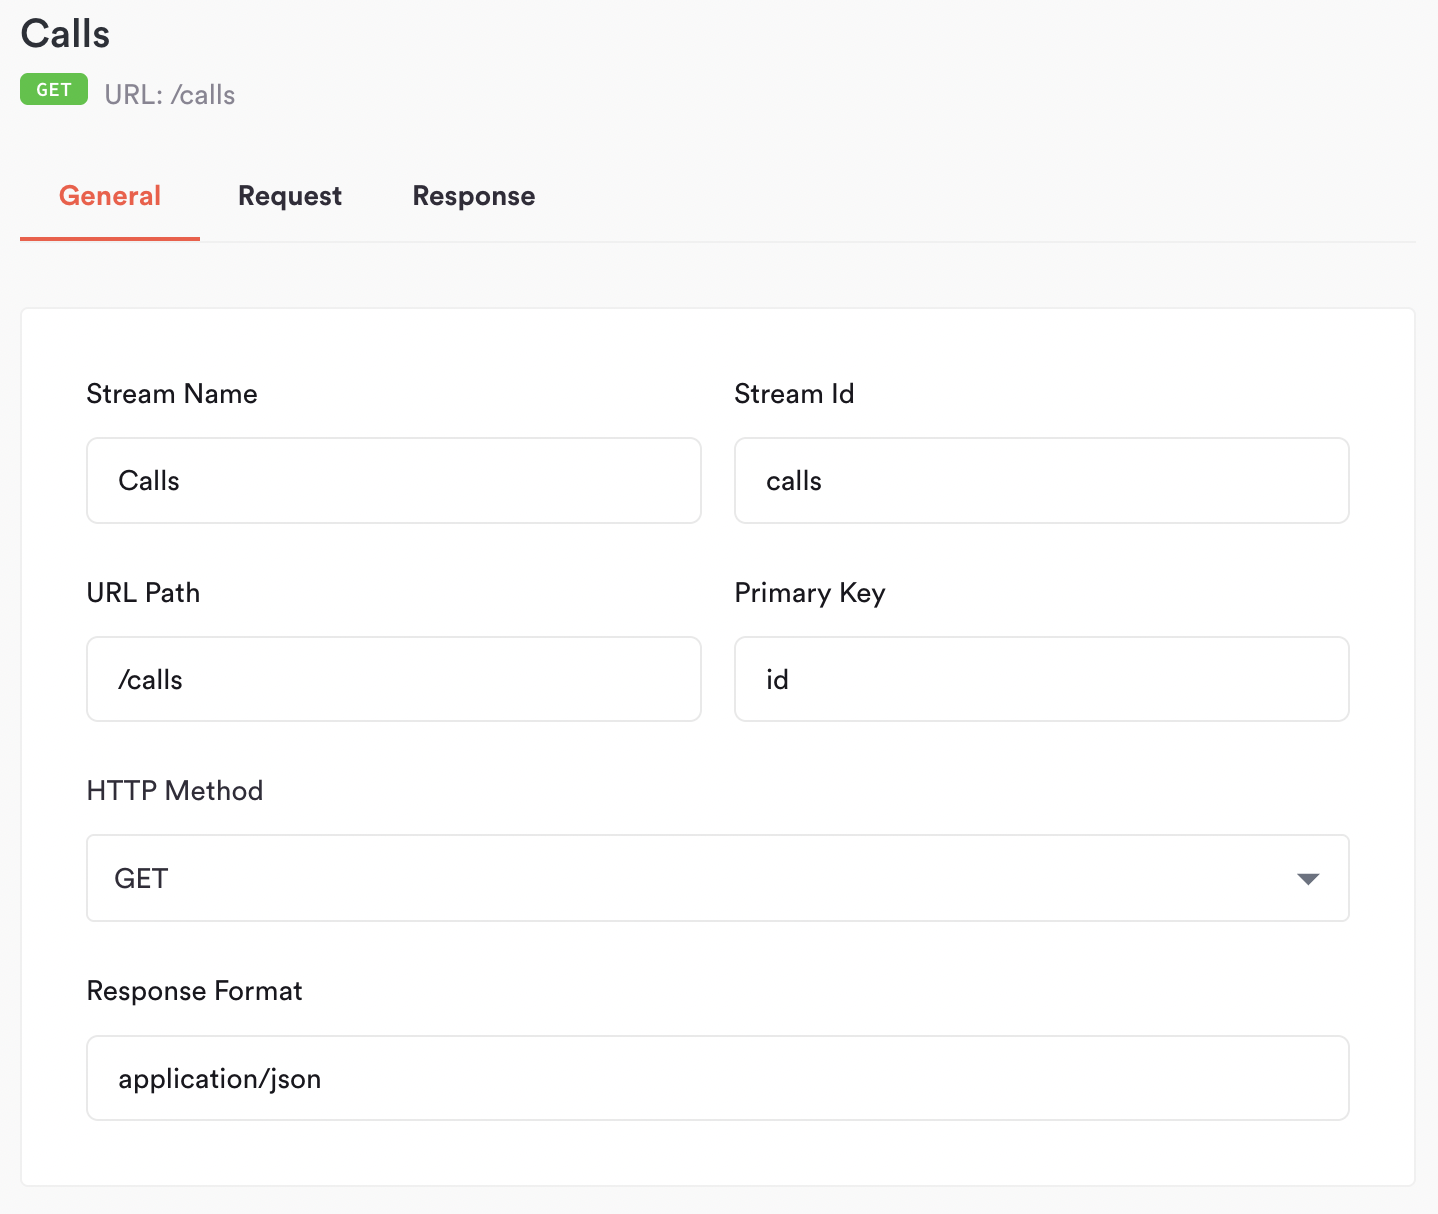
The final thing to configure are the Streams. This is where you define the objects or tables this connector supports. For my example (Aircall), the stream I’ll be configuring isCalls.
Details
To start, we’ll define the following:- Stream Name: the name of the stream, this is only shown in the connector builder. For example,
Calls - Stream Id: the id of the stream, this will be used in the field map and catalog. We recommend this being snakecase, e.g.
calls - URL Path: the API endpoint to use, without the base URL. e.g.
/calls - Primary Key: the field to use as the primary key. If there is no primary key, leave it empty. e.g.
id - HTTP Method: either
GETorPOST. In almost all cases this will beGET - Response Format: the MIME type of the API response. In almost all cases this should be
application/json
Request
Query Parameters
In the query parameters section, you can specify fields that should be added to the request URL. This is commonly used for filtering data. For example, you may need to add a query parameter like?status=Paid. This can even reference config parameters if this behavior is configurable
by users:

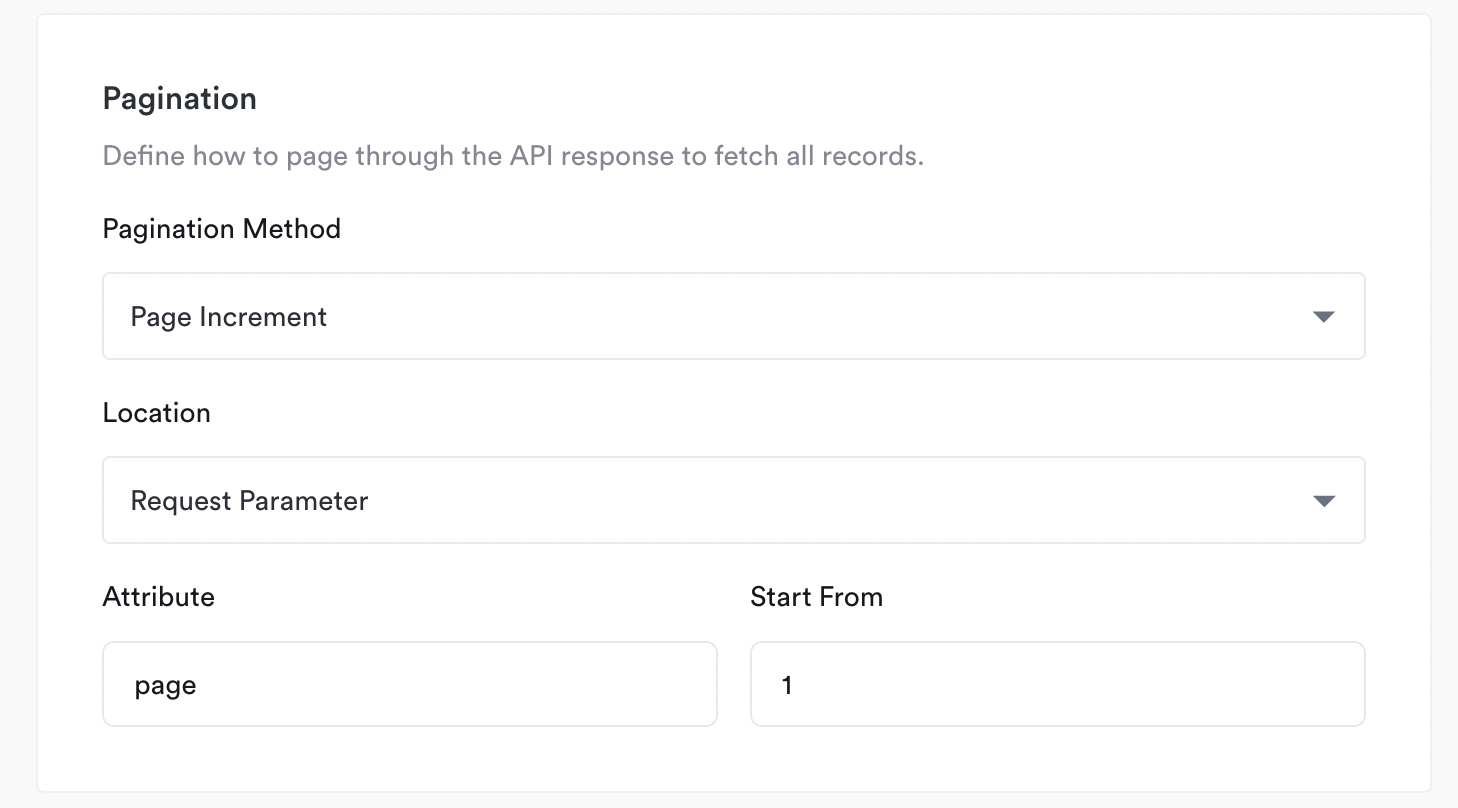
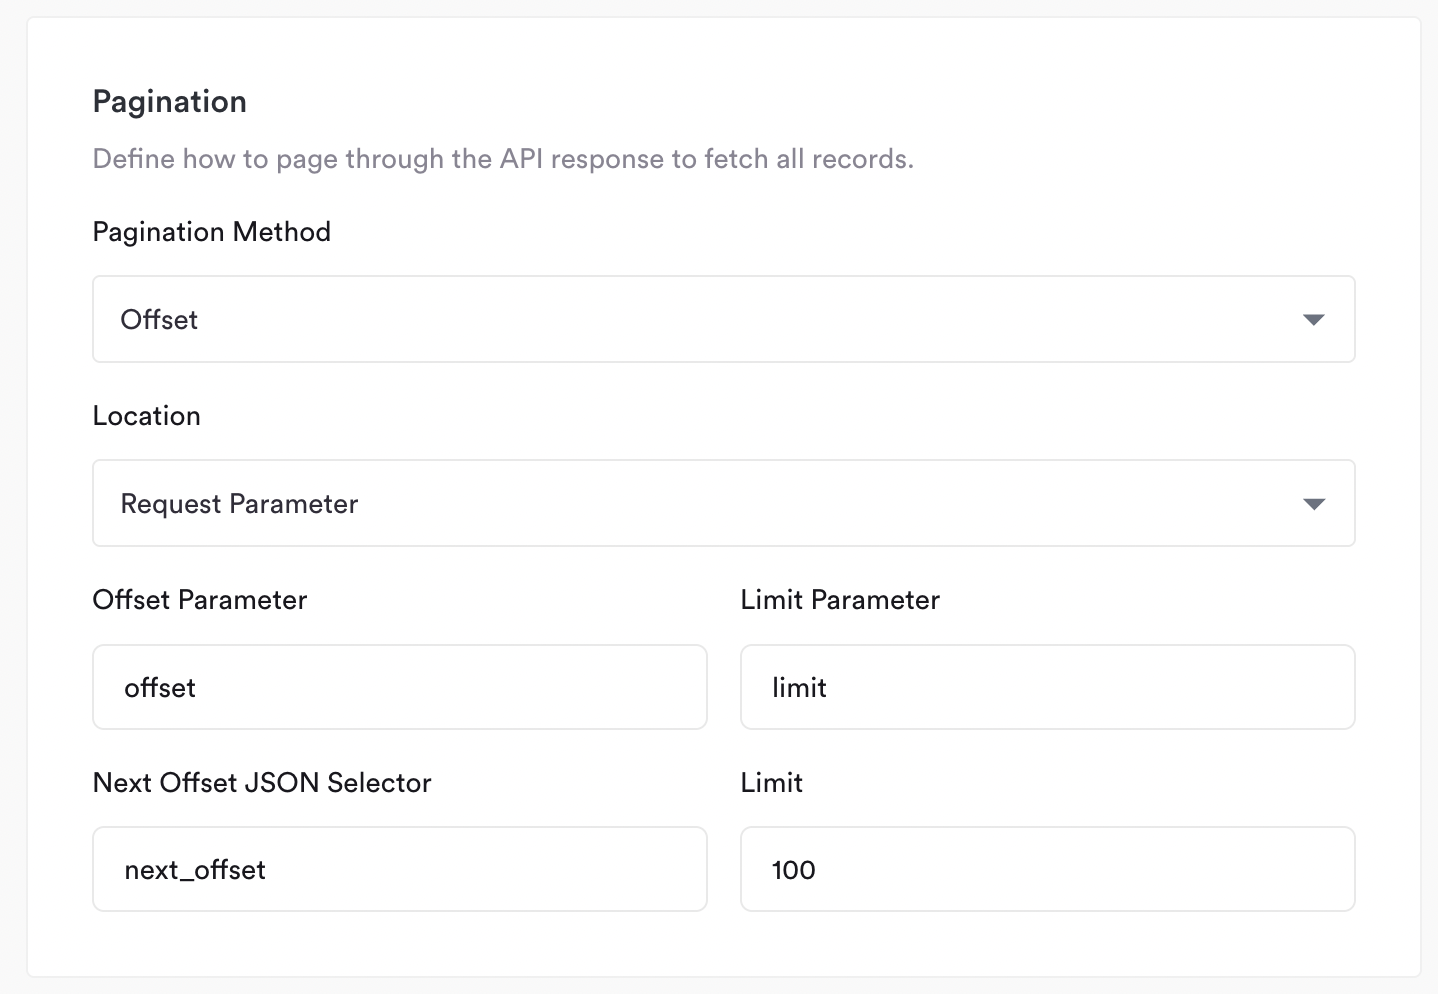
Pagination
In the pagination section we define how to page through the API. We support two methods: Page Increment Page increment should be used if the API expects some sort of page parameter in the requests, typically in the URL. To use this, you specify the following:- Location: whether this should be a request parameter (in the URL) or in the headers
- Attribute: the name of the field to use (e.g.
page) - Start From: the first page (e.g.
1)
page URL parameter, so requests will start from ?page=1 and continue until there is no more data.
- Location: whether this should be a request parameter (in the URL) or in the headers
- Offset Parameter: the name of the field to use to specify the offset (e.g.
offset) - Next Offset JSON Selector: the JSON Path to where in the response the next offset will be (e.g.
next_offset) - Limit Parameter: the name of the field to use to specify the limit (e.g.
limit) - Limit: the number of records each page will have (e.g.
100)
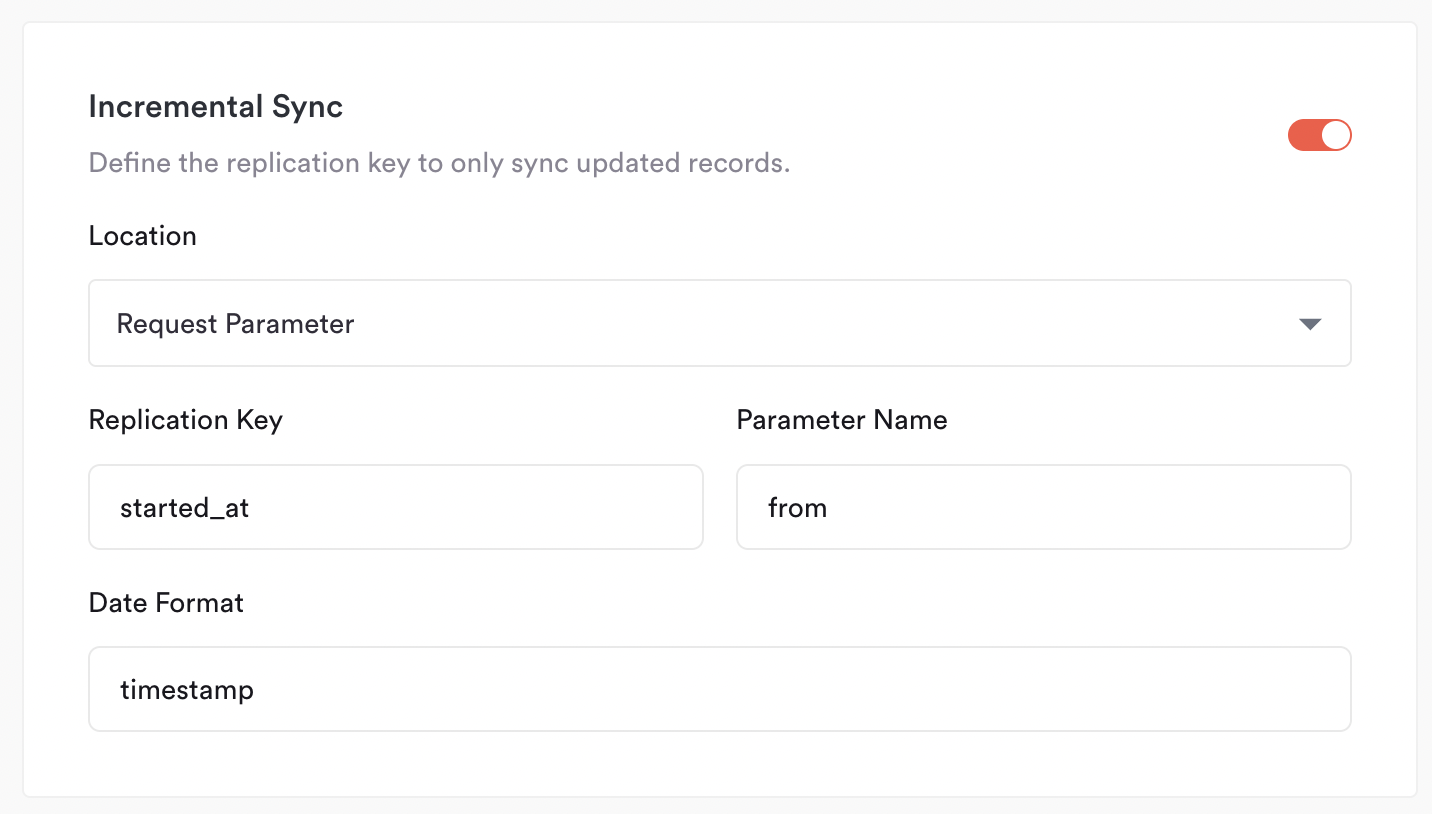
Incremental Sync
This section is optional, and is used to specify a replication key (a datetime field) that can be used as a filte rin the API request, so we only sync new or updated data since the last job. To use this you will specify:- Location: whether this should be a request parameter (in the URL) or in the headers
- Replication Key: the field in the response data we should use to filter (e.g.
updated_at) - Parameter Name: the filter parameter in the API (e.g.
updated_at[after]) - Date Format: the format the date will be in. Can be either
timestampfor UNIX timestamps, or a standard date format like%Y-%m-%d %H:%M:%S
started_at timestamp in the response data, and expects a filter in the URL like: &from=<timestamp>
Response
JSON Selector
First we specify the JSON path to the records within the response. For example, if I have a response payload that looks like:JSON Schema
Finally, we specify the JSON Schema of the records. You can do this using the infer schema tool within hotglue, or manually in JSON.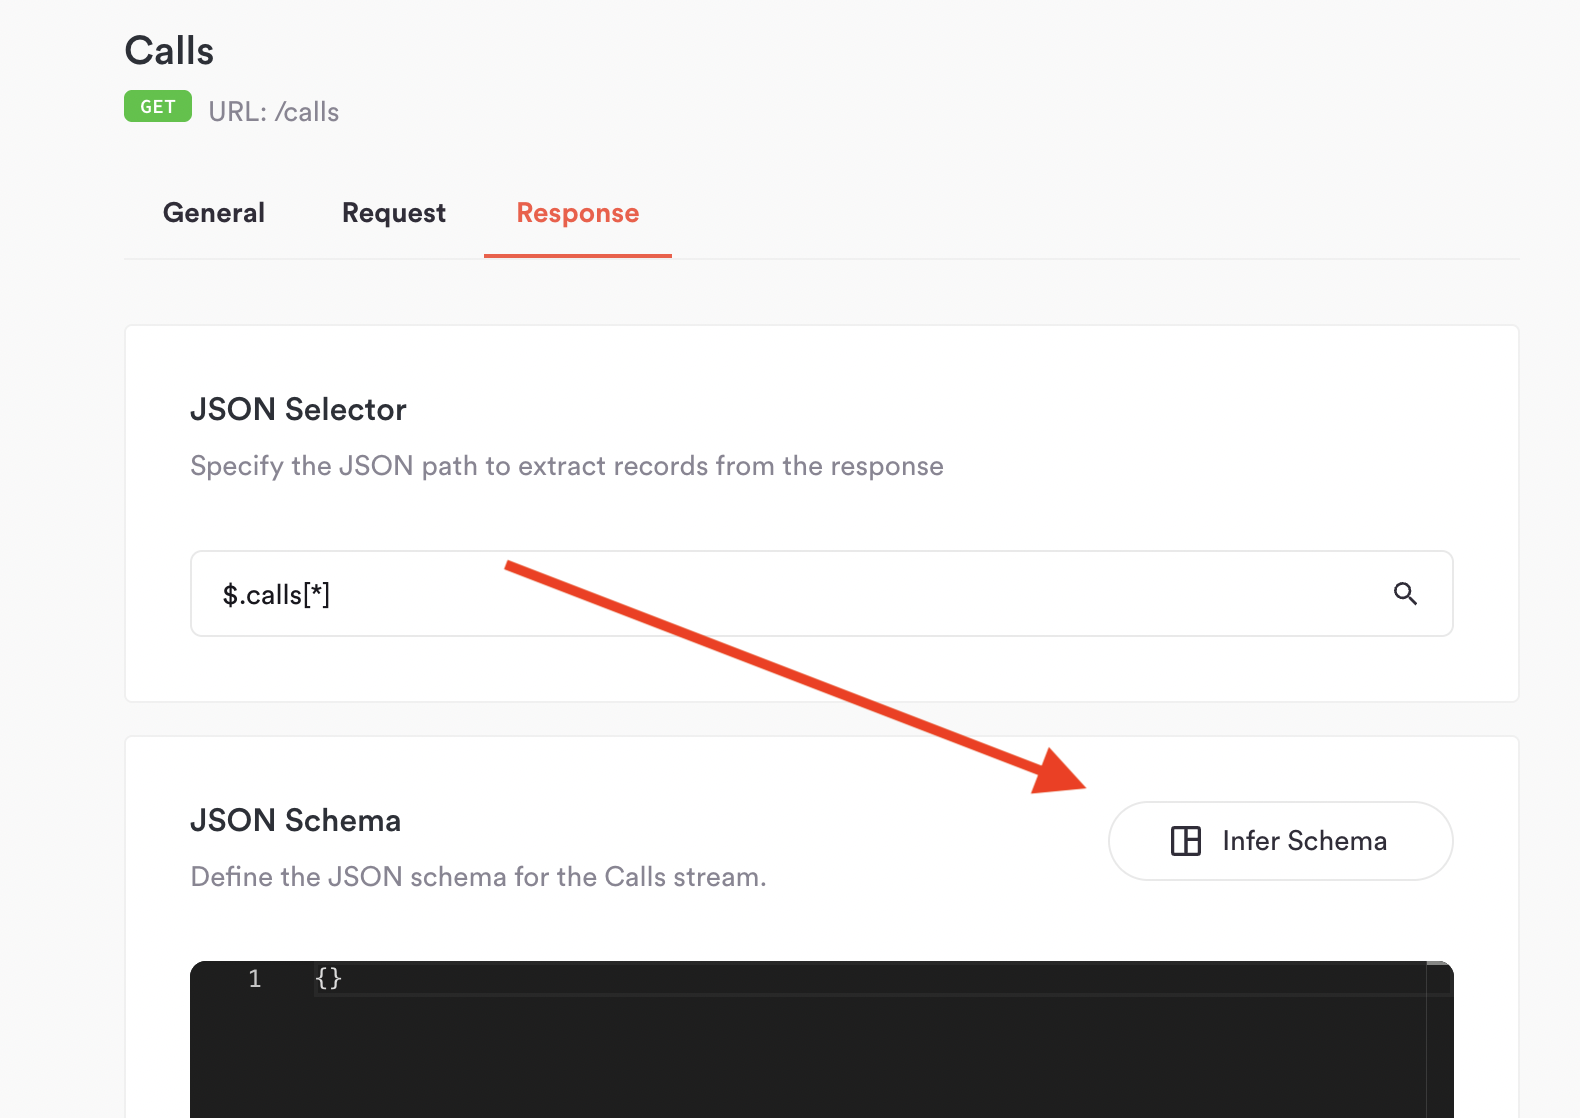
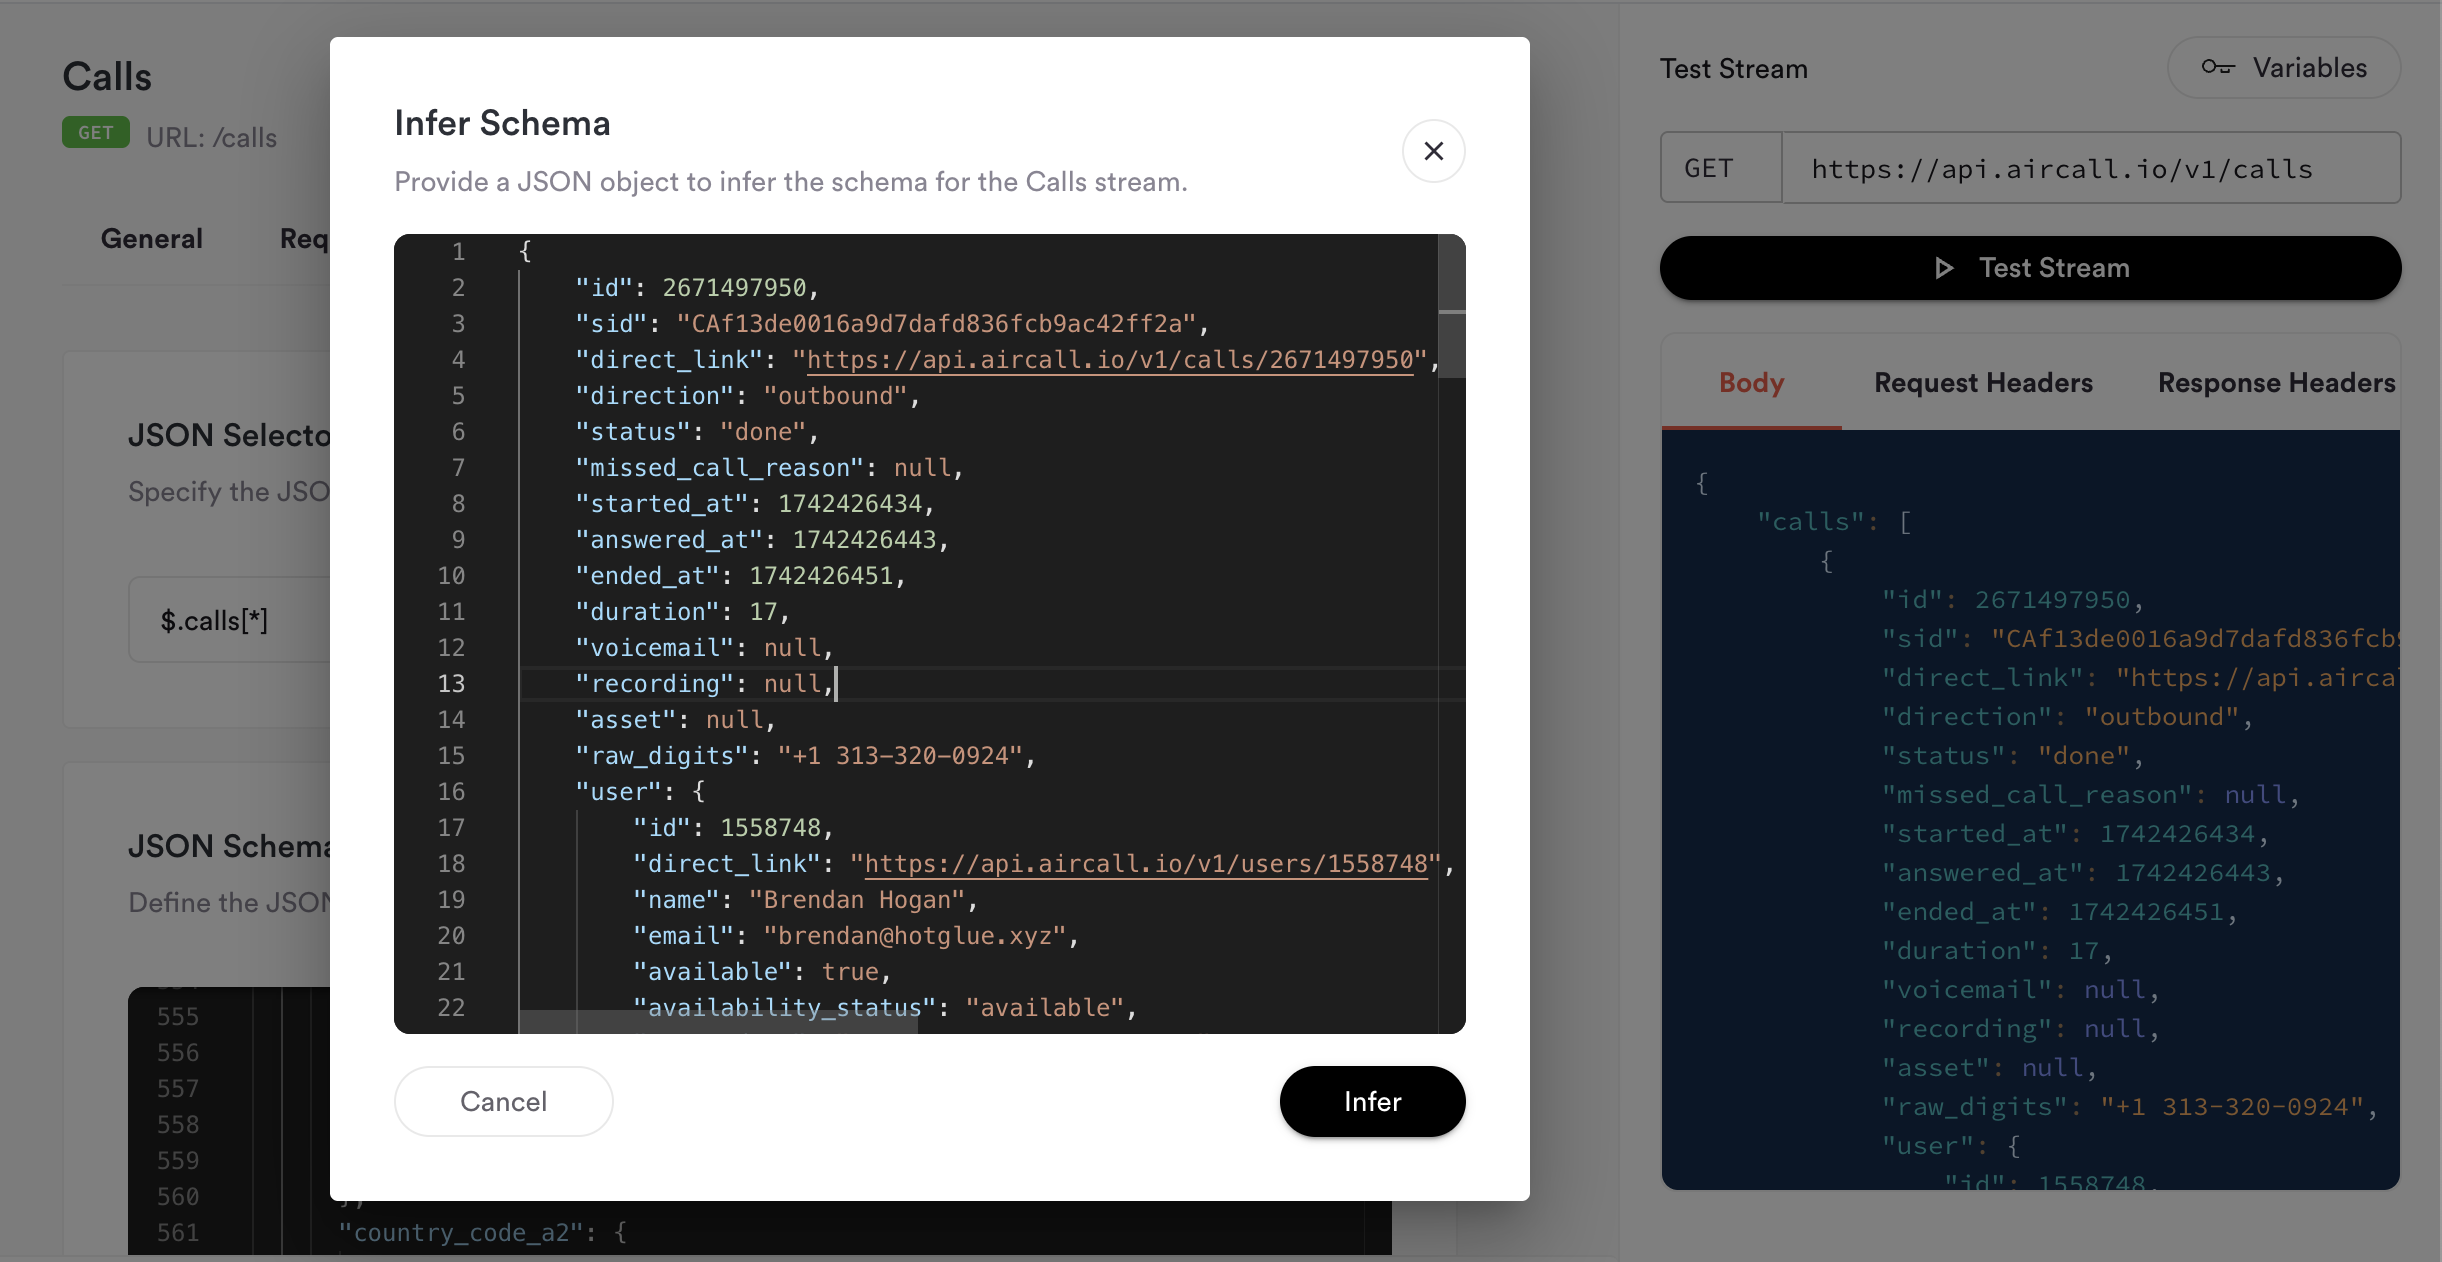
started_at field in my
schema to be formatted as a date-time beause I am using it as the Replication Key:
Sample JSON Schema
Sample JSON Schema
Advanced Features
Parent-Child Streams
In some cases streams are nested and require a parent-child relationship to work properly. For example, if you have the following streams:- Clients
/clients - Medical Forms
/clients/{client_id}/medical-forms
child_context – essentially a list of parameters the child streams will have access to in order to make their requests.
parent_stream: